Catch
Catch the cherries and avoid the burgers. Score points by catching cherries. Lose lives by dropping cherries or catching burgers. The game ends when all lives are lost.
Controls D pad - moves player

Learning outcome
New concepts introduced: Logic, Music and Variables.
This second MakeCode Arcade project builds on the foundations introduced in Chase, introducing new blocks from the music, logic, game and variables section of the toolbox. Anyone familiar with Scratch programming should find the Logic and Variables concepts familiar.
This project will typically take 30 to 60 minutes to complete.
The following blocks and concepts are used in this project:
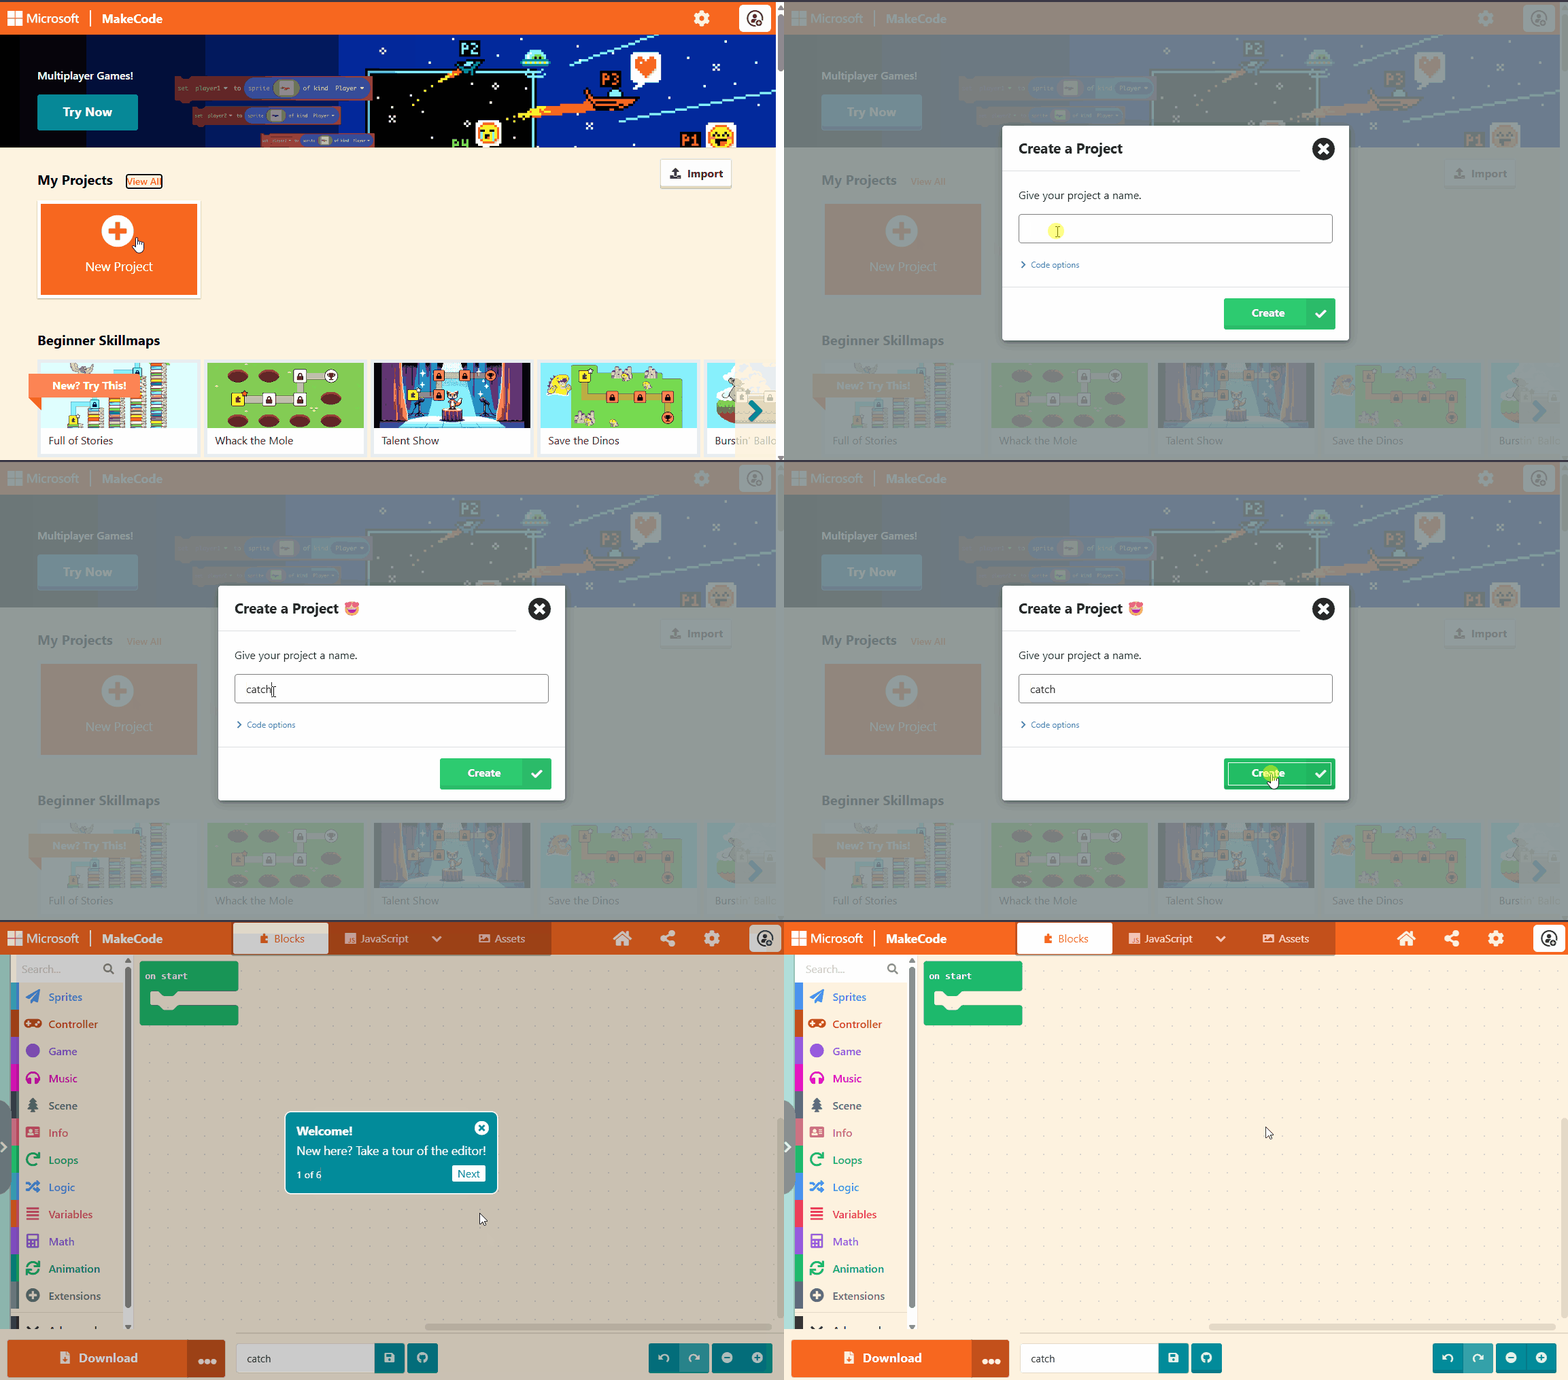
Step 1 - Create a new game
Navigate to the MakeCode Arcade website at the following address
https://arcade.makecode.com and create a new project
called catch as shown below:
Step 2 - Create the player sprite and move
The completed code for this step is available here.
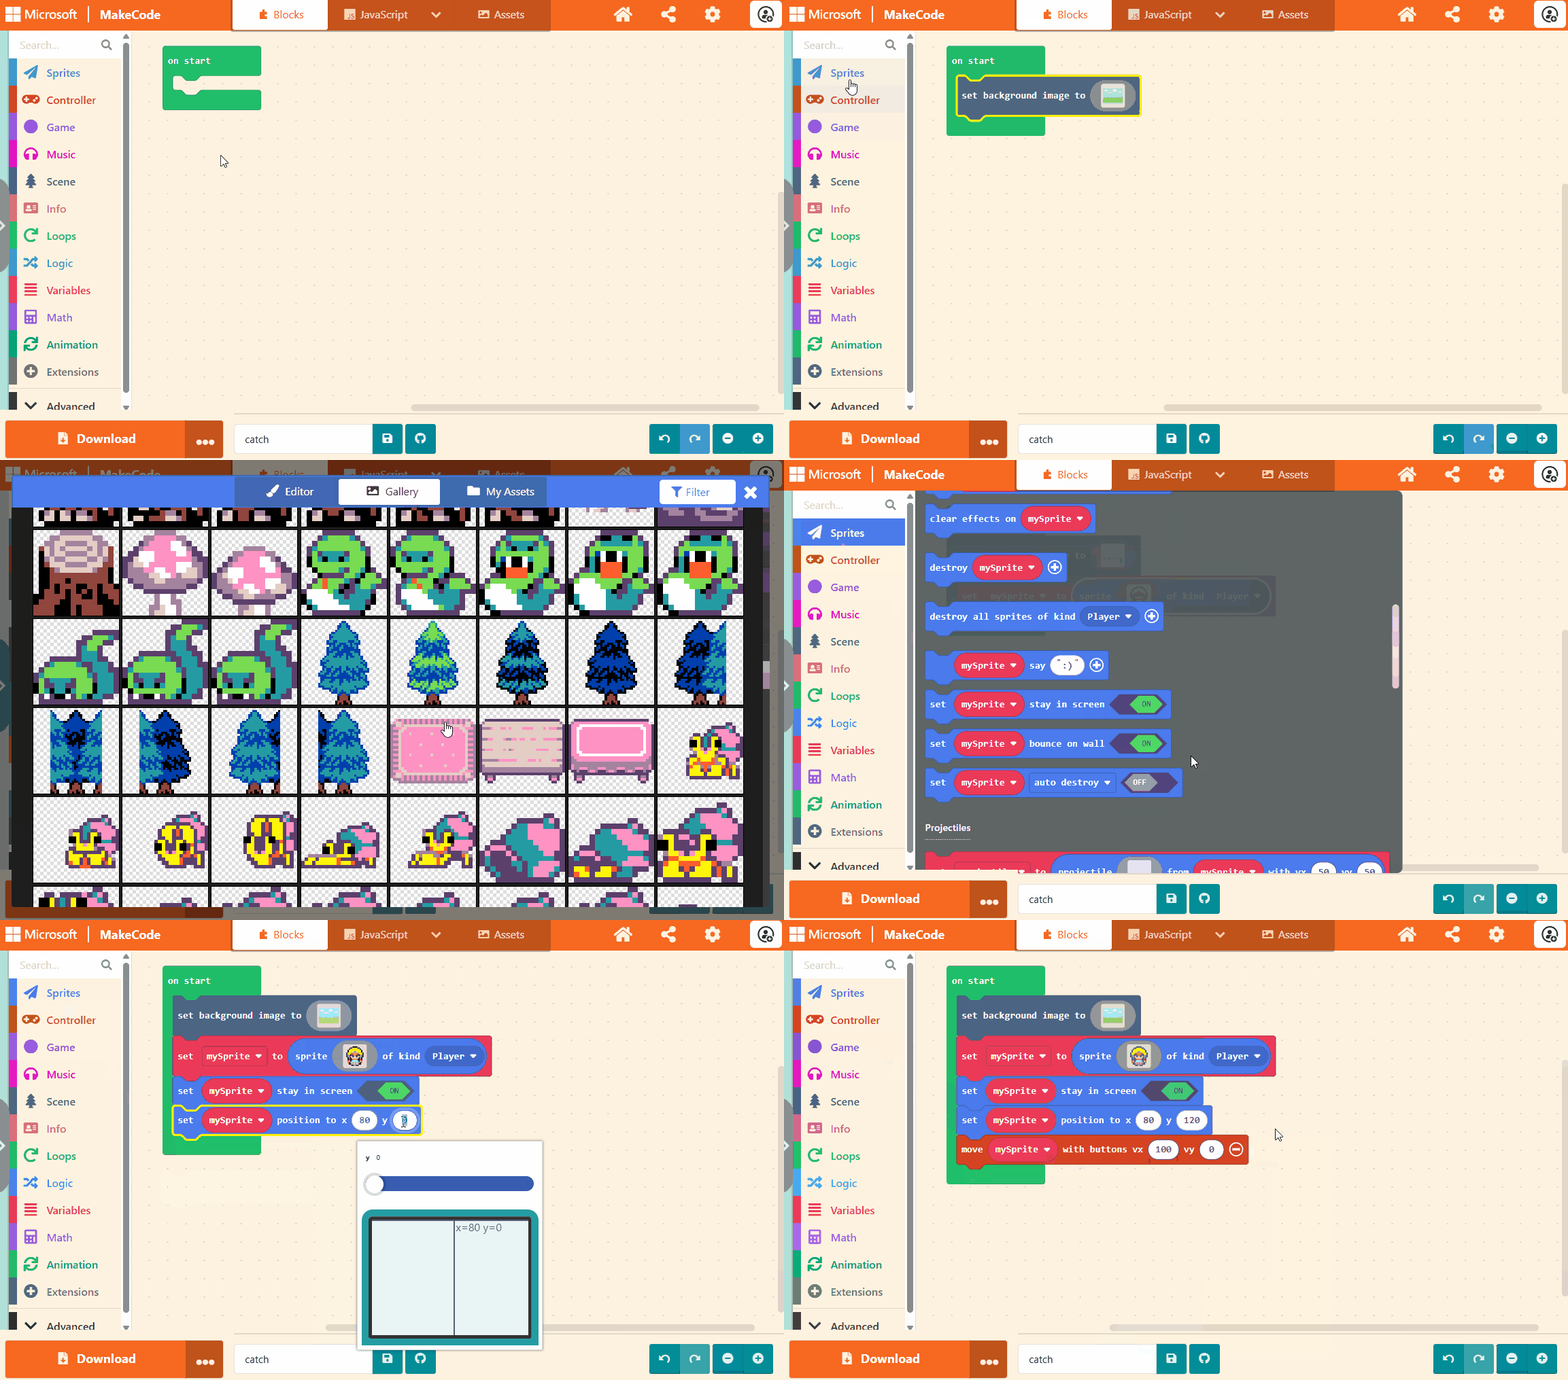
This step should be familiar if you have already completed the Chase project. There are a few key differences though so take care when constructing your code. The first block used is to select a nice background to use for the game. As before, an existing image can be selected from the Gallery or drawn yourself. If you wish to draw your own image, make sure it is 160 pixels wide by 120 pixels high.
Next we will create a Player sprite that will be moved using the D-pad. As before, the Player sprite
will be set so that it stays in the screen. We will also give the Player sprite an initial location
that is along the bottom of the screen.
The final block used is the controller block to move the sprite with the D-pad. In this game, we don't
want the Player sprite to be able to move vertically; we want them to only move left and right. We
achieve this by setting the vy value of the controller block to zero.
The completed code is provided after the animated image.
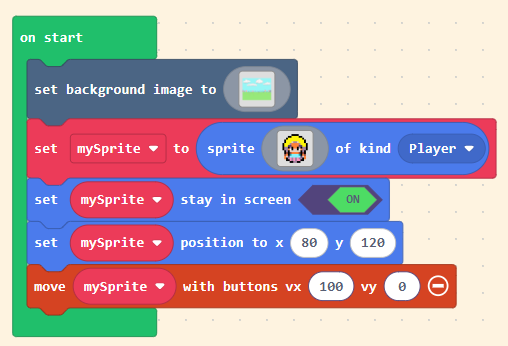
The completed code:
Experiment: Changing the speed of the Player sprite
Experiment with different values for the vx value in the move mySprite with buttons block
and observe how it changes the speed of movement. Some good values to experiment with are:
- -100
- 0
- 50
- 100
- 200
Experiment: Changing the position of the Player sprite
Experiment with different values for the x and y values in the set mySprite position to
block and observe how this changes where the sprite is placed. Start with the x value and
then move on to the y value. Some good values to experiment with are:
- -5
- 0
- 5
- 50
- 115
- 120
- 125
Step 3 - Moving left and right
The completed code for this step is available here.
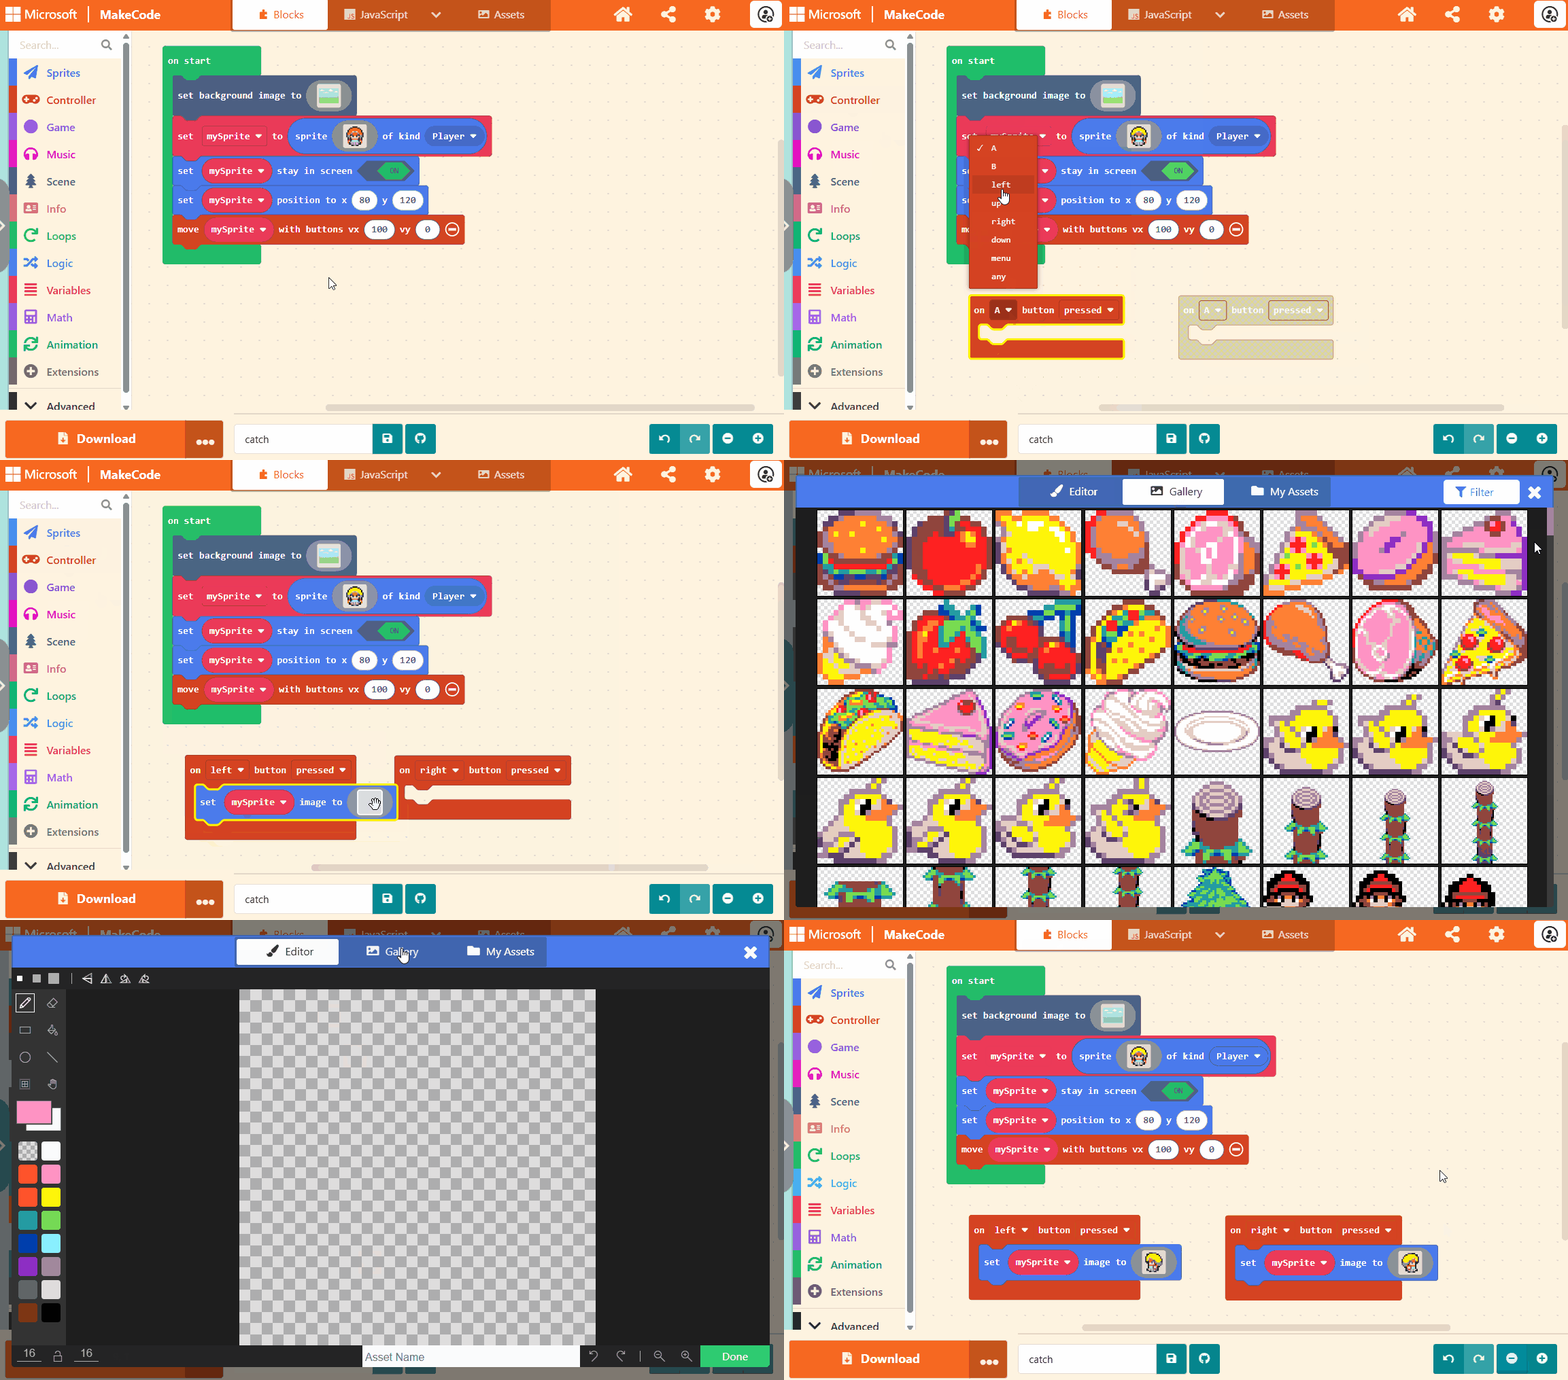
This step is achieved in the same as step 3 in Chase but the code will only
respond to left and right events from the controller D-pad. Images can either be selected
from the Gallery which contains pre-defined ones or drawn using the in-built editor. In
this step we will change the image of the sprite for only the left and right events as the
Player sprite cannot move up and down.
The completed code is provided after the animated image.
The completed code:

Step 4 - Adding the falling cherries
The completed code for this step is available here.
In this step we will add in the falling cherries. Because we want the game to get harder the bigger
the score, we will first introduce a new speed variable to use to modify the speed with which the
cherries fall. There are two ways we could implement this:
- Use the
speedvariable as an absolute speed, requiring an initial value. - Use the
speedvariable as an extra additional speed on top of a baseline speed.
Whilst option 1 is simpler, we are going to use option 2 here so that we can make use of the +
block in the code. Before we write the code to make the cherries fall we will create the new
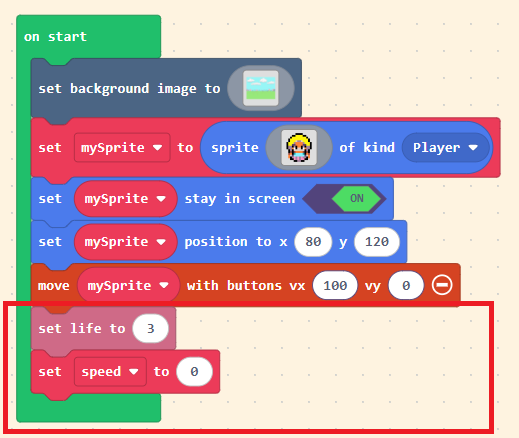
variable in the on start event as well as set the number of lives a Player has to 3.
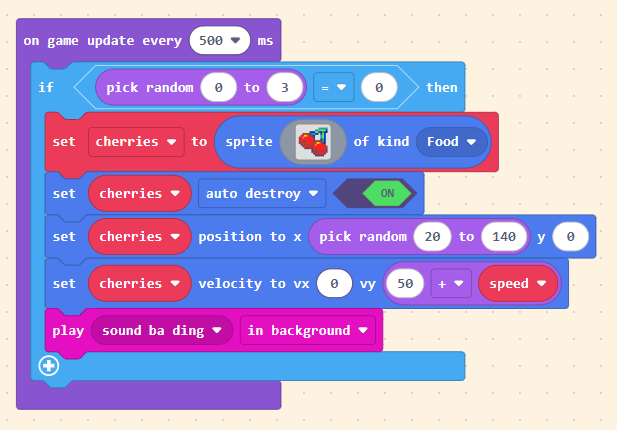
The method for creating the falling cherries is to use an event that triggers every 500 milliseconds.
We don't necessarily want a cherry to drop each time the event triggers as we want a random element
to it to avoid the game becoming too predictable. We therefore make use of random numbers. Each time
event triggers, we will randomly pick a number from 0, 1, 2 and 3. If the randomly chosen number is
0 (zero), we will create a new falling cherry. This means that we expect a cherry to fall (on
average) 1 in 4 times, or once every 2 seconds (4 x 500 milliseconds is 2 seconds). We use an if
condition block to achieve this.
If a new cherry is to fall, a new sprite is created. We choose a random position at the top of the screen between pixels 20 and 140 for the cherry to fall from. The sprite is also set to automatically destroy when it goes outside of the screen bounds. This is needed to avoid the number of cherries growing forever and the device running out of memory. Finally, a sound is played.
The completed code is provided after the animated image.
The completed code (newly added code is surrounded by the red box):
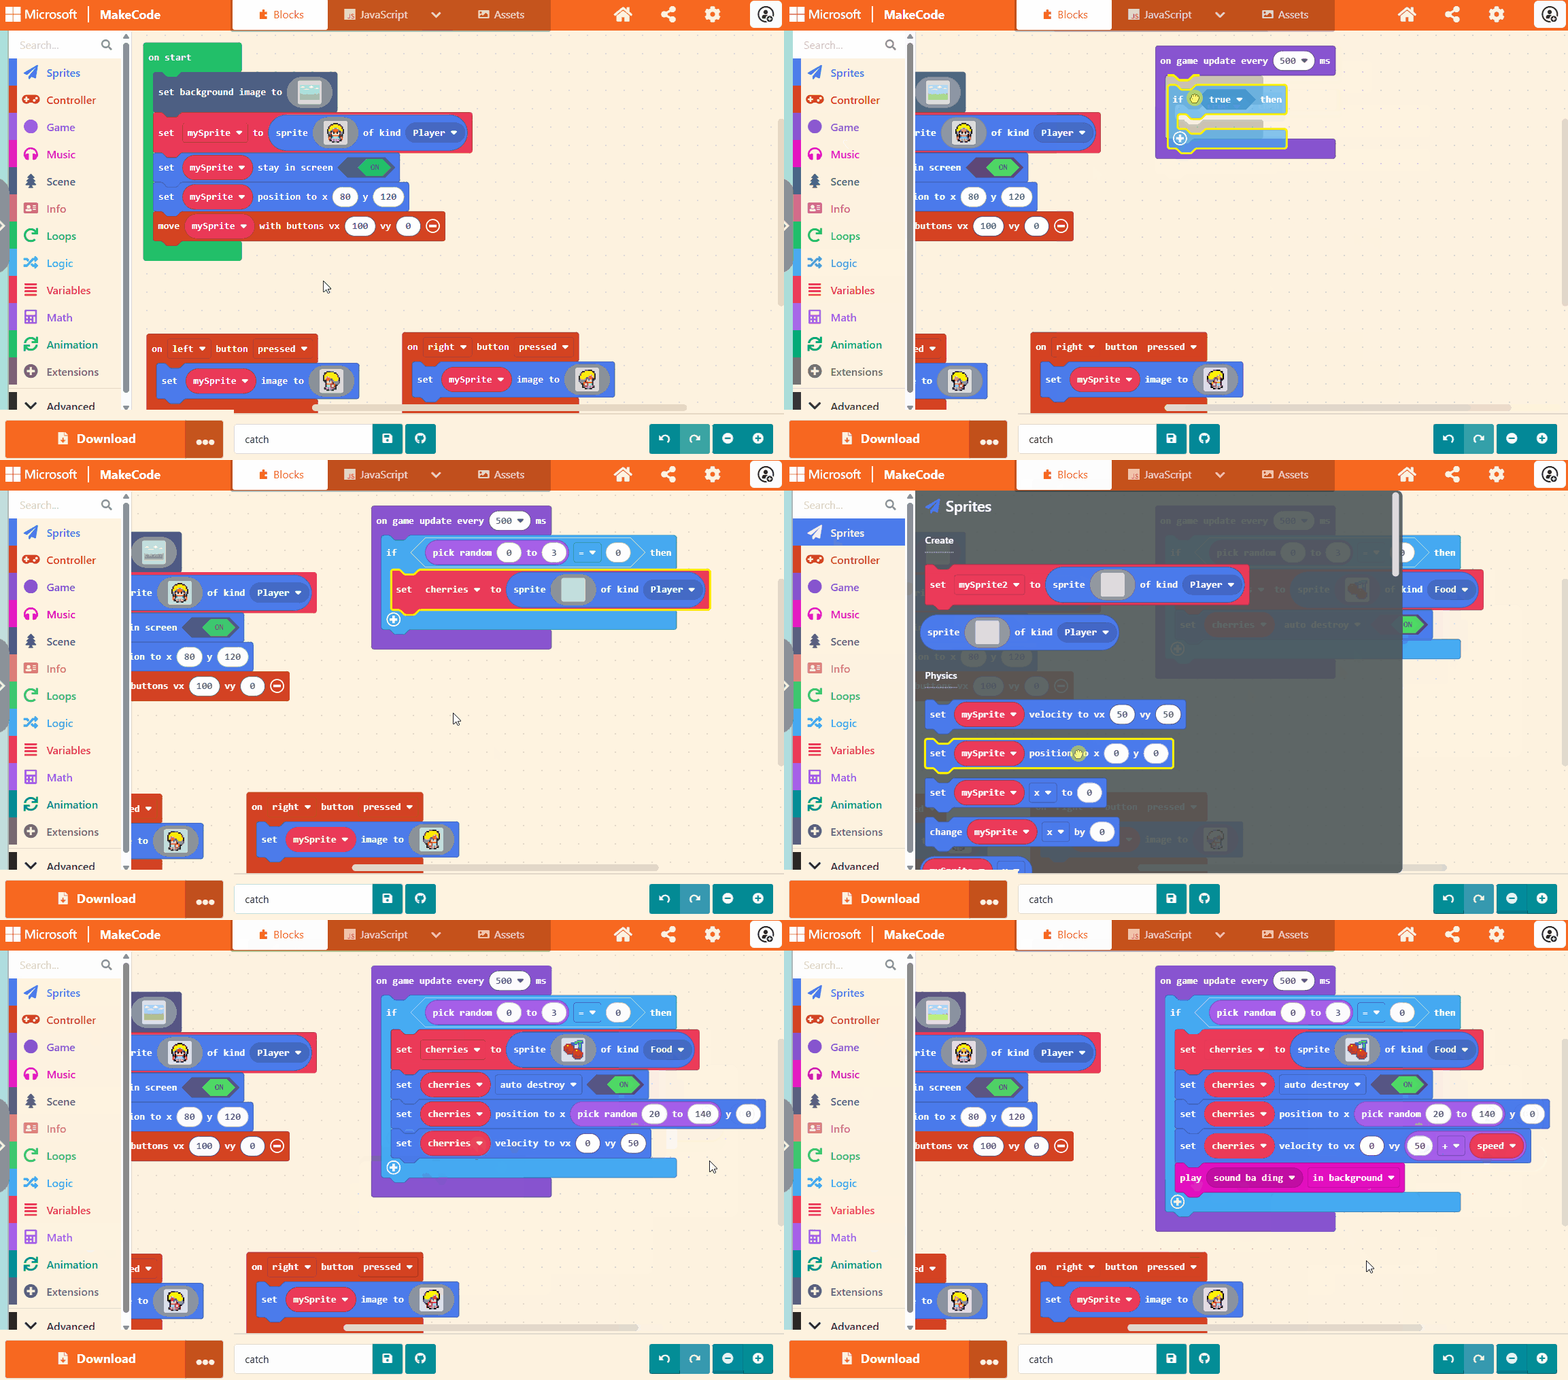
Experiment: Change how often the cherries appear
There are two settings that control how frequently cherries are dropped on average:
- The frequency of the event
- The range of the random numbers to select from
Experiment with both settings one at a time to see the effect it has. Try smaller and larger numbers for the frequency of the event and small and larger numbers for the random number range.
Experiment: Add side to side movement of the cherries
Presently the cherries always fall down vertically with no side to side movement because the
vx velocity is set to zero. Add in some lateral movement with a random number. Good ranges
to experiment with are:
- 0 to 20
- 10 to 30
- -20 to 0
- -20 to 20
Step 5 - Catching the cherries
The completed code for this step is available here.
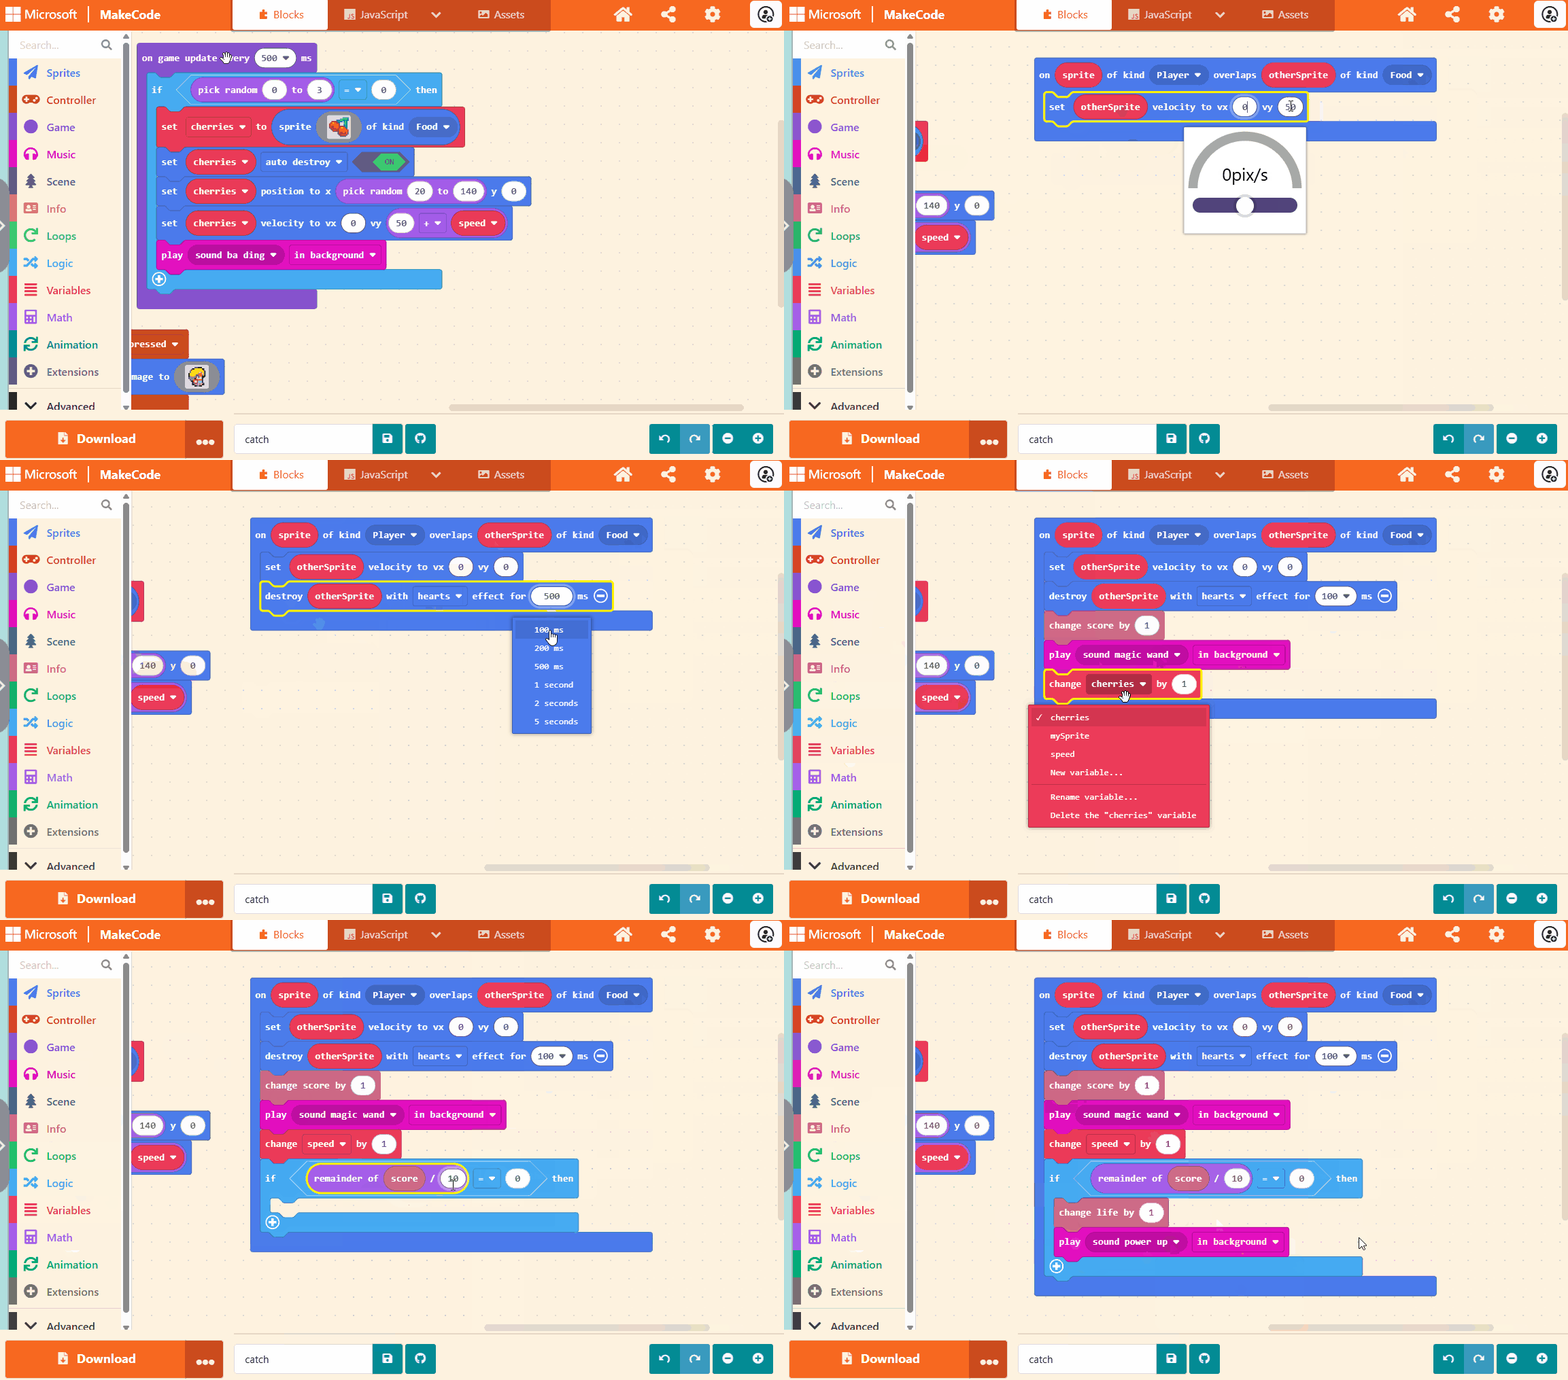
In this step, we will add the code to catch the falling cherries. The basis for this step
is the same as Step 5 - Eating the cherry in Chase
but with some additional functionality. As in Chase we will respond to a
collision (overlap) event between a Player sprite and a Food sprite. Rather than move
the Food sprite, we instead stop the sprite moving and then destroy the Food sprite
(along with a hearts particle effect). The score will be increased as will the speed
variable. We will also play a sound effect in the background.
Why do we stop the Food sprite moving? This is so the Food sprite remains within the
screen when it is destroyed. Why do we need to keep the Food sprite in the screen? This
will become a clearer in the next step when we detect cherries that have not been caught
but the basic premise is this:
- Cherries destroyed within the screen space have been caught.
- Cherries destroyed outside the screen space have been dropped.
The last section of code contains logic that awards the player a new life for every 10 cherries that are caught. How does it do this? Using a single technique using the remainder from a division operation. Any number evenly divisible by 10 will have a remainder of zero when divided by 10. We can use this fact to award the player a new life after catching each tenth cherry. This technique will be useful in many of your future games.
The completed code is provided after the animated image.
The completed code:
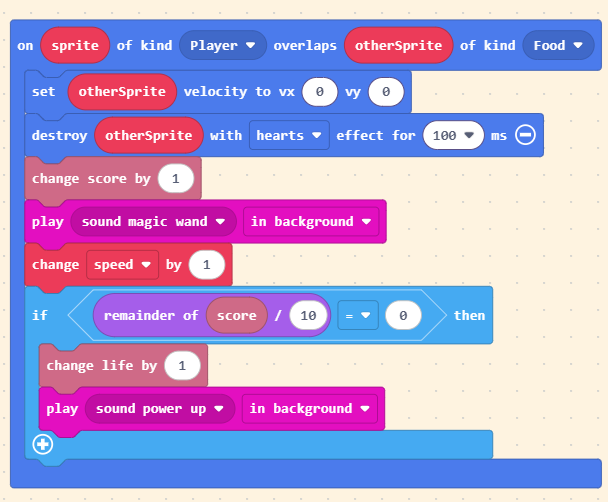
Experiment: Award a new life after each 5 cherries
Modify the code so that a new life is awarded after the player catches each 5 cherries rather than 10.
Step 6 - Dropping the cherries
The completed code for this step is available here.
The previous step handled catching the falling cherries, this step deals with dropping them.
In the previous step, when a cherry is caught, we stop its movement and then destroy it. This
is so the Food sprite remains in the screen when it is destroyed. We know this because the
collision detection code will only trigger when a Food sprite overlaps with the Player
sprite. As the Player sprite will always be on the screen, the collision must occur when the
cherry is also still on the screen.
In step 4 when we create the falling cherries (Food
sprites), the auto destroy property is set to On. That setting means any Foood sprite
that goes outside of the visible screen is automatically destroyed by the game engine. Because
the Food sprites are dropping downward, any automatically destroyed Food sprite must be
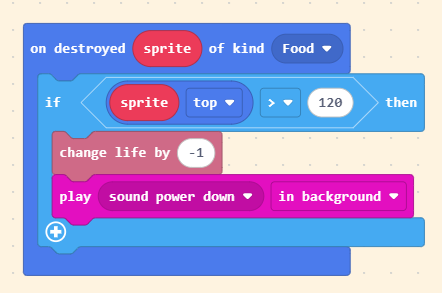
outside the screen bounds and therefore dropped. The property top of the Food sprite is
tested in the logic to see if it is on the screen or outside of it. If outside, the player
will lose a life and a background tune is played.
The completed code is provided after the animated image.
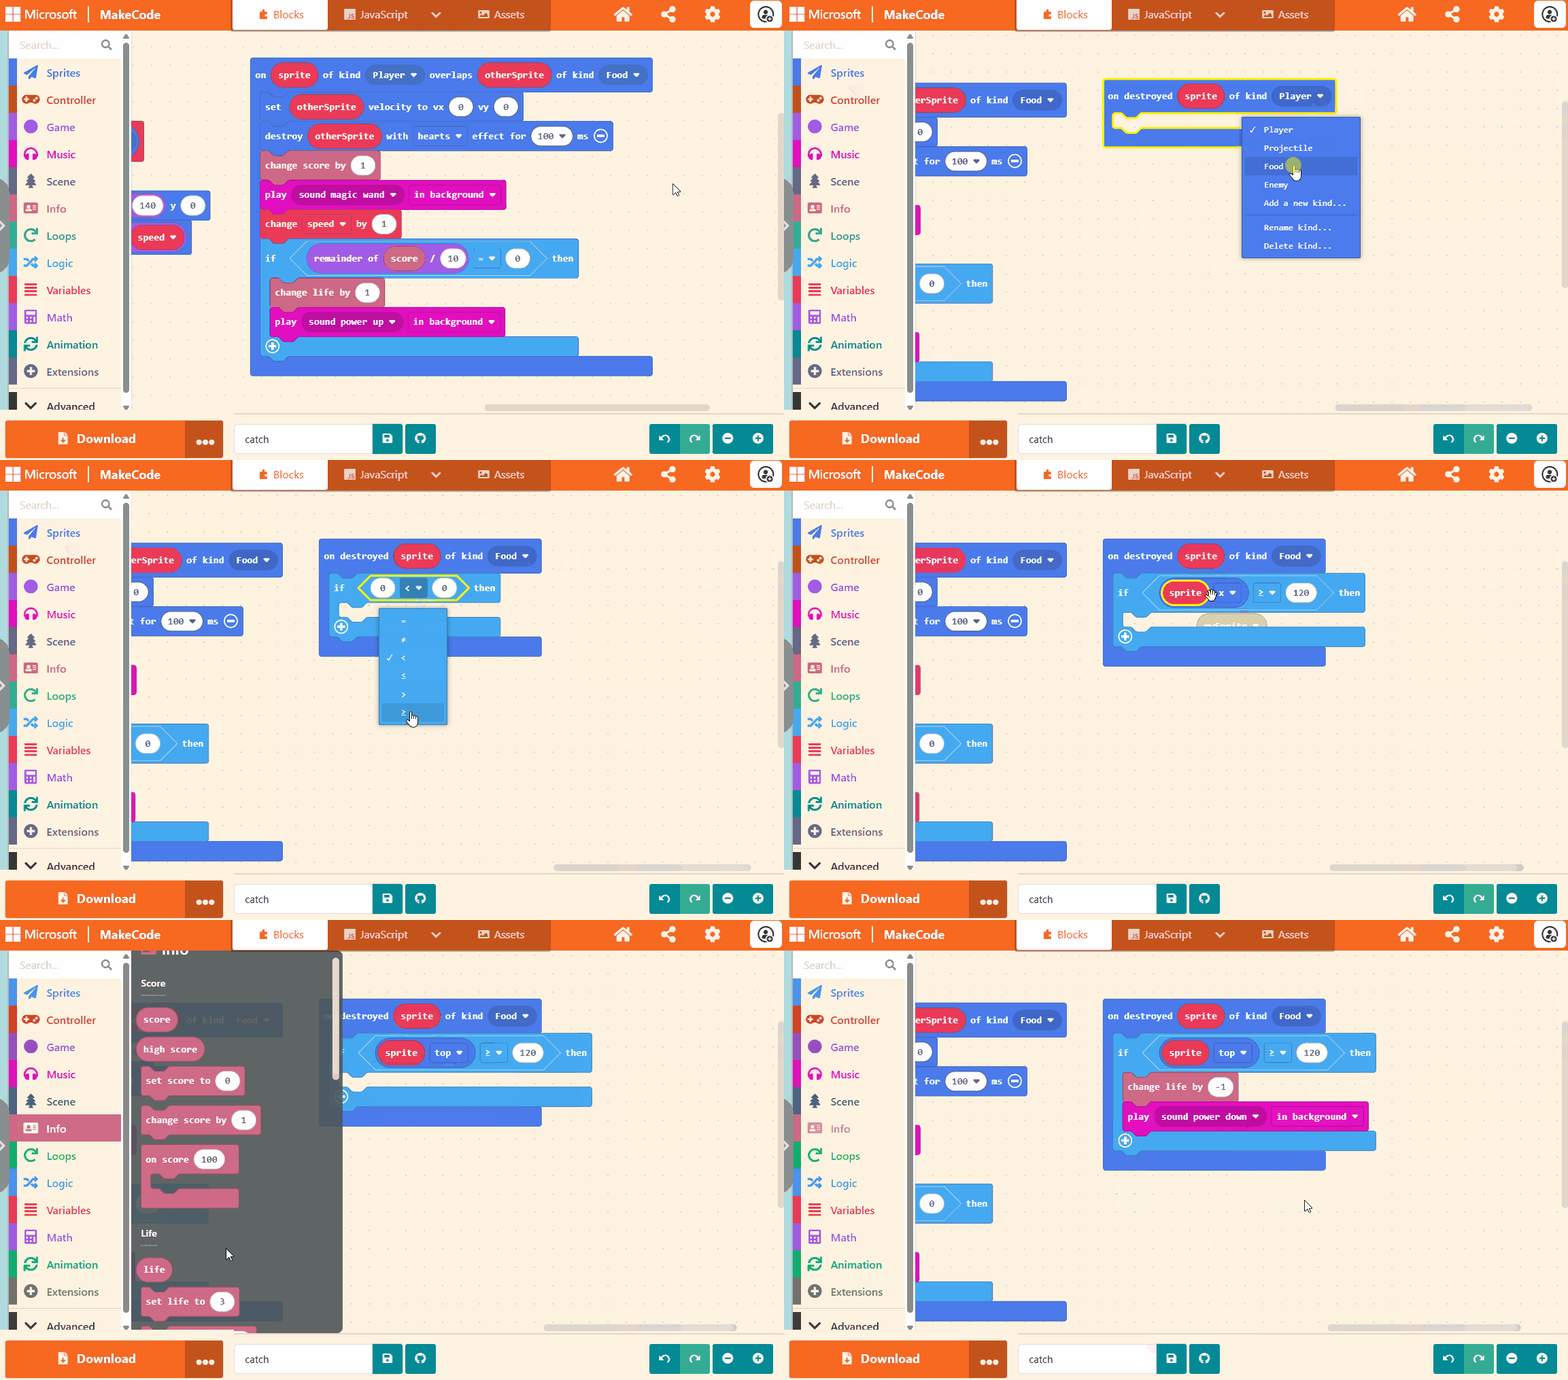
The completed code:
Step 7 - Adding the falling burger
The completed code for this step is available here.
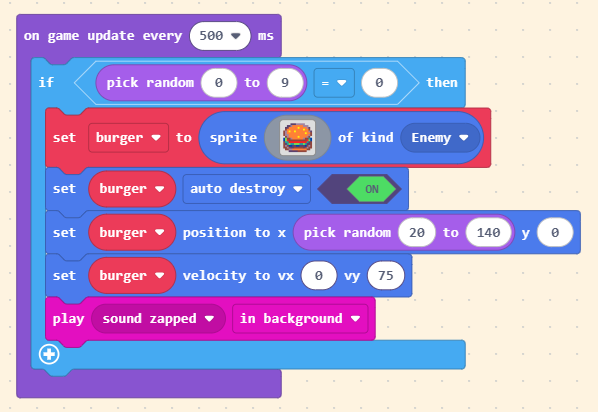
Adding the falling burger is almost the same code as adding the falling cherries. This
step demonstrates how to use the duplication and then modification of code to simplify
this coding step. Make sure you follow the instructions carefully and create a new
burger variable rather than renaming cherries.
As with previous steps for sprites, the image can be picked from the biult-in gallery or drawn to your own design.
The completed code is provided after the animated image.
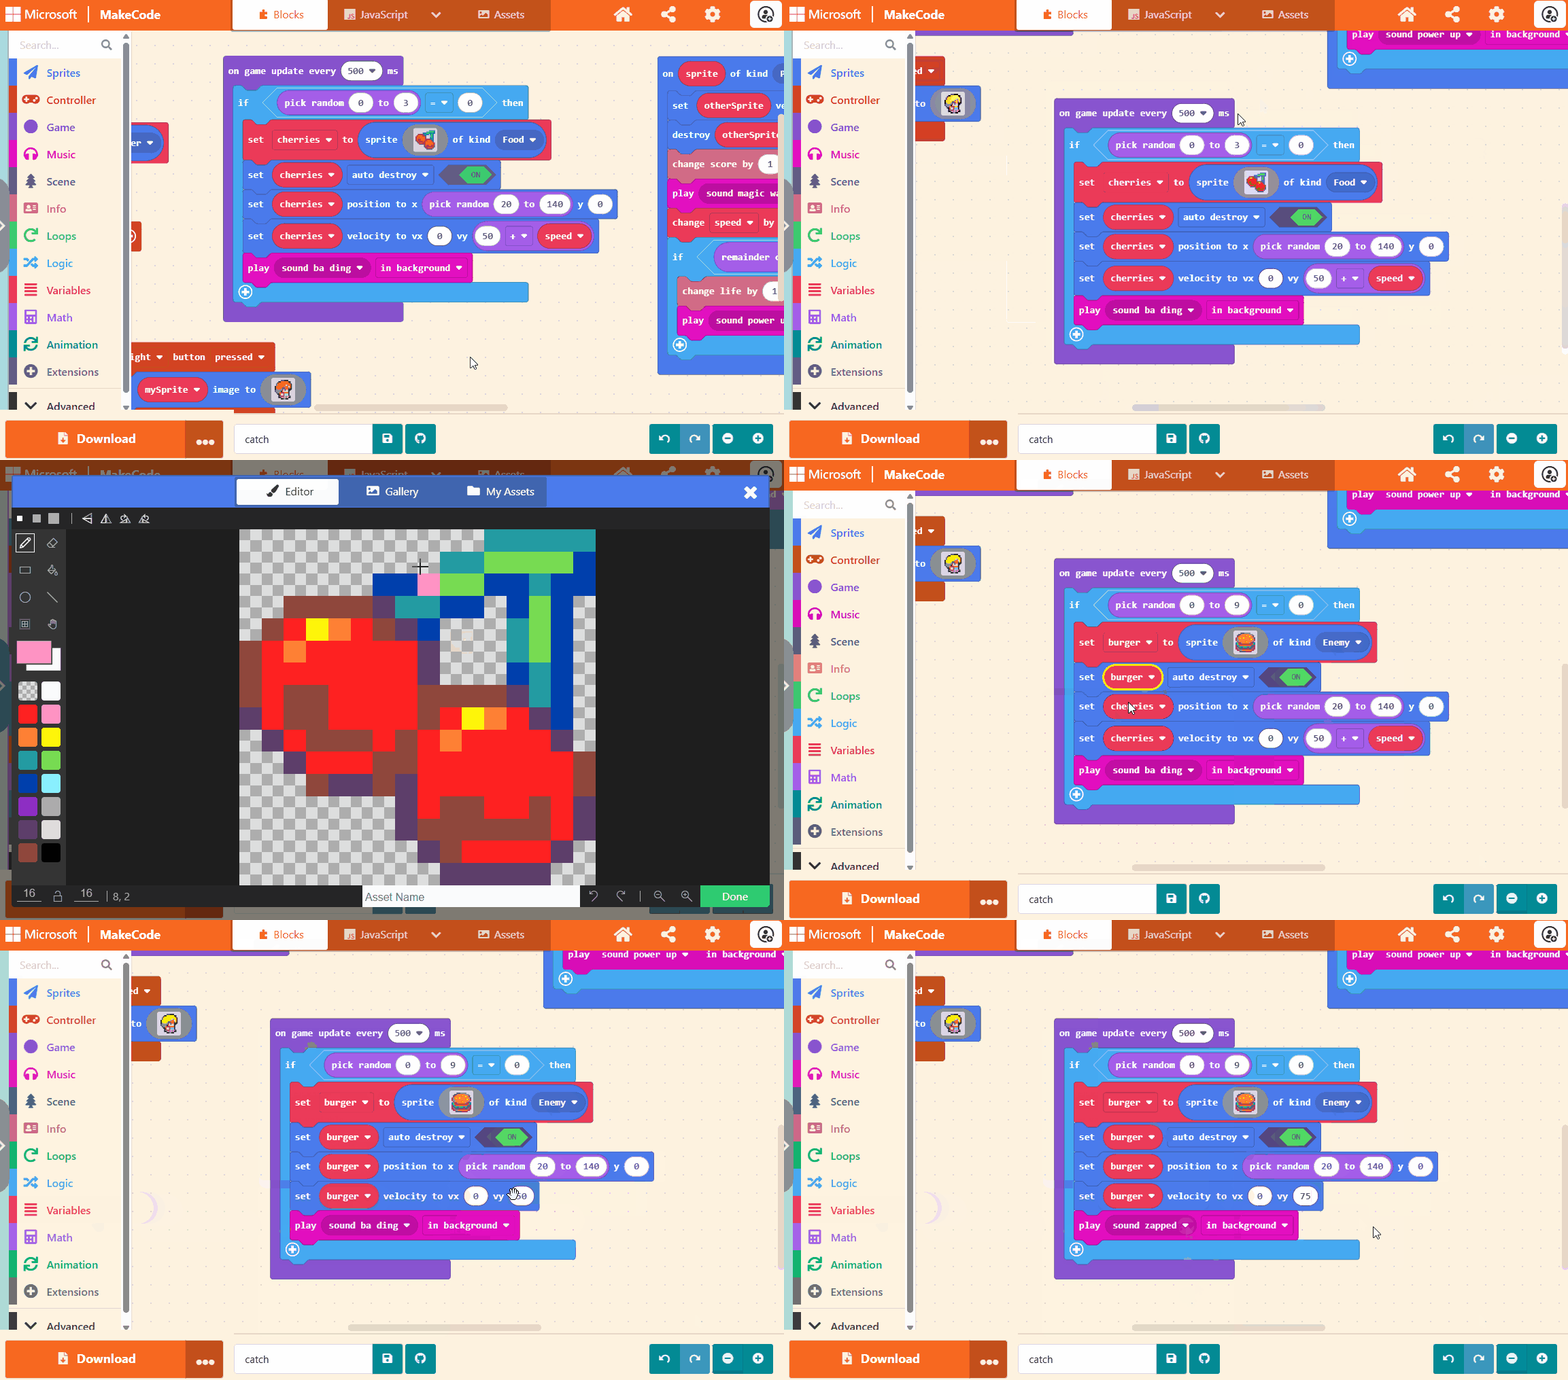
The completed code:
Experiment: Change how often the burgers appear
There are two settings that control how frequently burgers are dropped on average:
- The frequency of the event
- The range of the random numbers to select from
Experiment with both settings one at a time to see the effect it has. Try smaller and larger numbers for the frequency of the event and small and larger numbers for the random number range.
Experiment: Make the burgers go faster like the cherries
Whilst the burgers fall faster than cherries by default, they do not currently get any
faster the larger the players score. Modify the code that makes the burgers fall to
use the speed variable like the cherries.
Step 8 - Catching the falling burger
The completed code for this step is available here.
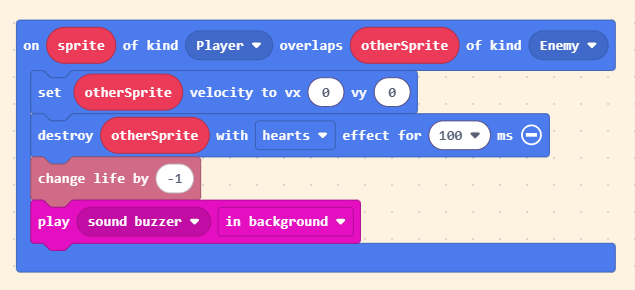
Catching a falling burger loses the player a life. As with other collision events we will make use of the overlap events which you should now be familiar with.
The completed code is provided after the animated image.
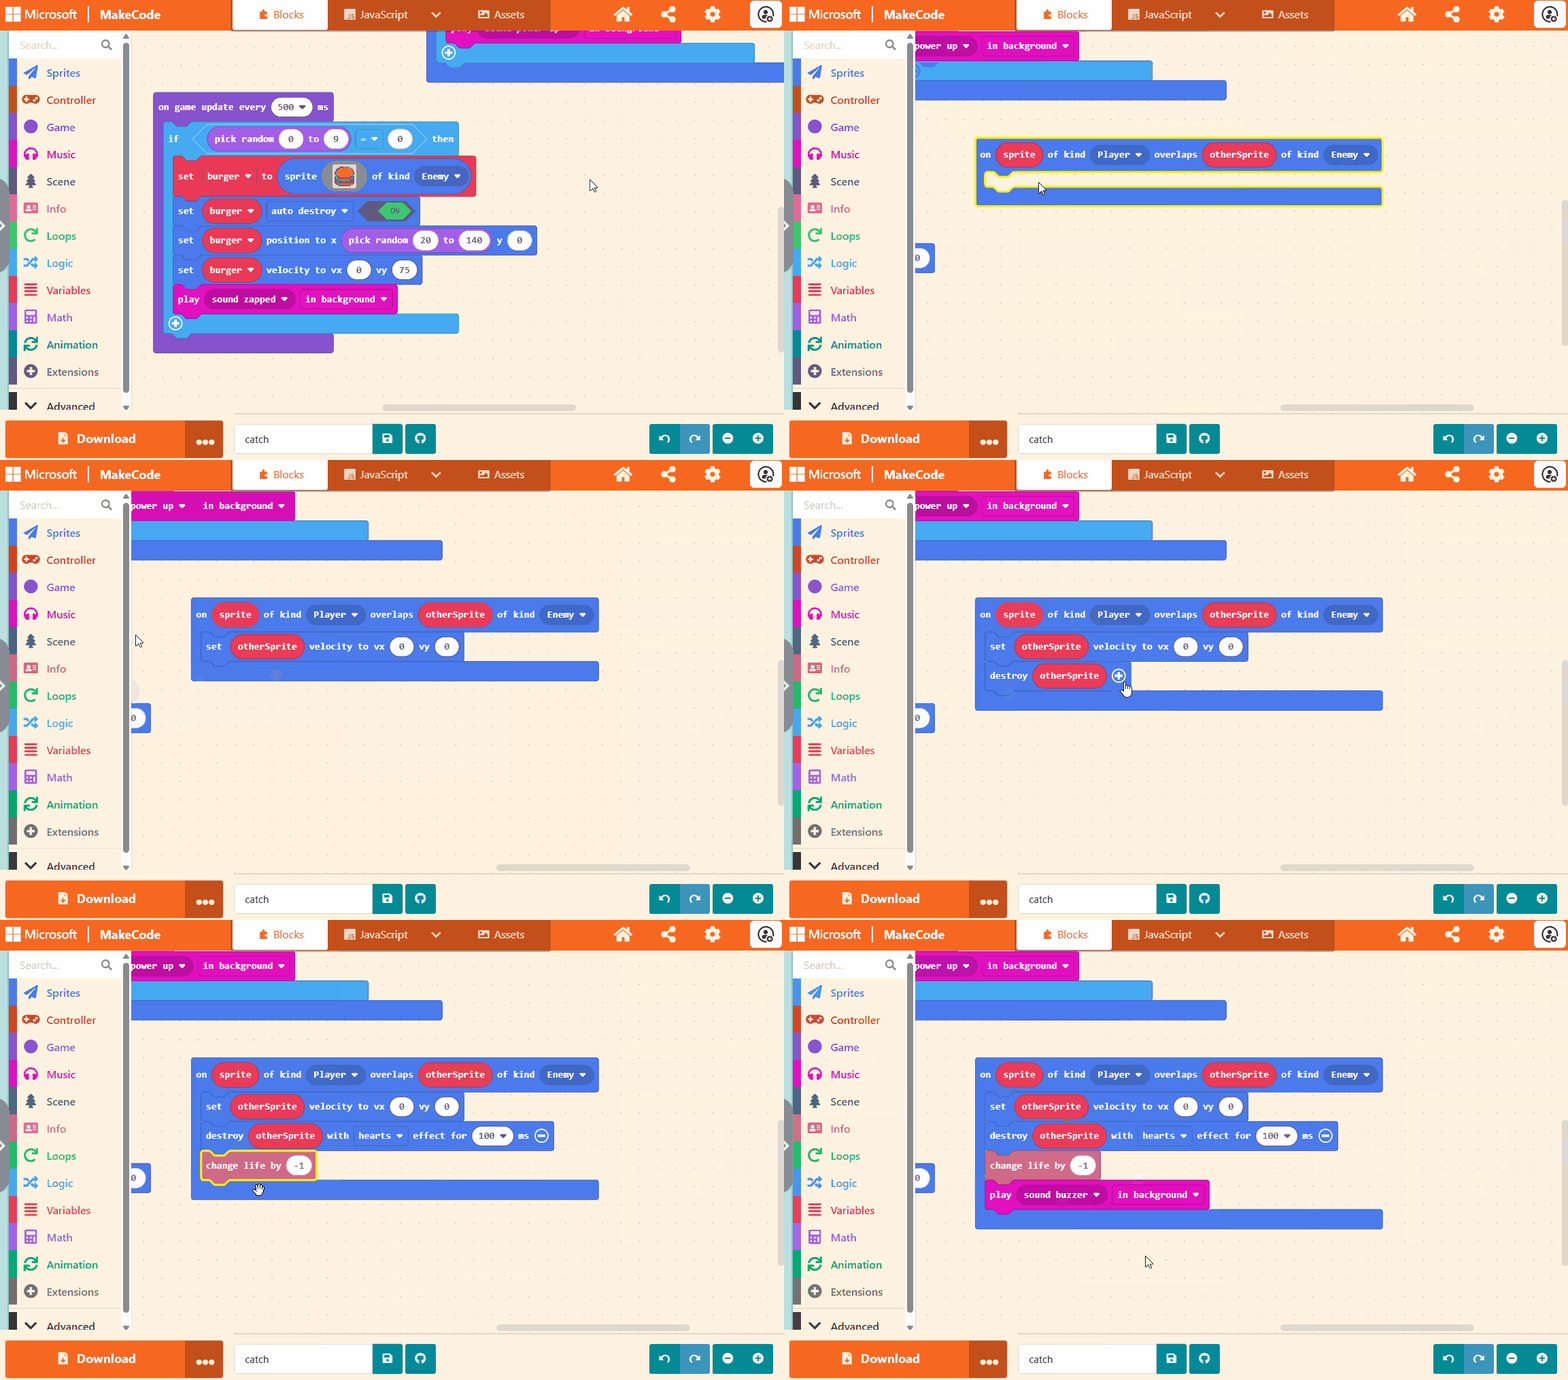
The completed code:
Extending the game
Add background music
All good arcade games should have a catchy tune that plays in the background Explore the MakeCode Arcade palette and find the block needed to play background music. Add this to your game.
Challenges
Add a jump
This is a more tricky challenge and will require you to investigate some more of the
physics properties of sprites which can be found in Sprites.
When the A button is pressed, allow the player jump and can be achieved by adding
just two blocks to the A button event handler.
Addendum
The completed code for this game is available here.
Original alpha quality instructions can be found here.