Chase
Collect as many cherries as possible before the time runs out and avoid being caught by the duck. Each time a cherry is collected, the time remaining resets back to 3 seconds. If the duck catches the player, then a life is lost. The game ends when the time runs out or all lives are lost.
Controls D pad - moves player

In Chase, the player must collect the cherries that appear in random locations on the screen. The player has 3 seconds to collect the cherries. Each time the cherries are collected, the player scores a point, new cherries appear somewhere else on the screen and the timer is reset to 3 seconds. All the time, there is a rampaging duck who just loves cherries and is determined to stop you collecting them. If the duck catches the player, the game is over.

Learning outcome
New concepts introduced: Sprites, Controller.
This is the first of the MakeCode Arcade materials and therefore introduces lots of new concepts. As such, the project is aimed to be straightforward to construct to allow focus on getting used to the MakeCode Arcade environment and where the blocks are location. To avoid an overload of information, not every concept will be fully explored or explained in this project. Later projects will expand on the information provided here. This project will however provide a solid foundation on Sprites and the Controller.
Ideally, the reader is would already have some experience using a blocks based programming such as Scratch or Snap. If this is not the case, the reader is recommended to start with the Scratch materials that can be found in the exploring section of the website.
This project will typically take 30 to 60 minutes to complete.
The following blocks and concepts are used in this project:
Step 1 - Create a new game
Navigate to the MakeCode Arcade website at the following address
https://arcade.makecode.com and create a new project
called chase as shown below:
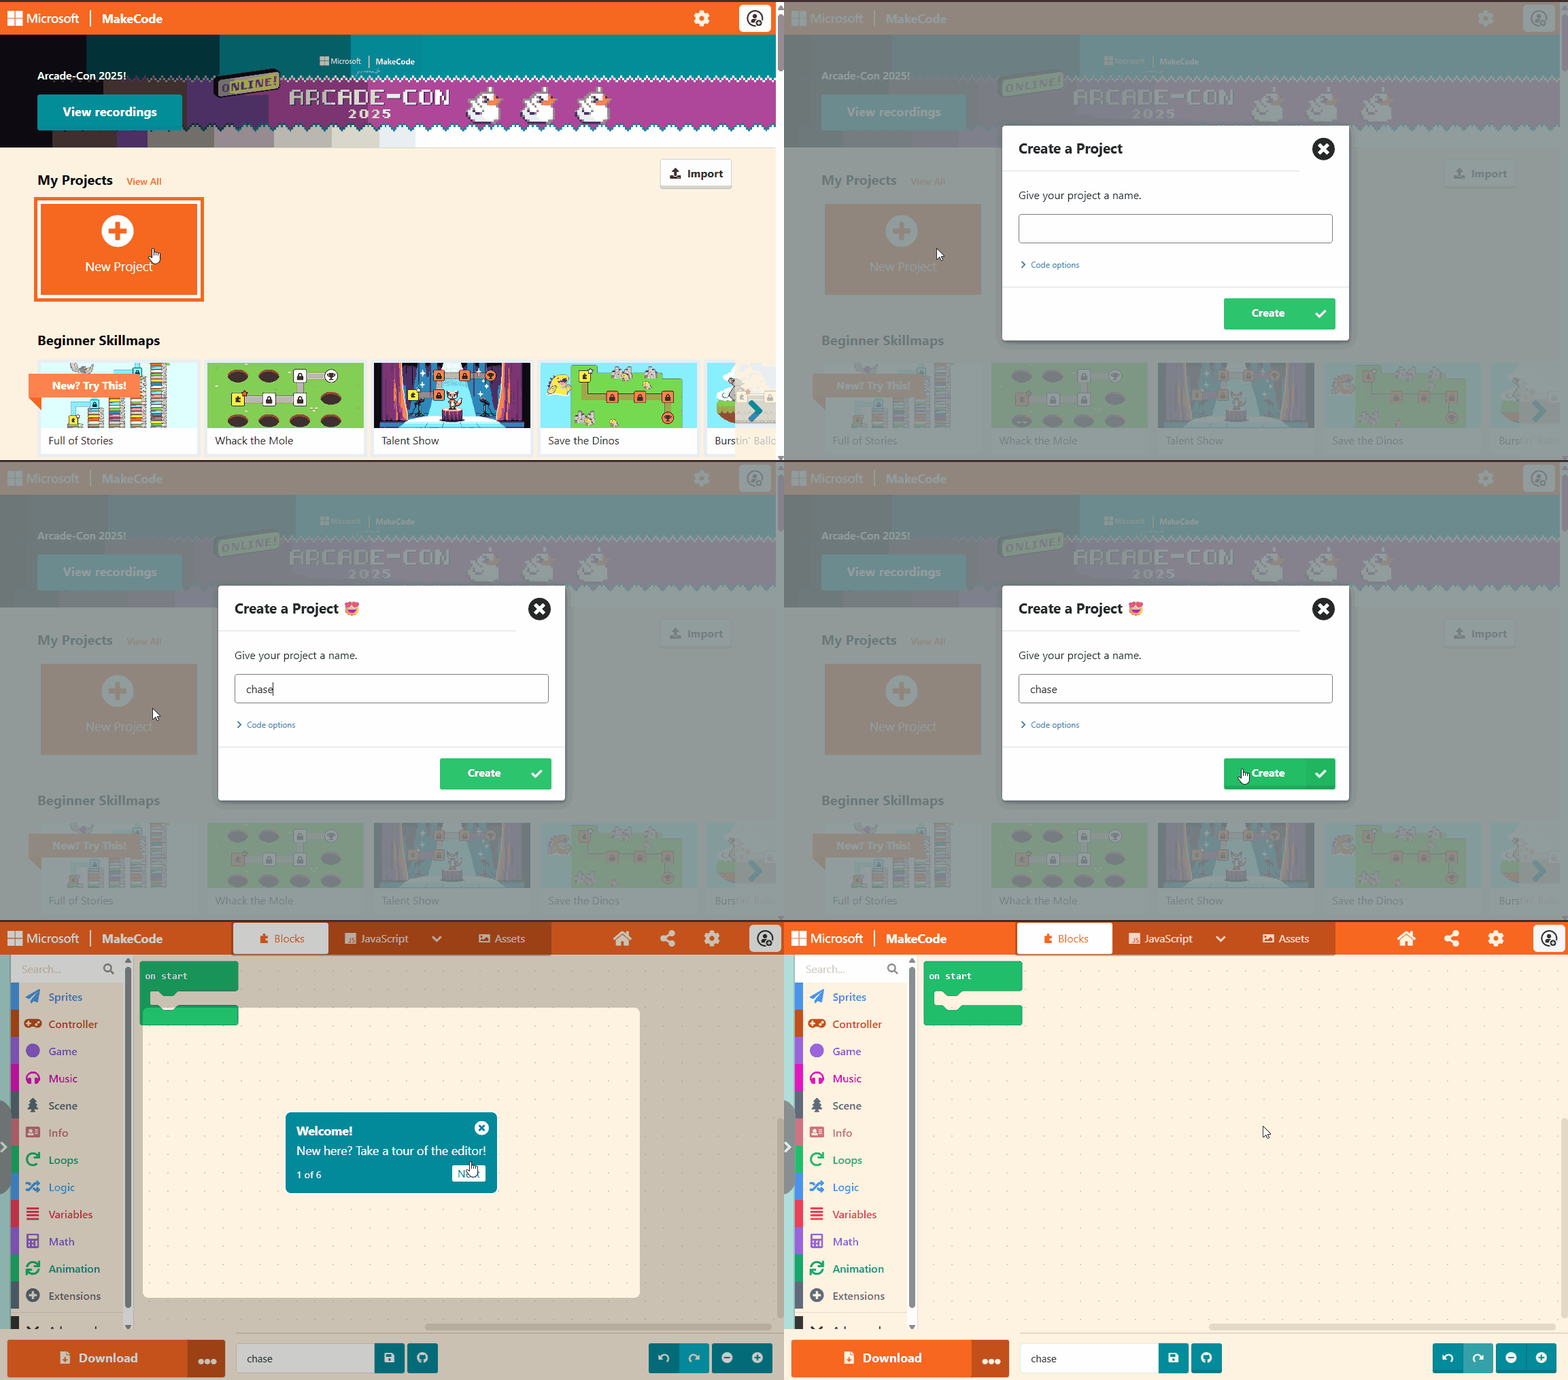
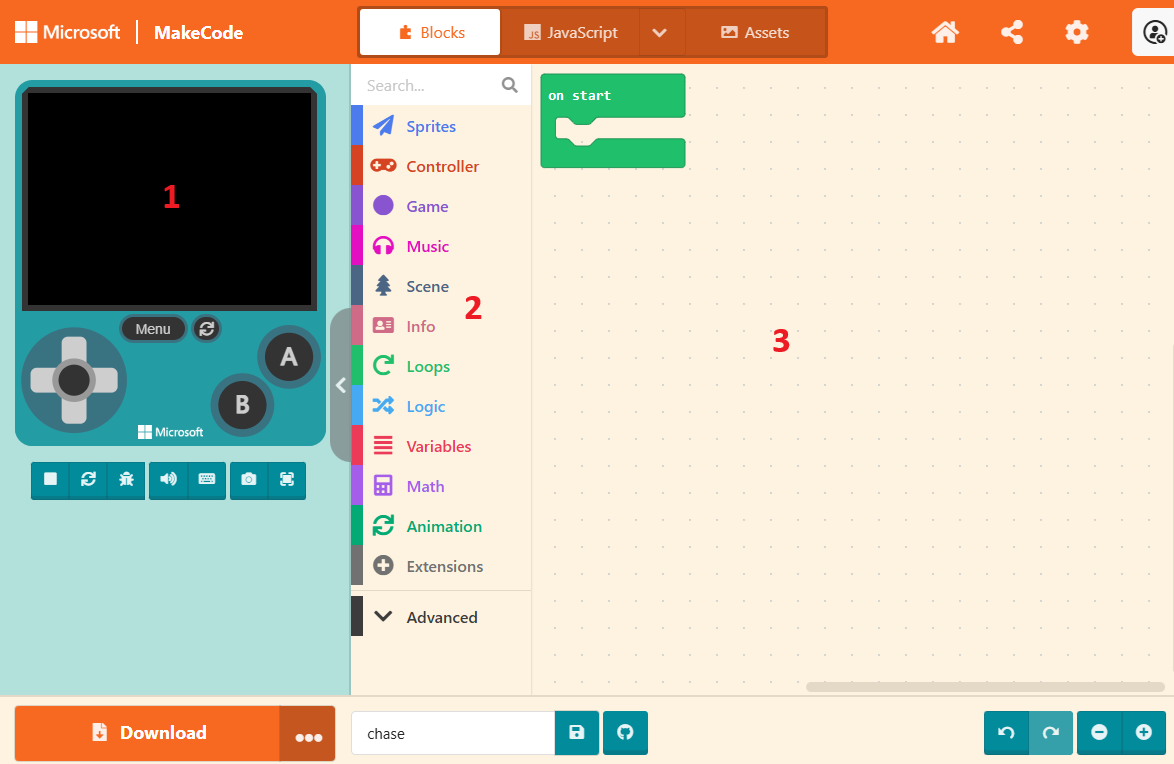
Once created, a new project will be created and the workspace will look like the image below. If you have previously used Scratch, the workspace should be familiar to you even though the layout is slightly different to Scratch. The key parts of the workspace have been numbered and are explained briefly:
- Emulator - this is where you will play your game as you are developing it
- Toolbox - this is where the code blocks are found, grouped by function
- Workspace - this is where you will drag code blocks to write your code
Later sections and projects will explore the other parts of the MakeCode Arcade application.
The principles of blocks coding in MakeCode Arcade are identical to those in scratch. The palette of blocks available are grouped together by function in the toolbox. Locate the block needed and then drag the block into the workspace where it will "snap" together with other compatible blocks. Each time the code is changed, the emulator will recompile the game. Games can be played in the emulator; the emulator can also be made full screen.
For a final flourish, games can be downloaded onto compatible physical MakeCode Arcade hardware to play on the go. For an overview of some compatible MakeCode Arcade hardware devices, see the devices page.
Step 2 – Create the player sprite and move
The completed code for this step is available here.
In this step, we will create a single Player sprite that can be moved using the D-pad
(up, down, left and right buttons) and is restricted such that it can't move outside of the
screen. In this example, we will select the sprites image from the Gallery but you can also
draw your own sprite image using the built in editor.
Sprites are fundamental to MakeCode Arcade and you will likely use them in every single game
you make. Sprites represent the game objects such as the player, enemies, projectiles and food
(all sprites have a Kind). All sprites have a range of properties that can be set which
controls the sprites behaviour. For example, a sprite can be made invisible or given a horizontal
speed which will make it move. There are lots of properties representing position, movement,
physics, lifetime and environment interactions. More details of the properties can be found in
Sprites.
The controller is another fundamental to MakeCode Arcade as it is how the player interacts with the game. The controller represents the buttons (up, down, left, right, A, B and menu) and the events they can trigger (pressed, released, repeat). Because using the D-pad (up, down, left and right buttons) to controller a main player sprite is such a common requirement, there is a specific block for setting up that functionality and we will use it here. More details of the controller can be found in Controller.
The completed code is provided after the animated image.
![]()
The completed code:
![]()
Experiment: Changing the speed of the Player sprite
Experiment with different values for the vx and vy values in the move mySprite with buttons block.
Try changing the vx values first and then the vy values and observe what happens. Some good values
to experiment with are:
- -100
- 0
- 50
- 100
- 200
Step 3 – Add in different images for moving
The completed code for this step is available here.
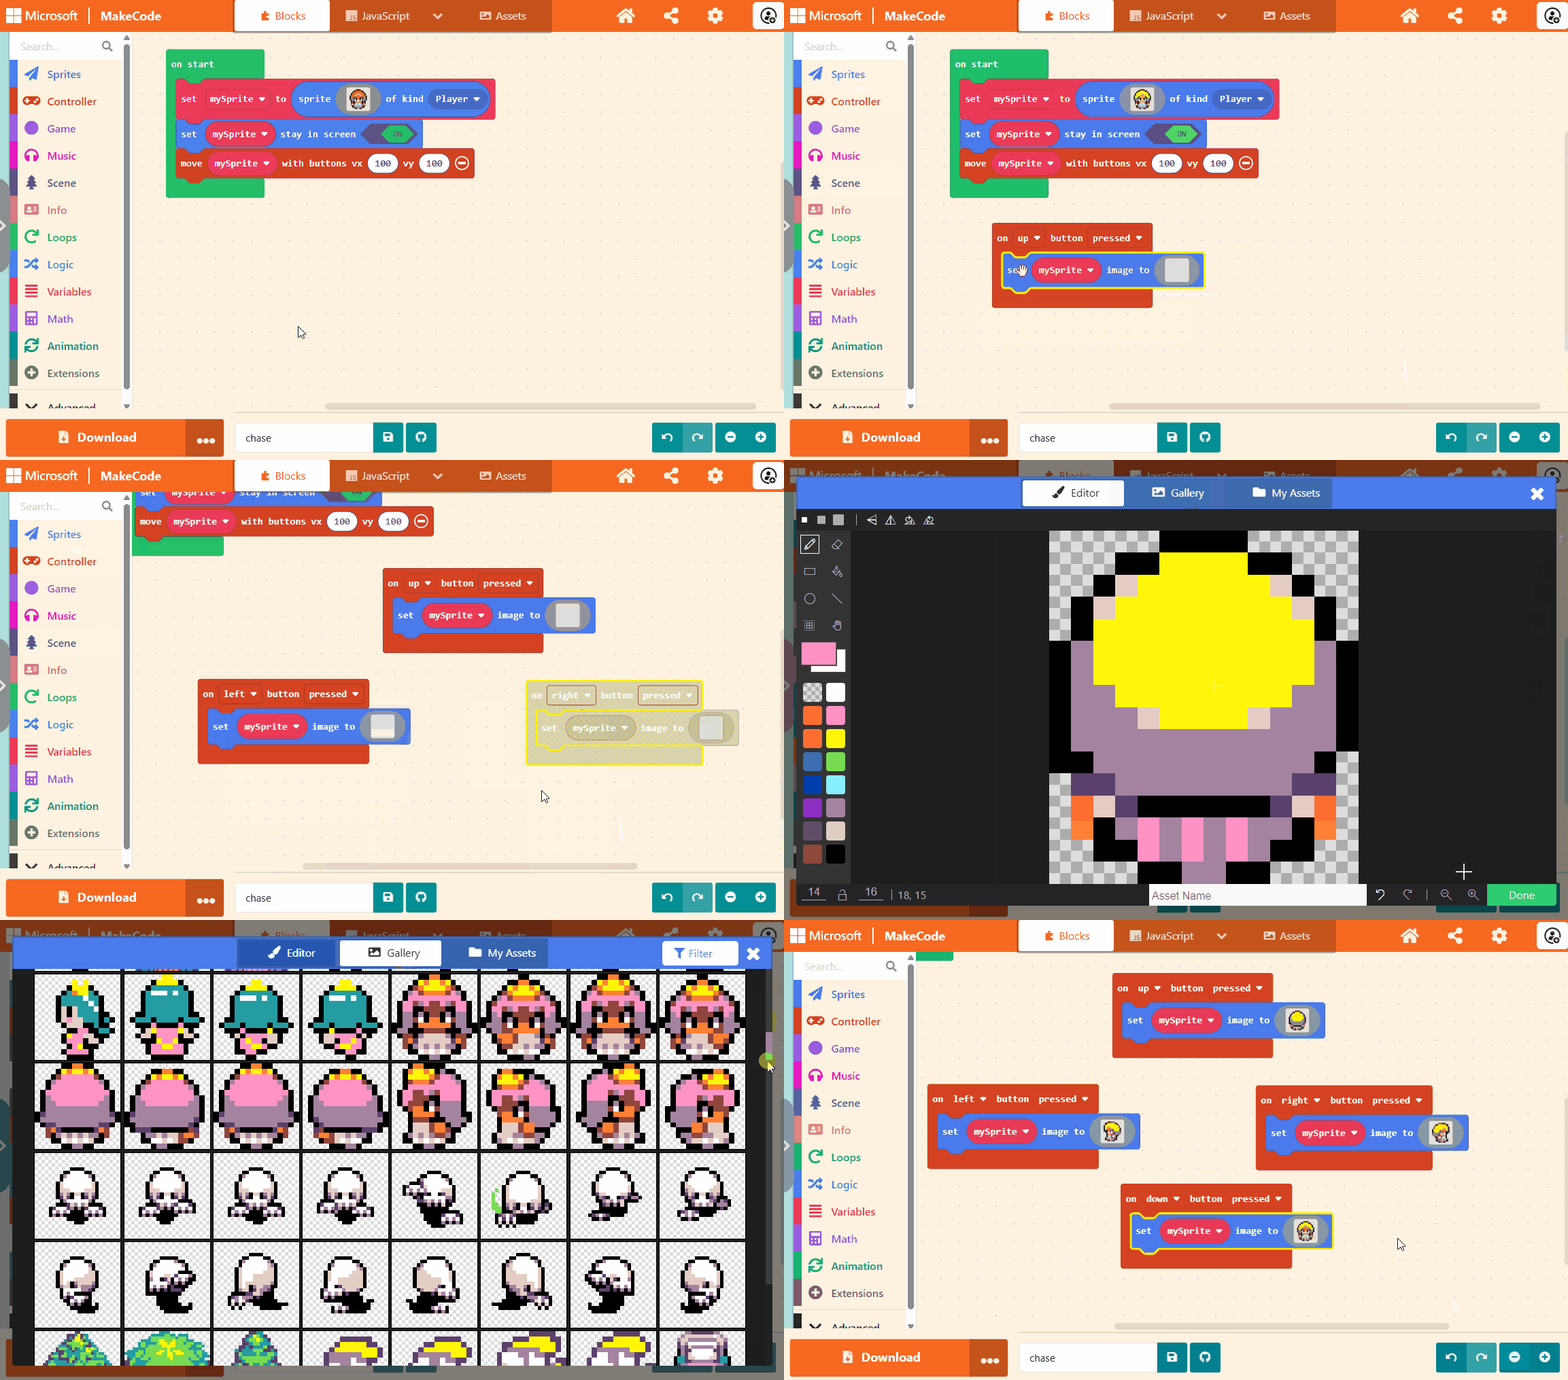
One of the many properties of sprites is image and this can be changed with code. A sprites image
controllers other sprite properties such as width and height too. Therefore, changing a sprites
image to a different sized image will change it's size.
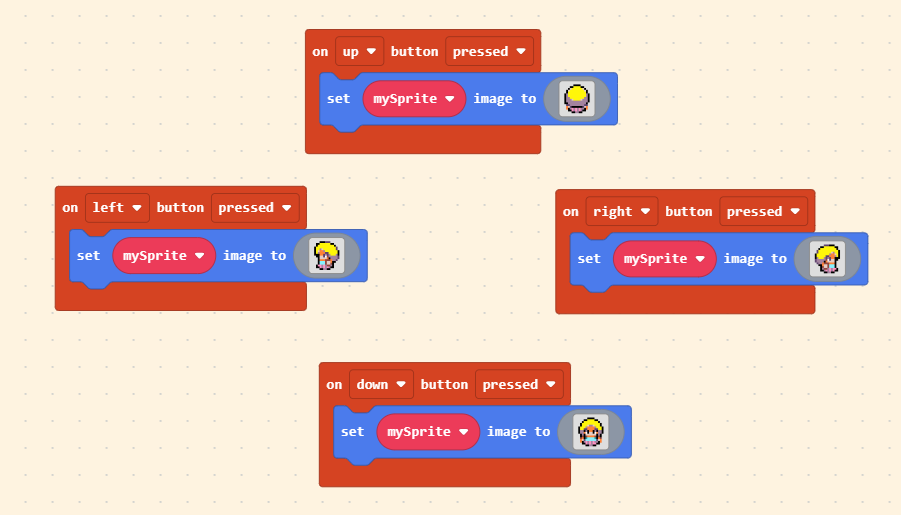
As demonstrated in step 2, images can either be selected from the Gallery which contains pre-defined ones or drawn using the in-built editor. In this step we will change the image of the sprite depending on which controller button is pressed. The sprite will therefore look like they are facing the direction they are travelling in. Four button press events will be used to monitor the four D-pad buttons: up, down, left and right.
The completed code is provided after the animated image.
The completed code:
Step 4 – Add the Cherry and countdown
The completed code for this step is available here.
In this step, we will add an additional sprite and change its name to cherry and its kind to
Food. This sprite will be the food that we will collect by using the player sprite. As in the
earlier step, the image for the sprite can either be selected from the Gallery or you can draw your
own image.
So what is a sprites Kind? In an earlier step, it was explained that sprites represent the game
objects such as the player, enemies, projectiles and food. It is a sprites kind that determines
what type of sprite it is. The MakeCode Arcade game engine will detect events based on one kind
of sprite overlapping a sprite of another kind. This will form the basis of the collision
detection in your game and this will be added in the next step. By default there are four kinds
of sprites but you can also create new kinds should you wish to:
PlayerProjectileFoodEnemy
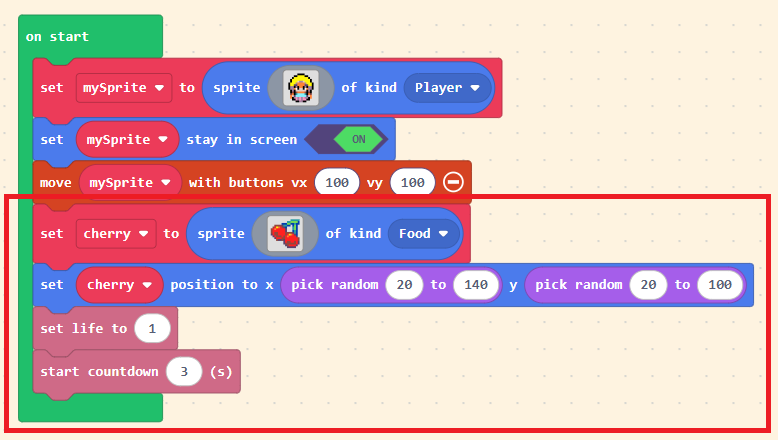
The cherry sprite will be randomly placed on the screen. A MakeCode Arcade screen is 160 pixels wide by 120 pixels high. As we want the full image of the cherry to be in the screen and the position of a sprite is its centre point, we use a 20 pixel border around the screen to bound the randomly selected position for the cherry so it is always visible.
The last blocks that will be added to the code are used to set the number of lives in the game engine to 1 and a countdown timer for 3 seconds. When run, the game will countdown for 3 seconds and the player will lose their one and only life; this will end the game.
The completed code is provided after the animated image.
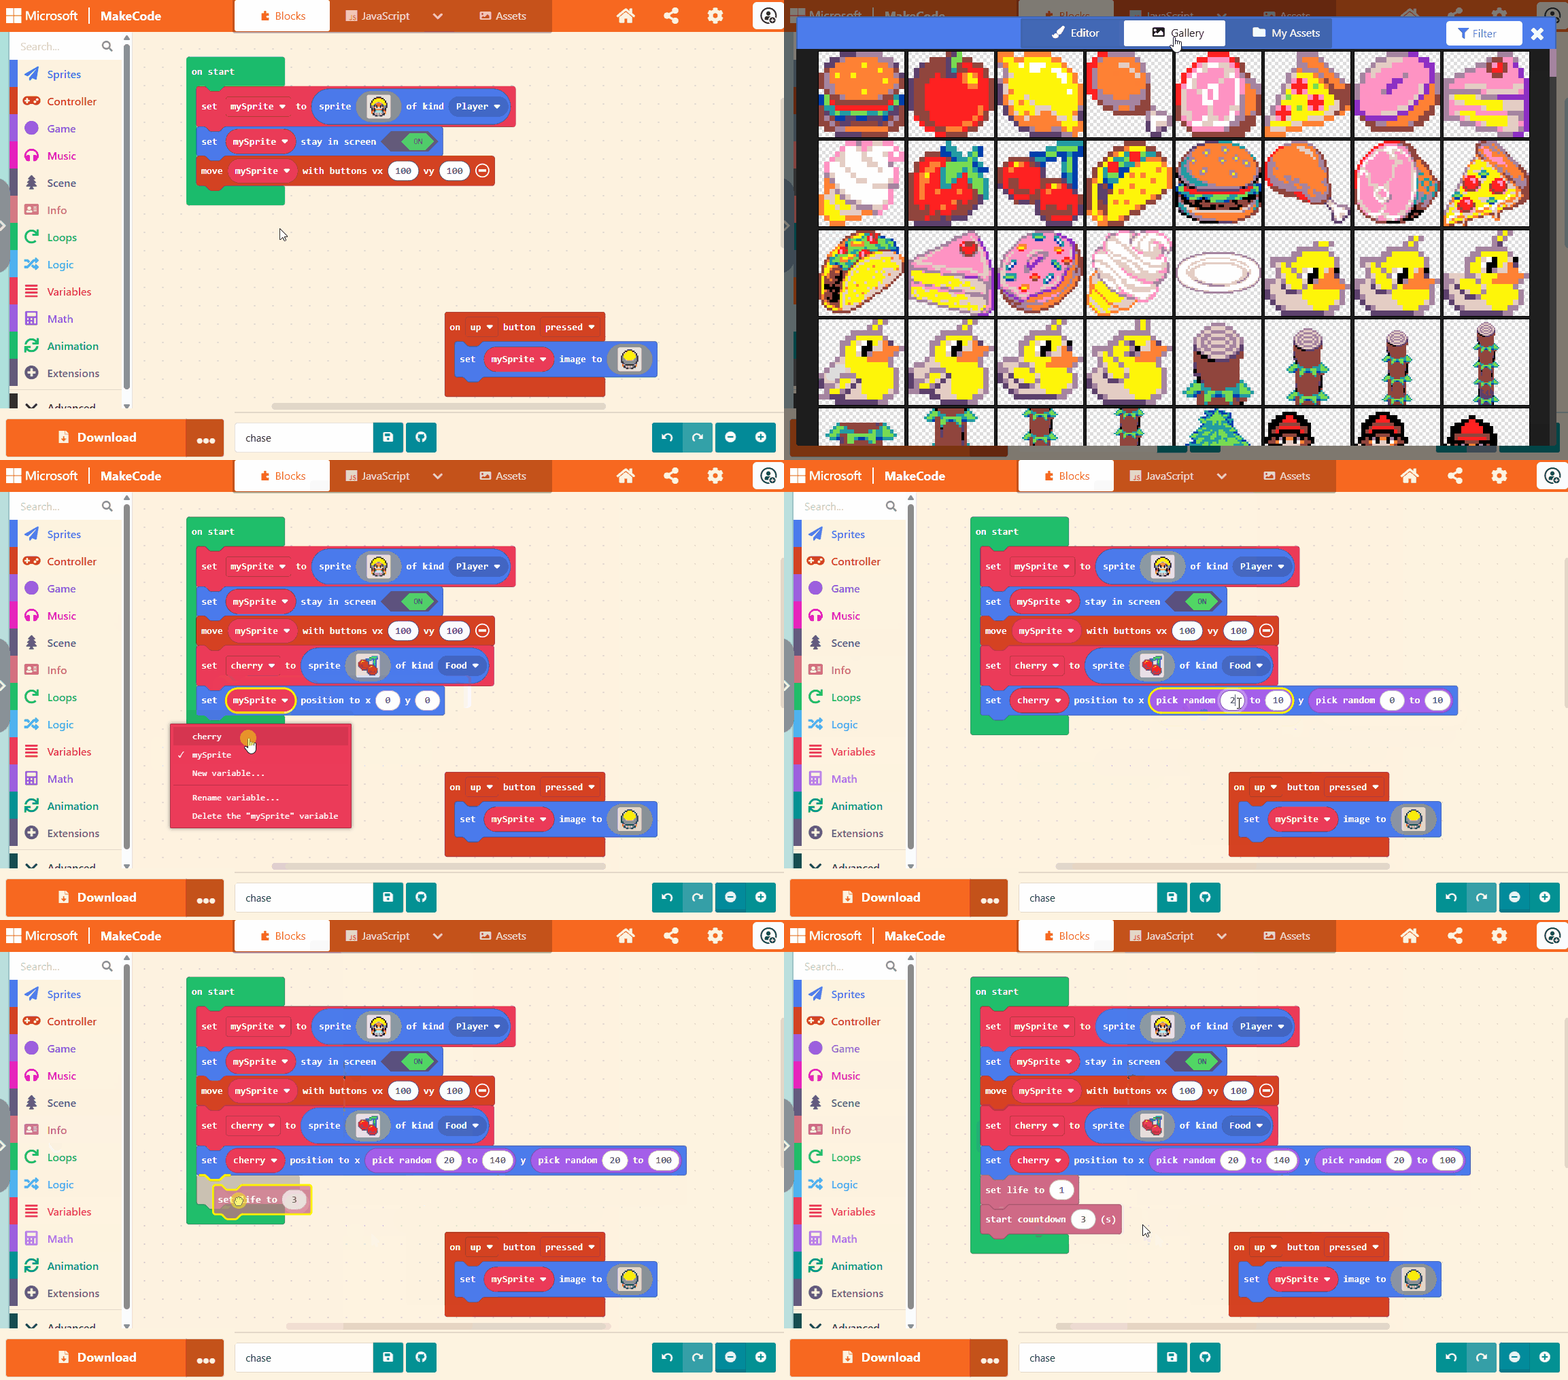
The completed code (newly added code is surrounded by the red box):
Experiment: Changing the position of the Food sprite
The MakeCode Arcade screen is 160 pixels wide by 120 pixels high. Experiment with different ranges of random numbers and see the effect it has on where the cherry is placed. Try and modify the ranges so that the cherry only appears in:
- The top left quadrant of the screen
- The top right quadrant of the screen
- The bottom left quadrant of the screen
- The bottom right quadrant of the screen
- The centre of the screen
Step 5 - Eating the cherry
The completed code for this step is available here.
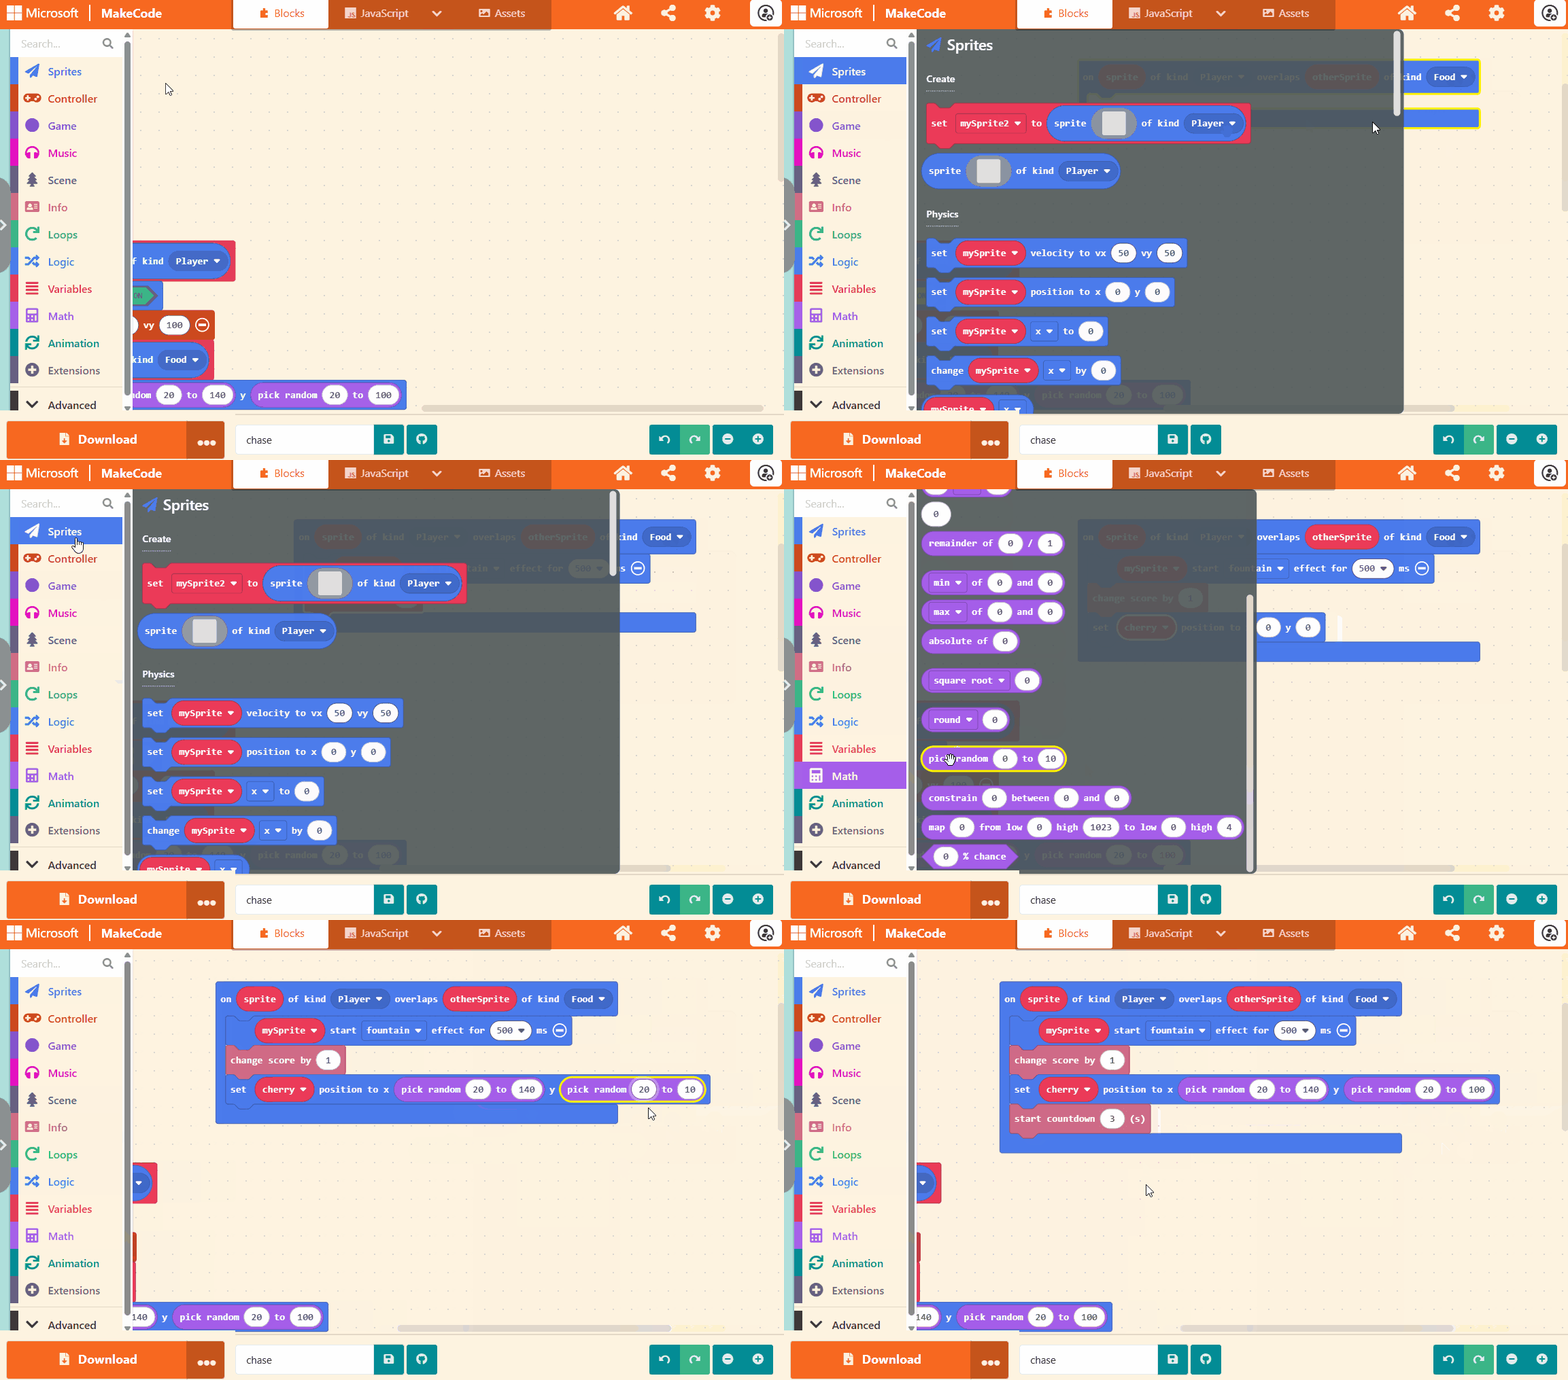
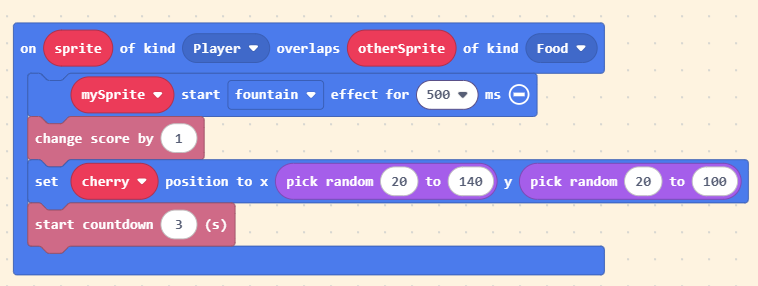
In this step we will demonstrate how the sprites kind is used by the game engine for
collision detection events, allowing you to respond to such events. We will setup an event
handler so when the player sprite (kind is Player) overlaps with the cherry sprite
(kind is Food) we will increase the players score, move the cherry and restart the
timer countdown from 3 seconds.
The completed code is provided after the animated image.
The completed code:
Step 6 – Add the duck
The completed code for this step is available here.
The game is not very challenging. It is easy for the player to collect the cherry as there
are no obstacles and no jeopardy to the game. In this step we will change this by adding the
rampaging duck sprite, renaming the variable to duck.
The duck sprite will be added with the kind of Enemy and like the cherry will be randomly
placed on the screen. As before, the duck image can be be selected from the Gallery or drawn.
We will also set the duck sprite to follow the player sprite, called mySprite. This has the
effect of the duck chasing the player. Once the code has been added, run the game. What happens
when the rampaging duck catches the player? Why do you think this is?
The completed code is provided after the animated image.
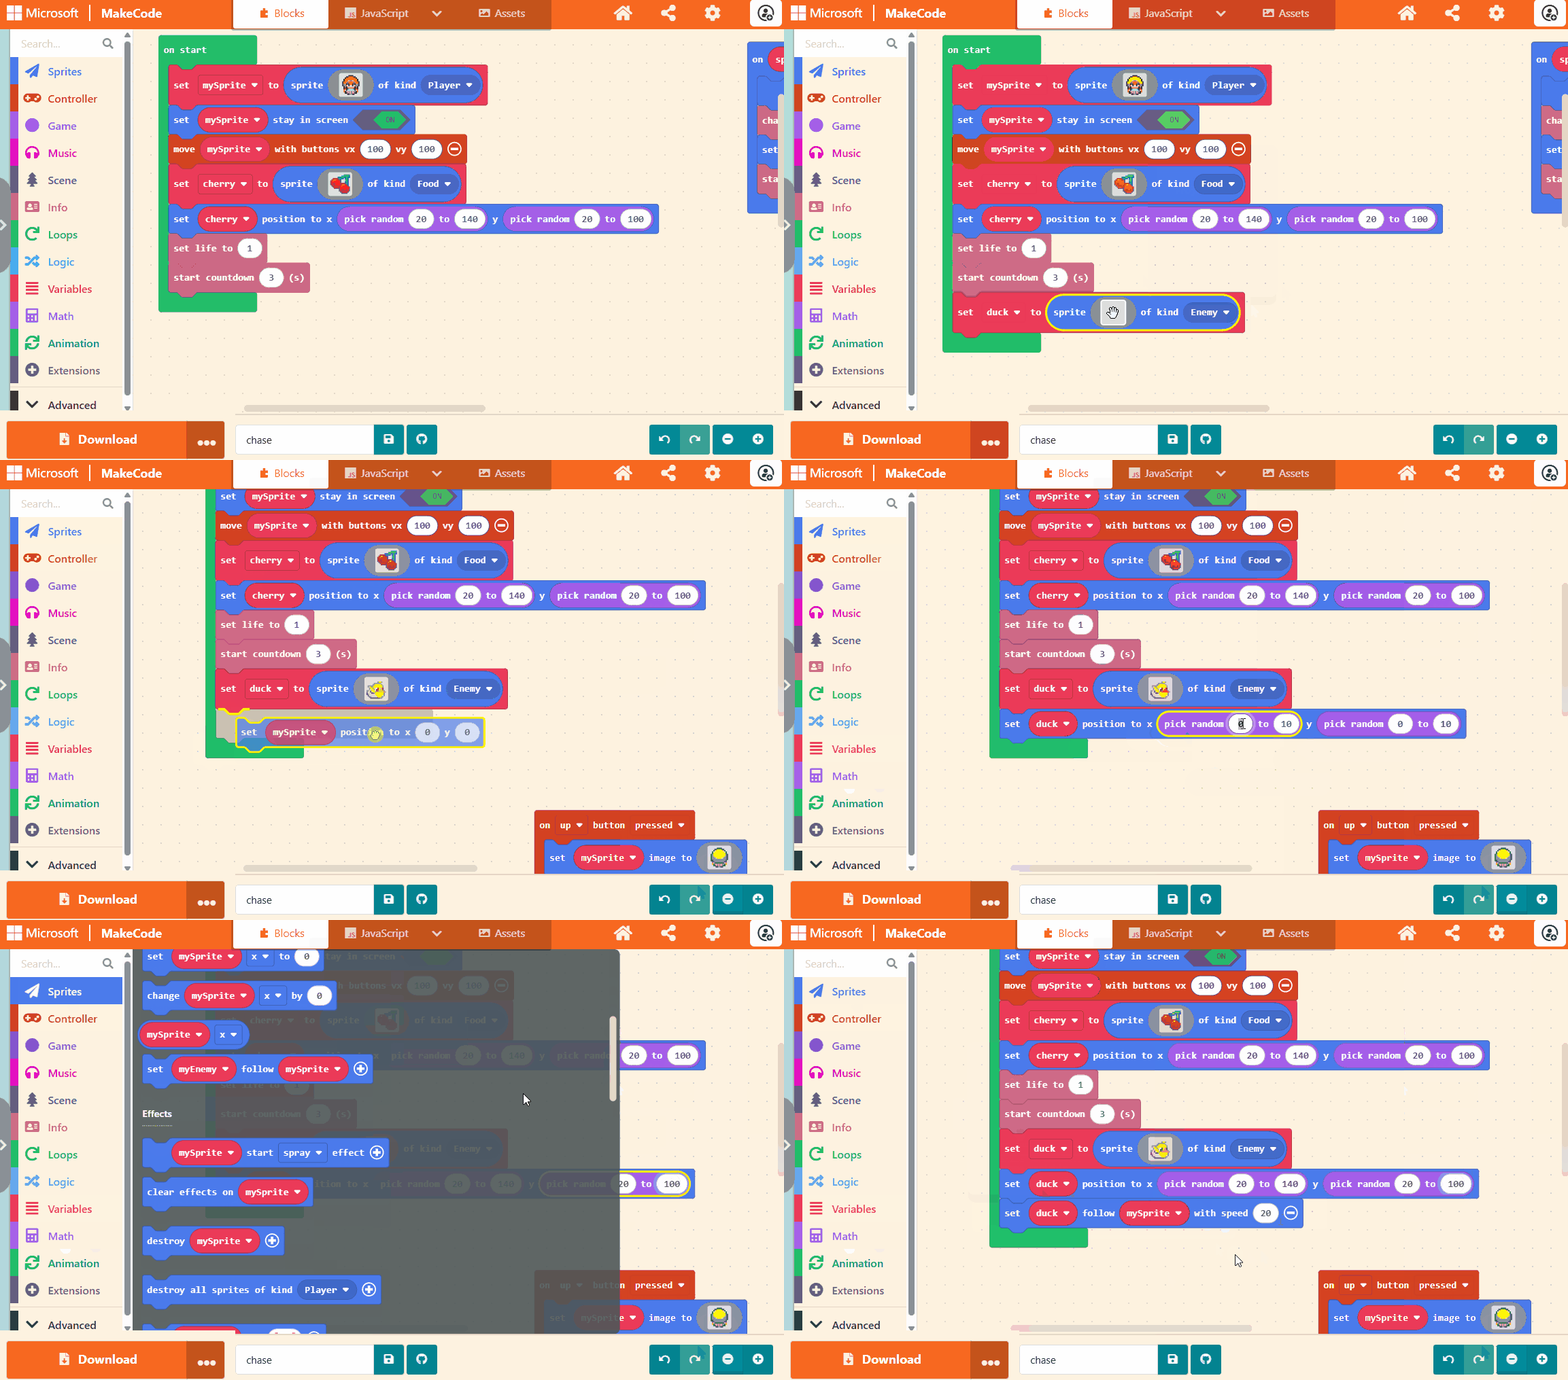
The completed code:
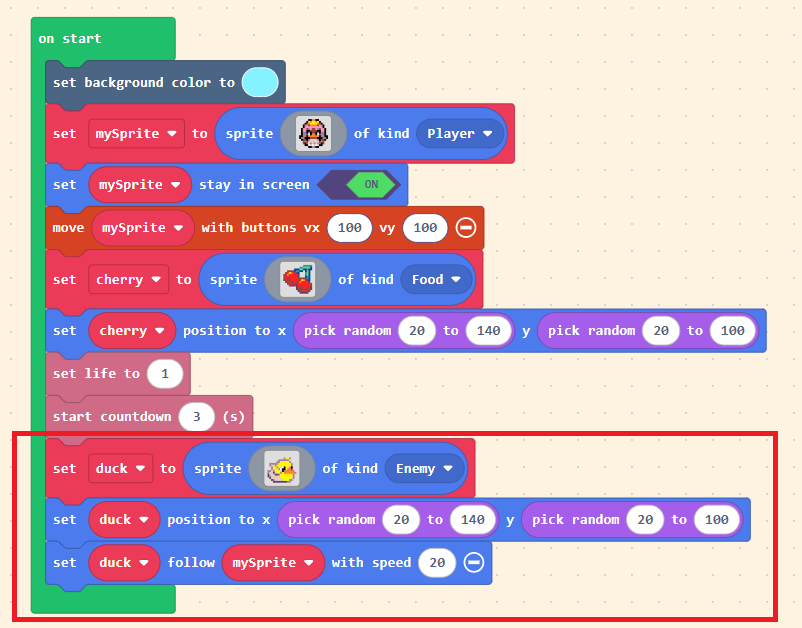
Step 7 – Caught by the duck
The completed code for this step is available here.
Presently, when the rampaging duck catches the player, nothing happens. This is because
we have not set up an event handler for when a sprite of kind Player overlaps with
a sprite of kind Enemy. In this step we will do exactly that, ending the game.
The completed code is provided after the animated image.
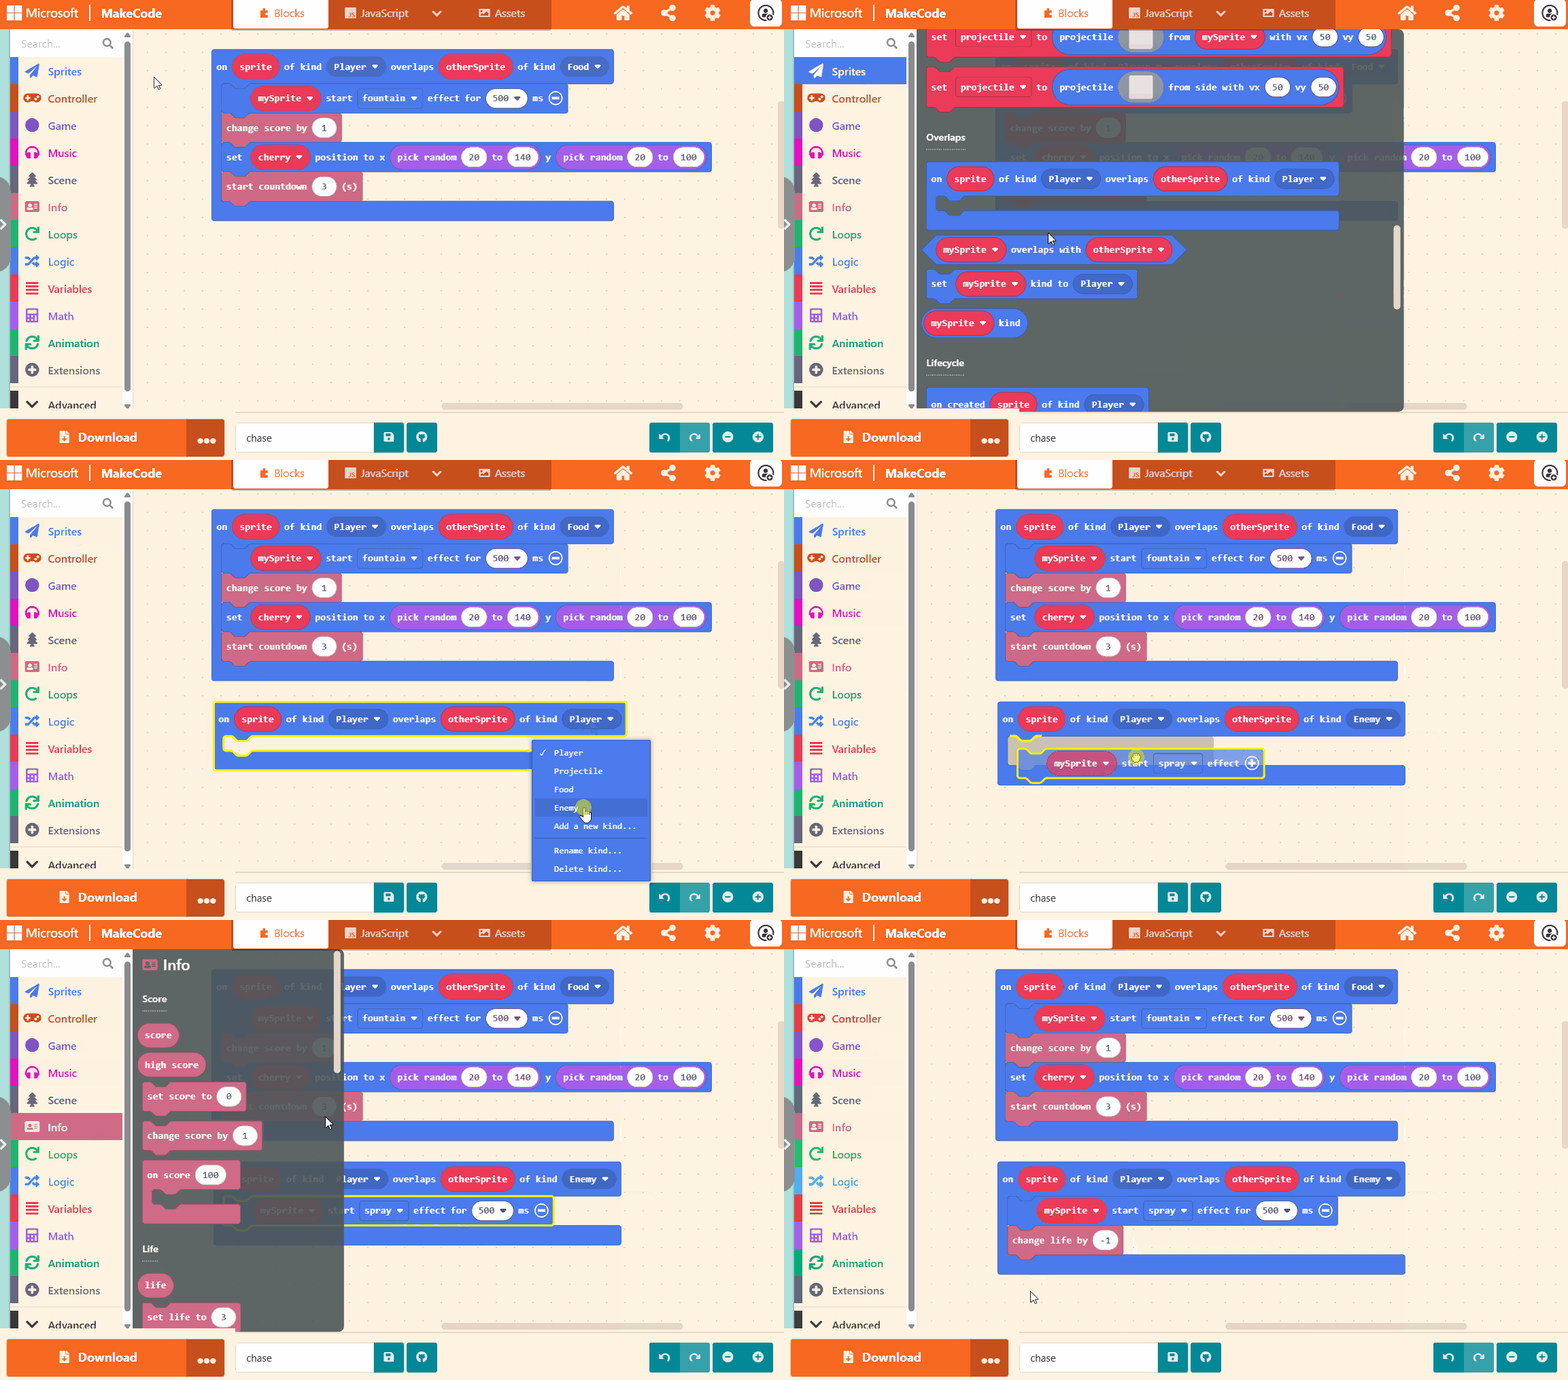
The completed code (newly added code is surrounded by the red box):

Step 8 – More colourful backgrounds
The completed code for this step is available here.
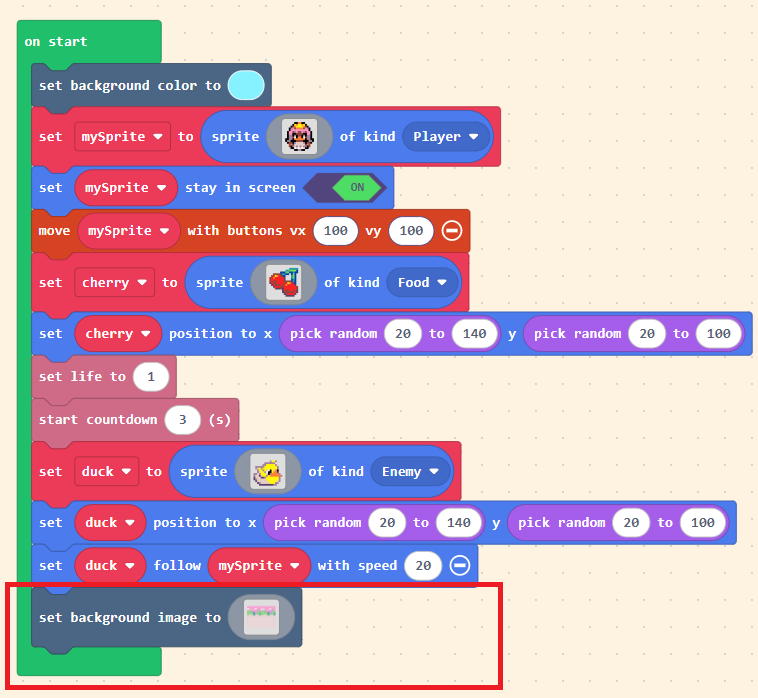
The final finishing touch to complete our game is to choose a background for the game. As with previous steps, an image can be selected from the Gallery or can be drawn. As this is a background image, it should be 160 pixels wide by 120 pixels high.
The completed code is provided after the animated image.
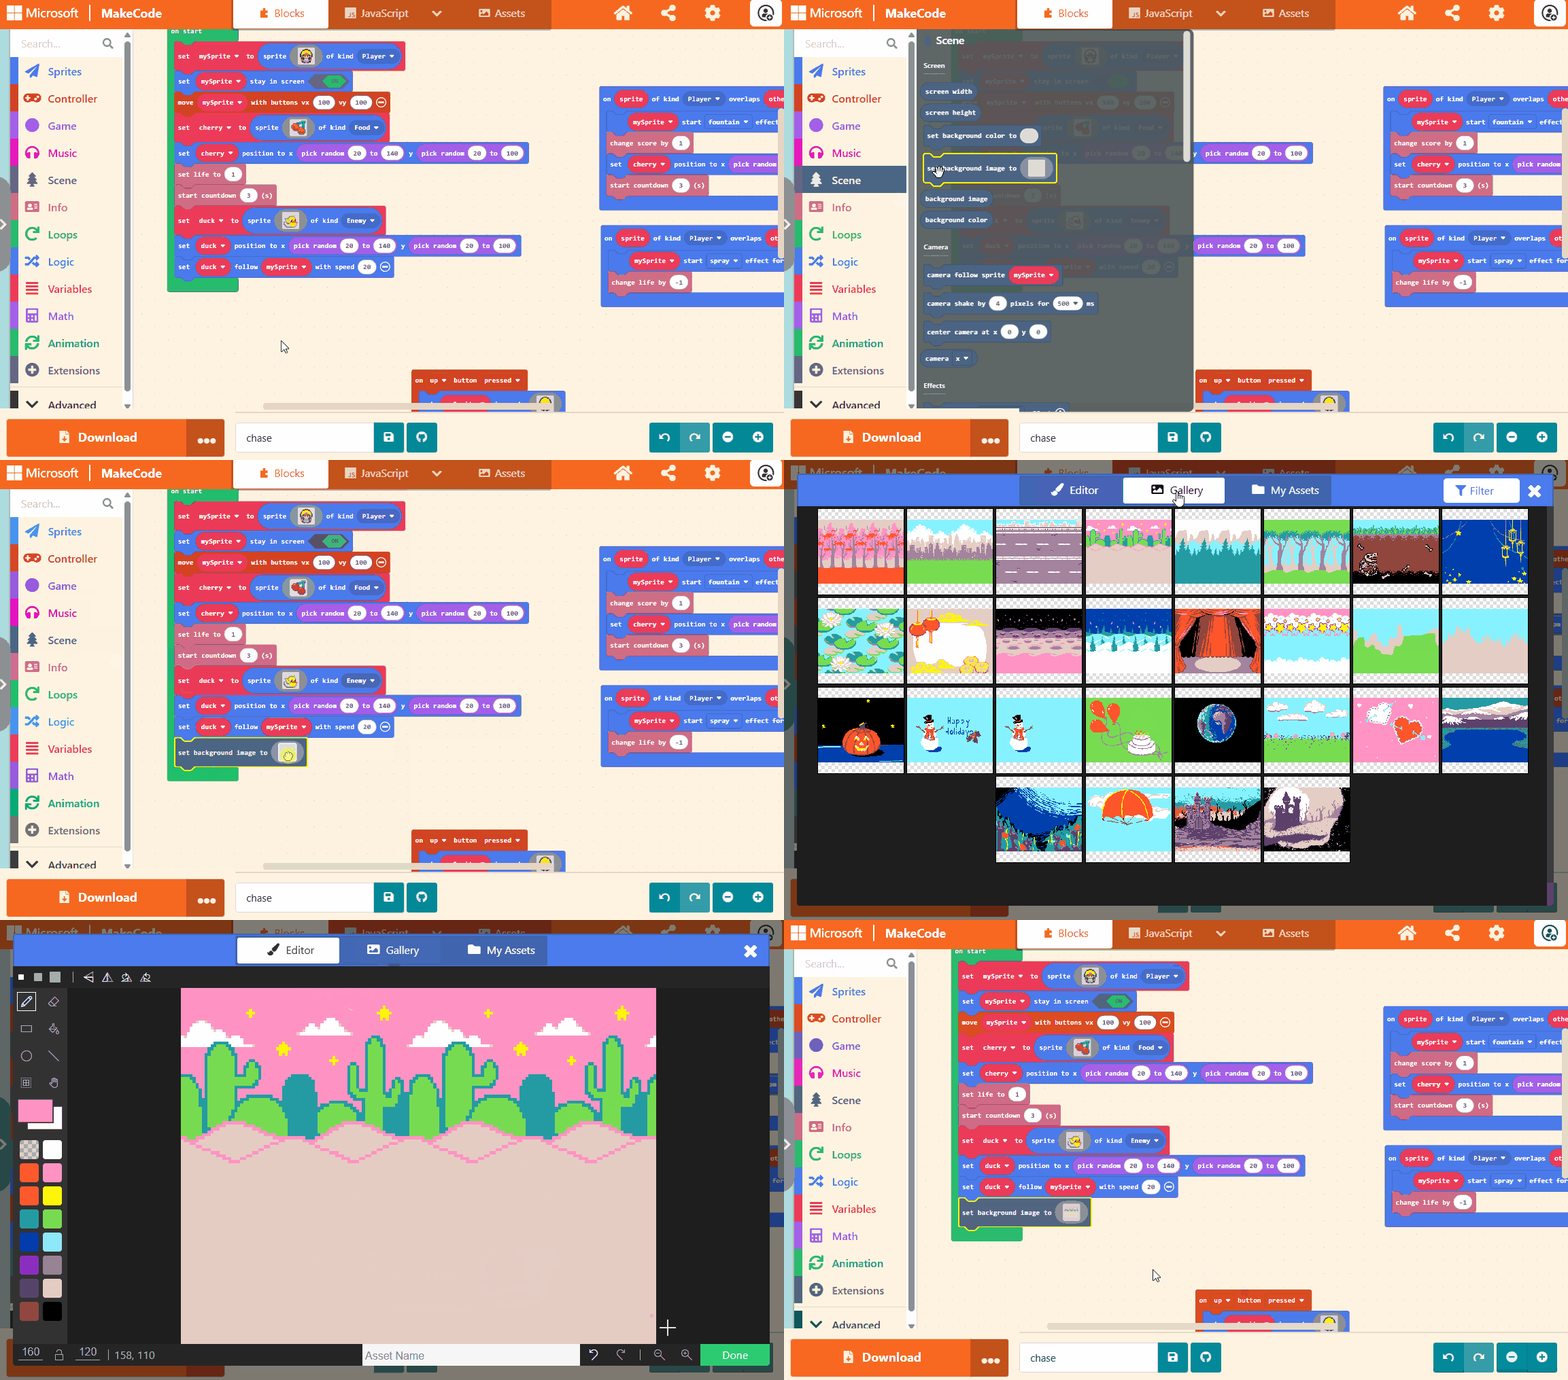
The completed code (newly added code is surrounded by the red box):
Step 9 - Download the game to your device
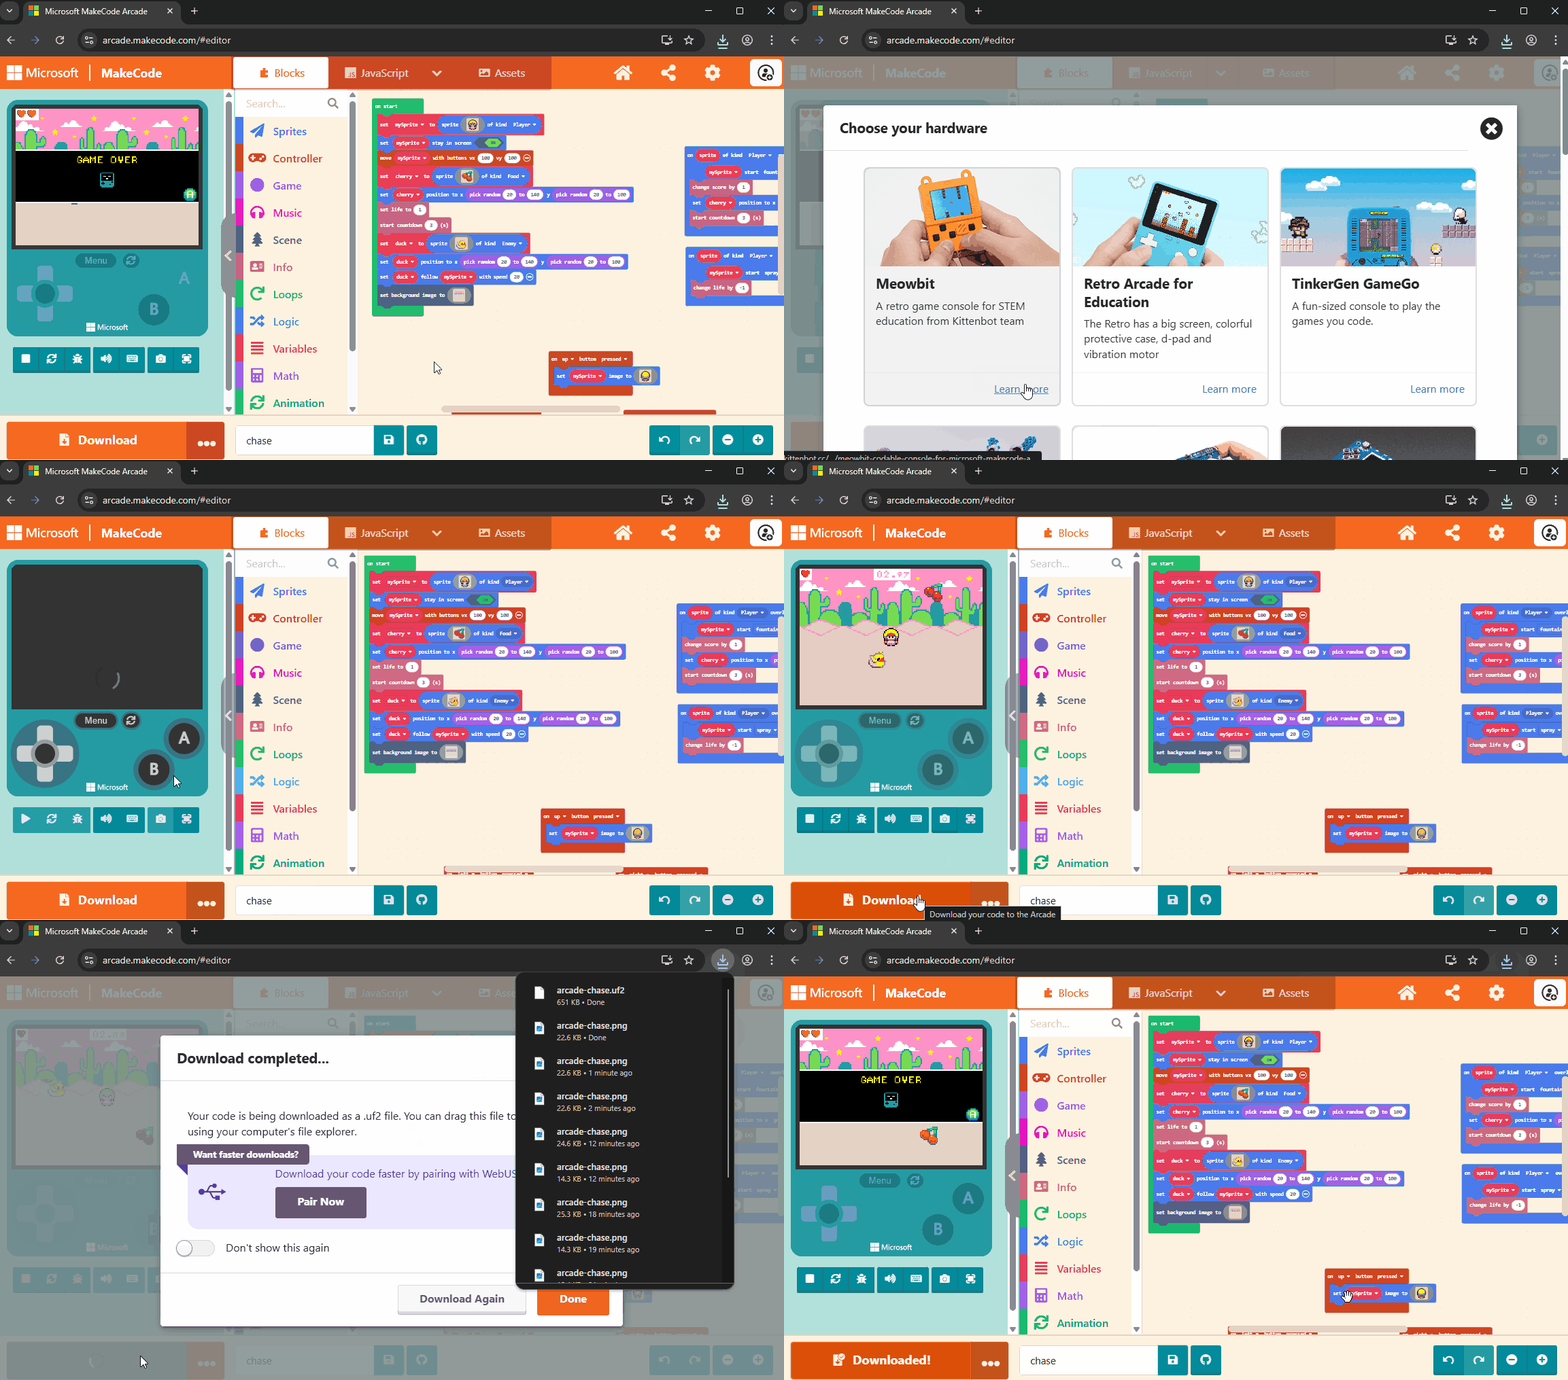
One of the greatest features of the MakeCode Arcade platform is that you
can download your games onto physical hardware. This is really easy to do.
You will use MakeCode Arcade to create a uf2 file specific for your device
which you can then drag onto your device when it is connected via USB to
flash your console. The steps to follow are:
- Select the correct hardware for your device.
- Click Download, which will create and download the
uf2file. - Connect your device to the computers usb port.
- Drag the
uf2file onto your device using Windows Explorer (other platforms vary).
Step 10 - Saving your game
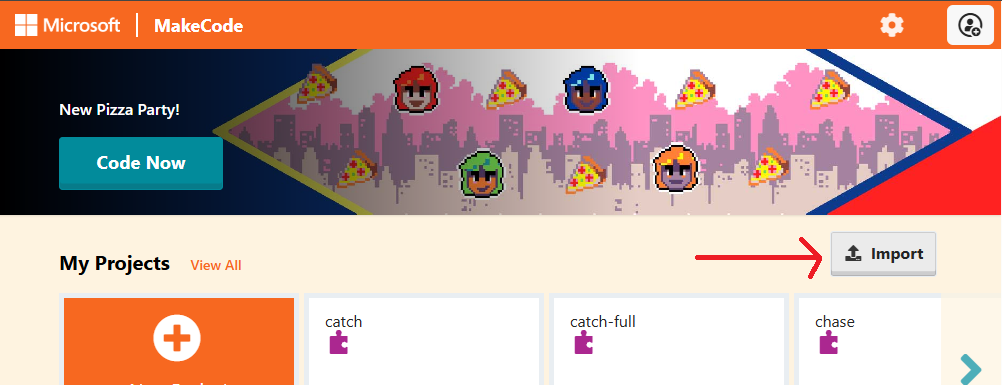
All MakeCode Arcade games are stored in your browsers cache. This is great and makes them easily accessible if you want to go back to them. However, this does not work in all cases. If you clear your browser cache or use a shared computer then you can lose or have your programs modified by other people. It is advised to save your program to a safe location so it can be imported at a later date. Importing is easy and done on the MakeCode Arcade home screen:
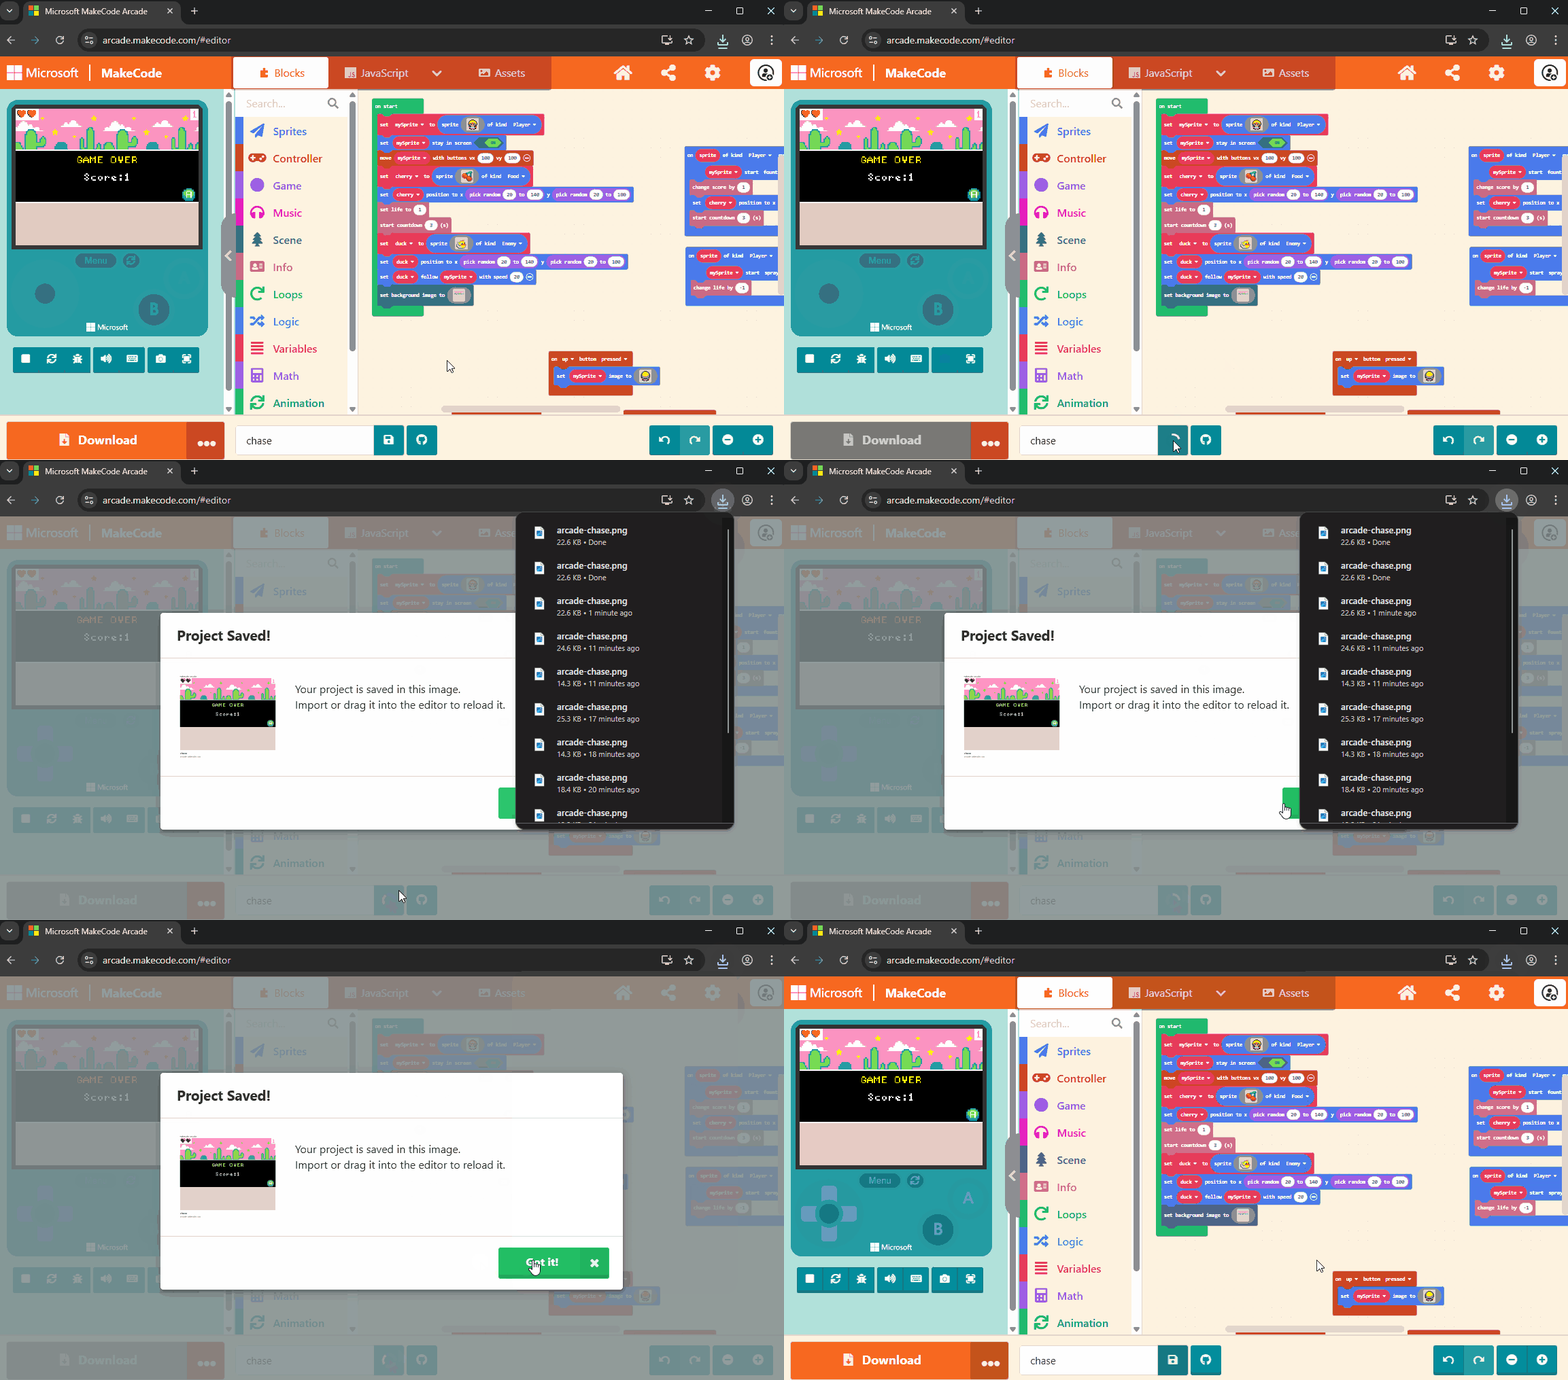
Saving your game as a uf2 file for your device produces a file specific to the
device that you are using. There is another way to save your game which does so
as a png (Portable Network Graphic) file. A png file is a picture but with your
code embedded inside. This can be saved to a safe place or shared with friends.
Extending the game
Add background music
All good arcade games should have a catchy tune that plays in the background Explore the MakeCode Arcade palette and find the block needed to play background music. Add this to your game.
Add sound effects
As well as background music, the game can be greatly enhanced with sound effects. Explore the MakeCode Arcade palette and find the blocks that cna be used to play sound effects when the player collects food or is caught by the rampaging duck.
Challenges
Award the player a new life after each 20 points scored. Adding this enhancement will mean the game does not necessarily end when the rampaging duck catches the player. This means the duck will need to be moved to a new random location after catching the player. For a tip on how to do this, take a look at step 5 in Catch.
Addendum
The completed code for this game is available here.
Original alpha quality instructions can be found here.