Christmas Tree - CircuitPython version
The completed code for this project: code.py.
This is a modification of the MakeCode Maker Christmas Tree instructions but using CircuitPython rather than MakeCode Maker. The primary difference is that this version of the materials uses two additional pins to allow for control of the white star LED and a buzzer.
For this project I also used the more powerful Pimoroni Tiny 2350 microcontroller rather than the Tiny 2040 microcontroller used with the MakeCode Maker Christmas Tree, simply because I had lots of them readily available. Either microcontroller will work equally well and the instructions are identical; just make sure you install the correct variant of CircuitPython for the microcontroller you use.
It is recommended to use either Thonny or the online Viper IDE to do this project.
Project overview
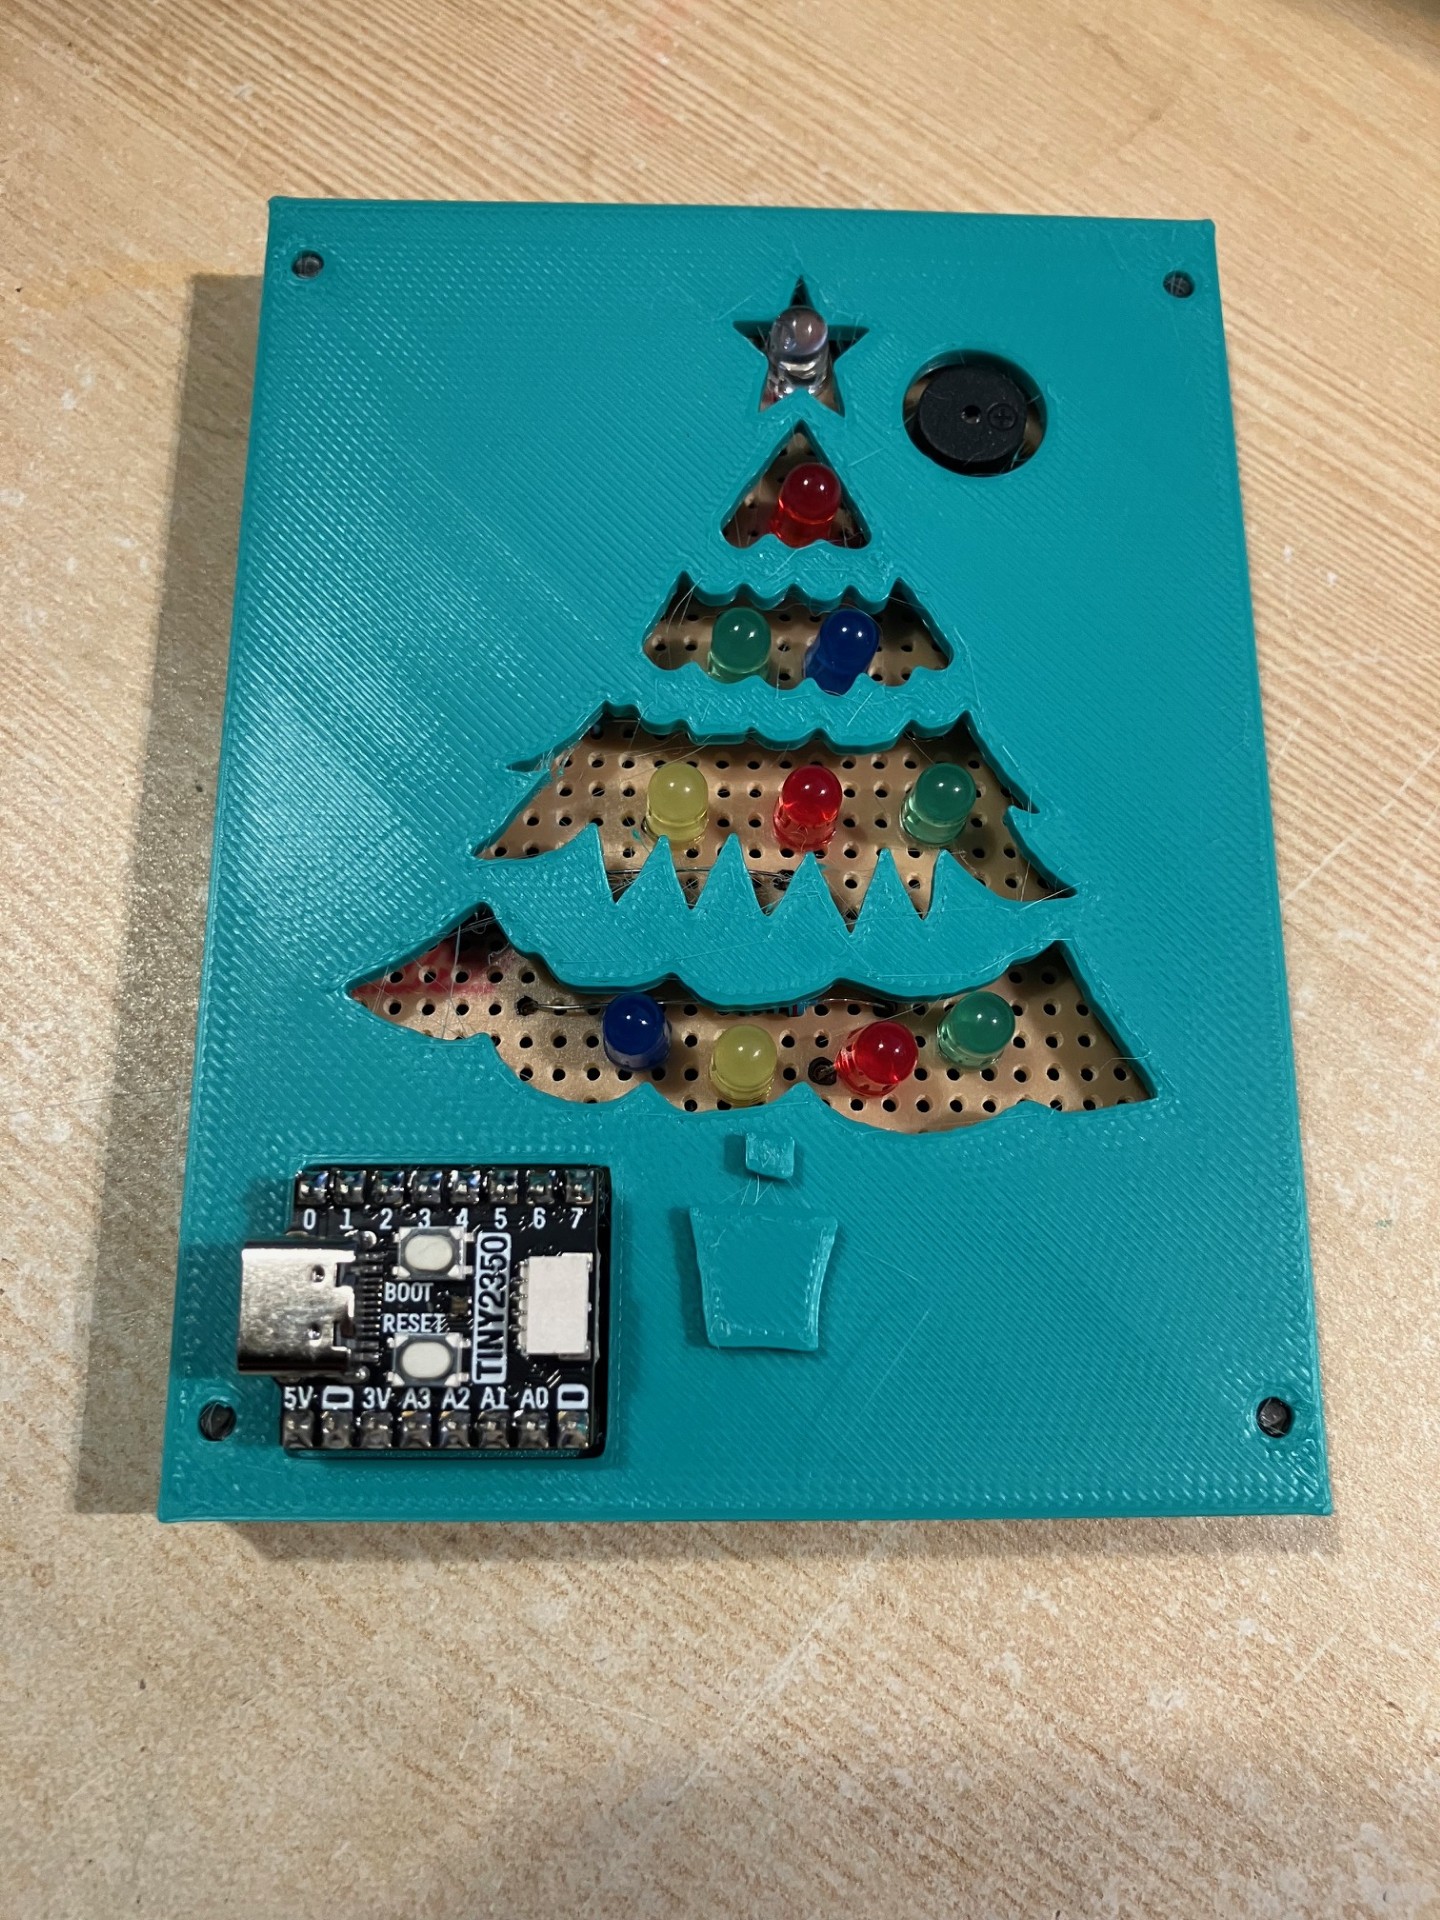
The layout of the LEDs on the Christmas Tree is as follows:
| Layer | Colour, Pin | Colour, Pin | Colour, Pin | Colour, Pin |
|---|---|---|---|---|
| Buzzer | Black, A3 |
|||
| Star | White, A2/GP28 |
|||
| Top row | Red, GP2 |
|||
| Second row | Green, GP1 |
Blue, GP4 |
||
| Third row | Yellow, A1/GP27 |
Red, GP3 |
Green, GP6 |
|
| Bottom row | Blue, GP0 |
Yellow, A0/GP26 |
Red, GP5 |
Green, GP7 |
Step 1 - Prepare the microcontroller with CircuitPython
This project is built using CircuitPython and the cptkip
library. This project has been built using version 0.1.0 of
cptkip.
The directory CircuitPython in the cptkip project
contains the binaries for CircuitPython for the microcontrollers which have been tested as
compatible with cptkip. Use the appropriate binary
to install CircuitPython on your microcontroller.
Bundled with the CircuitPython binaries is a lib directory which contains the dependencies
of the cptkip library. Copy the contents of that lib
directory into the lib directory of the microcontroller.
Copy the cptkip directory from
cptkip to the root directory of the microcontroller.
Copy the config.py file to the root directory
of the microcontroller. This config.py file
has been setup for a Pimoroni Tiny 2040 or Tiny 2350 microcontroller based on the wiring
diagram for this project. If you have a different microcontroller or are using a different wiring
arrangement, you will need to adjust the contents of the config.py file to match.
Copy the examples directory from
cptkip to the root directory of the microcontroller.
Use Thonny or the online Viper IDE to test the
examples. If the microcontroller has been setup correctly and the settings in config.py) are
correct, the examples should run without error. Good examples to test are:
examples/b_config_load_values.pyexamples/f_device_button.pyexamples/f_device_buzzer.pyexamples/f_device_led_blink.pyexamples/f_device_play_melody.py
Step 2 - Blink an individual LED
The cptkip library provides a range of classes that
simplifies creating visual effects and interactions with LEDs, buzzers and buttons; allowing
the user to concentrate of creating nice visual effects instead. This project will introduce
a number of these effects, starting with blinking an LED. The LED that we will blink is the
red LED in the top row which is connected to the board.GP2 pin.
Modify the code in the code.py file so it reads as follows and then execute it. The red
LED should blink.
import board
from adafruit_led_animation.animation.blink import Blink

import cptkip.device.led as device
import cptkip.pin.pwm_pin as pin
import cptkip.task.basic_runner_async as runner
import cptkip.task.periodic_task_async as periodic_task

BRIGHTNESS = (128, 128, 128)

pinGP2 = pin.PwmPin(board.GP2)
ledGP2 = device.Led(pinGP2)
animationGP2 = Blink(ledGP2, speed=1/2, color=BRIGHTNESS)

# Step 3 Flicker code goes here.

# Step 4 Pulse code goes here.

# Step 5 Sparkle code goes here.

async def animate() -> None:
    animationGP2.animate()

animate_task = periodic_task.create(animate)

# Step 6 Chase code goes here.

# Step 7 Melody code goes here.

# Step 8 Button code goes here.

runner.run([animate_task])
How does it work?
In this code, we are using cptkip library to
treat the GP2 pin as an LED. This is done in two steps:
- Treating the pin as a
PwmPinpin (Pulse Width Modulation or PWM). This allows the underlying library code to adjust the brightness. - Wrapping the pin in an
Ledclass that allows us to turn the LED on and off.
The Led class is designed to allow the LED to be used with CircuitPython animations.
These are mostly exposed through adafruit_led_animation and in this case the Blink
animation is used. Animations generally have a speed parameter. In the case of Blink
this parameter determines how quickly the animation will blink. A speed of 1/2 means
the LED will blink on an off every half-second.
The animations are originally designed to work with NeoPixels which can change colour.
All animations will have a colour parameter and this is used to control the colour
and adjust the colour of the relevant strand of NeoPixels. NeoPixels have their colour
specified as a (Red, Green, Blue) triplet. Because LEDs have a fixed colour, the
color parameter instead represents the brightness of the LED. Each of the three values
in the triplet can have a value from 0 (off) to 255 (maximum). In this case, we are using
128 for each 3 values and this translates to the LED brightness of approximately half.
For the animations to work, the animate() method needs to be called regularly (many times
per second). This can easily be done in a loop when there only a small number of LEDs
to animate. This gets more complicated however when your program has lots of devices, buzzers
and buttons all working at the same time. The cptkip
library provides a simple way to run multiple tasks at the same time for us using
asynchronous (async) functions. In this example we create an animate_task that will
call our animate() function repeatedly. Our animate() function will then call the
animate() method on the Blink animation, making it blink.
Experiment: Change the blink speed
Modify the Blink animation to make the red LED blink at different speeds and observe
what happens. Good values to try are:
- 1/16
- 1/8
- 2
Experiment: Make the LED brighter
Adjust the BRIGHTNESS variable and observe what happens. Good examples to try are:
- (2, 2, 2)
- (64, 64, 64)
- (255, 255, 255)
Step 3 - Make an LED flicker
In this step we are going to make the green LED on the left of the second row flicker.
This LED is connected to the microcontroller pin board.GP1. The animation that we will
be using is one provided by the cptkip library
and called Flicker. The code follows a similar pattern to that used to make the red
LED blink.
Add the following code to your program in the location indicated by the comment.
from cptkip.animation.flicker import Flicker

pinGP1 = pin.PwmPin(board.GP1)
ledGP1 = device.Led(pinGP1)
animationGP1 = Flicker(ledGP1, speed=1/20, color=BRIGHTNESS)
To keep the code simpler, rather than create an additional task to animate the flicker,
we will modify the existing animate() function to also animate the flickering green LED.
Change your existing animate() function to call animationGP1.animate(). It should look
like the code below.
async def animate() -> None:
    animationGP2.animate()
    animationGP1.animate()
Experiment: Change the flicker speed
Modify the Flicker animation to make the green LED flicker at different speeds and
observe what happens. Good values to try are:
- 1
- 1/2
- 1/10
- 1/50
- 1/100
Extension: Make another LED flicker
Using what you have learnt about Flicker, modify your code to make the blue
LED on the second row flicker. The blue LED is on pin board.GP4.
Hint 1: animationGP3 = Flicker(ledGP4, speed=1 / 40, color=BRIGHTNESS)
Hint 2: Remember to add the call to animationGP4.animate() in the animate() function.
There are an additional two parameters that can be specified to Flicker. Each takes a
value of between 0 and 255. The total of the two values should not exceed 255. These
two parameters are base (default value 150) and flame (default value 105). The flicker
effect is created by adding a randomly generated number between 0 and flame to base.
Experiment with different values for these and observe what happens. Good examples to
try are:
- 0 and 255
- 50 and 205
- 100 and 155
- 150 and 105
- 200 and 55
- 250 and 5
If you are stuck and don't know how to do this, scroll to the end of the page for the solution.
Step 4 - Make an LED pulse
In this step we are going to make the yellow LED on the left of the third row pulse.
This LED is connected to the microcontroller pin board.GP27. The animation that we
will be using is one provided by the Adafruit animation library for CircuitPython and
is called Pulse. The code follows a similar pattern to that used to make the red
LED blink and green LED flicker.
Add the following code to your program in the location indicated by the comment.
from adafruit_led_animation.animation.pulse import Pulse

pinGP27 = pin.PwmPin(board.GP27)
ledGP27 = device.Led(pinGP27)
animationGP27 = Pulse(ledGP27, speed=1/100, period=2, color=BRIGHTNESS)
As before, we are going to keep things simple and modify your existing animate()
function to call animationGP27.animate(). Your animate() function should look
like the code below.
async def animate() -> None:
    animationGP2.animate()
    animationGP1.animate()
    animationGP4.animate()
    animationGP27.animate()
Experiment: Change the pulse speed
Modify the Pulse animation to make the yellow LED pulse at different speeds
and observe what happens. Good values to try are:
- 1/4
- 1/10
- 1/20
- 2
Experiment: Change the pulse duration
Modify the Pulse animation to change the length of time (the period parameter) the
yellow LED takes to pulse and observe what happens. Good values to try are:
- 1/4
- 1/2
- 1
- 5
Extension: Make the red and green LEDs pulse
Use the knowledge that you have gained from this step to make the other two LEDs
in the third row pulse. The red LED is on pin board.GP3 and the green pin is
on board.GP6.
If you are stuck and don't know how to do this, scroll to the end of the page for the solution.
Step 5 - Make the star sparkle
Whilst there is a Sparkle animation available in CircuitPython, it can't be used
with an Led instance because Sparkle requires at least two elements to function
and Led only supports a single LED. We can however do a good approximation of a
sparkle effect by turning the LED on and off quickly. We can do this without the
need of PWM and can therefore simply create an OutputPin which can be turned on
and off by changing it's value property. The star is on pin board.GP28.
Add the following code to your program in the location indicated by the comment.
import cptkip.pin.output_pin as outputpin
ledGP28 = outputpin.OutputPin(board.GP28)
As before, we are going to keep things simple and modify your existing animate()
function to switch the LED on and off quickly. Your animate() function should look
like the code below.
async def animate() -> None:
    animationGP2.animate()
    animationGP1.animate()
    animationGP4.animate()
    animationGP27.animate()
    animationGP3.animate()
    animationGP6.animate()
    ledGP28.value = not ledGP28.value
Step 6 - Make the bottom row chase
Using the same technique for controlling an LED using OutputPin, this step will
animate the bottom row of four LEDs into a chase pattern. The LEDs are connected
to the following pins: Blue: board.GP0, Yellow: board.GP26, Red: board.GP5
and Green: board.GP7. To make the chase effect work, we will be tracking which
LED is currently lit and then moving it to the right, one LED at a time. To make
the chase effect work the way we want, we don't want to execute this logic as
fast as possible as we have done with the other animate methods we've used. We
want the logic to execute at a pre-determined rate to give us the speed of chase
we desire. To achieve this we will create a new task with the logic and get the
cptkip library to execute it at our
desired rate.
Add the following code to your program in the location indicated by the comment.
ledGP0 = outputpin.OutputPin(board.GP0)
ledGP26 = outputpin.OutputPin(board.GP26)
ledGP5 = outputpin.OutputPin(board.GP5)
ledGP7 = outputpin.OutputPin(board.GP7)

led = 0

async def chase() -> None:
    global led
    ledGP0.off()
    ledGP26.off()
    ledGP5.off()
    ledGP7.off()
    if led == 0:
        ledGP0.on()
        led = 1
    elif led == 1:
        ledGP26.on()
        led = 2
    elif led == 2:
        ledGP5.on()
        led = 3
    else:
        ledGP7.on()
        led = 0

chase_task = periodic_task.create(chase, frequency=3)
If you run your program now, the LEDs wont chase. The reason for this is that
even though we have created the task, we have not told the
cptkip runner about it. To do so, modify
the runner statement at the end of your program to also execute the chase_task.
It should now look like the code below.
runner.run([animate_task, chase_task])
Extension: Change the speed of the chase
The speed of the chase effect is controlled by the frequency (rate) at which the
logic in the chase function is called. This frequency is controlled by the
value of the frequency parameter specified when creating the chase_task task.
Experiment with different values for these and observe what happens. Good
examples to try are:
- 1/2
- 1
- 16
- 64
Experiment: Reverse the chase
Currently, the direction of the chase is from left to right. Can you make it chase from right to left instead?
Experiment: Bounce the chase
Currently, the chase pattern goes from one side to the other and then goes back to the start to chase again. Can you change the code so it instead reverses direction? That is, the chase goes from left to right, then when it reaches the rightmost LED it reverses direction and goes from right to left.
Step 7 - Playing sounds with the buzzer
What better way to jazz up your Christmas Tree than to have it play music! Luckily,
the cptkip library makes this really easy
by using the Melody class to generate tones which we can then play through a buzzer.
So how are melodies specified? A song is list of notes that specify both the note and duration. Each note can optionally also specify the Octave. If no octave is specified, then the octave will be the last octave set by a previous note or 4 if it is the first note in the melody. The duration is the number of beats the note should last for. An example of a simple C scale is:
scale = [
    "C4:1", "D:1", "E:1", "F:1", "G:1", "A:1", "B:1", "C5:1",
    "B4:1", "A:1", "G:1", "F:1", "E:1", "D:1", "C:1"]
Sharps and Flats can be specified using #, S, F or B respectively. For example:
song = ["C#3:4", "FS7:2", "Eb3:1", "AF1:1"]
As with the previous step, we will create a new task to play the Melody.
Add the following code to your program in the location indicated by the comment.
import cptkip.pin.buzzer_pin as buzzerpin
import cptkip.device.melody as melody

buzzer = buzzerpin.BuzzerPin(board.GP29)
buzzer.volume = 0.1

jingle_bells = [
    "E4:2", "E:2", "E:4", "E:2", "E:2", "E:4",
    "E:2", "G:2", "C:2", "D:2", "E:8",
    "F:2", "F:2", "F:2", "F:2", "F:2", "E:2", "E:2", "E:1", "E:1",
    "E:2", "D:2", "D:2", "E:2", "D:4", "G:2", "R:2",
    "E:2", "E:2", "E:4", "E:2", "E:2", "E:4",
    "E:2", "G:2", "C:2", "D:2", "E:8",
    "F:2", "F:2", "F:2", "F:2", "F:2", "E:2", "E:2", "E:1", "E:1",
    "G:2", "G:2", "F:2", "D:2", "C:8",
    "R:8"]

song = melody.Melody(buzzer, melody.decode_melody(jingle_bells), 480)

async def play_music() -> None:
    song.update()

music_task = periodic_task.create(play_music)
As in the previous step modify the runner statement at the end of your program
to also execute the music_task. It should now look like the code below.
runner.run([animate_task, chase_task, music_task])
Experiment: Adjust the music volume
The volume of the music is controlled by the volume specified for the buzzer. The
value is currently specified as 0.1. The value can be anything from 0 (off) to
1 (maximum). Experiment with different values for these and observe what happens.
Good examples to try are:
- 0
- 0.5
- 1.0
Experiment: Adjust the music tempo
The temp (speed) the music is played is controlled by the tempo specified when creating
the Melody. The value is current specified as 480. Experiment with different values
and observe what happens. Good examples to try are:
- 80
- 240
- 1480
Experiment: Change the song
There is no reason to stick with Jingle Bells. Experiment with changing the song. Either create your own or use one of the following pre-arranged songs.
Song: Rudolph the red nosed reindeer
rudolph = [
    "G4:1", "A:2", "G:1", "E:2", "C5:2", "A4:2", "G:6",
    "G:1", "A:1", "G:1", "A:1", "G:2", "C5:2", "B4:8",
    "F:1", "G:2", "F:1", "D:2", "B:2", "A:2", "G:6",
    "G:1", "A:1", "G:1", "A:1", "G:2", "A:2", "E:8",
    "G:1", "A:2", "G:1", "E:2", "C5:2", "A4:2", "G:6",
    "G:1", "A:1", "G:1", "A:1", "G:2", "C5:2", "B4:8",

    "F:1", "G:2", "F:1", "D:2", "B:2", "A:2", "G:6",
    "G:1", "A:1", "G:1", "A:1", "G:2", "D5:2", "C:8",
    "A4:2", "A:2", "C5:2", "A4:2", "G:2", "E:2", "G:4",
    "F:2", "A:2", "G:2", "F:2", "E:8",
    "D:2", "E:2", "G:2", "A:2", "B:2", "B:2", "B:4",
    "D5:2", "C:2", "B4:2", "A:2", "G:2", "F:2", "D:4",

    "G:1", "A:2", "G:1", "E:2", "C5:2", "A4:2", "G:6",
    "G:1", "A:1", "G:1", "A:1", "G:2", "C5:2", "B4:8",
    "F:1", "G:2", "F:1", "D:2", "B:2", "A:2", "G:6",
    "G:1", "A:1", "G:1", "A:1", "G:2", "D5:2", "C:8",
    "R:8"]
Song: When Santa got stuck up the chimney
santa = [
    "G4:1",
    "C:1", "C:1", "D:1", "E:1", "E:1", "F:1", "G:3", "C5:3",
    "A4:2", "G:1", "F:2", "A:1", "G:3", "R:2", "G:1",

    "C5:2", "C:1", "B4:2", "B:1", "A:1", "A:1", "A:1", "G:2", "G:1",
    "E:2", "E:1", "D:2", "C:1", "G:3", "R:2", "G:1",

    "C5:2", "C:1", "B4:2", "B:1", "A:1", "A:1", "A:1", "G:2", "G:1",
    "E:2", "E:1", "G:1", "F:1", "E:1", "D:3", "R:2", "G:1",

    "C:1", "C:1", "D:1", "E:1", "E:1", "F:1", "G:3", "C5:2", "A4:1",
    "G:2", "C5:1", "B4:2", "D5:1", "C:7",

    "R:8"]
Song: We wish you a Merry Christmas
merry_christmas = [
    "D4:2",
    "G:2", "G:1", "A:1", "G:1", "F:1", "E:2", "C:2", "E:2",
    "A:2", "A:1", "B:1", "A:1", "G:1", "F:2", "D:2", "F:2",
    "B:2", "B:1", "C5:1", "B4:1", "A:1", "G:2", "E:2", "D:1", "D:1",
    "E:2", "A:2", "F:2", "G:4", "D:2",
    "G:2", "G:2", "G:2", "F:4", "F:2",
    "G:2", "F:2", "E:2", "D:4", "A:2",
    "B:2", "A:1", "A:1", "G:1", "G:1", "D5:2", "D4:2", "D:1", "D:1",
    "E:2", "A:2", "F:2", "G:4", "R:2",
    "R:4"]
Step 8 - Button presses
The Pimoroni Tiny microcontrollers have two buttons on them. One is called Reset and this
reboots the microcontroller. The other button is called Boot and this can be used by
your own CircuitPython code. In this step, we are going to add a click handler to the Boot
button which will pause and resume the song.
Add the following code to your program in the location indicated by the comment.
def click_handler() -> None:
    if song.paused:
        song.resume()
    else:
        song.pause()

import cptkip.pin.input_pin as inputpin
from cptkip.device.button import Button

input_pin = inputpin.InputPin(board.BUTTON, False)
button = Button(input_pin, click=click_handler)
To make the button "work" and respond to button presses, we need to call the
button.update() method from a task. As this button is to pause and resume the currently
playing song, we will add the call to the existing play_music() function. Modify your
play_music() function so that it matches that below.
async def play_music() -> None:
    song.update()
    button.update()
Extension: Cycling through multiple songs
The cptkip library provides a way to chain songs together in a sequence and it will play each of them in turn. Using the 4 songs from step 7, we can chain them together. There are several steps to achieve this.
Step 8a: Replace song with melody_sequence
Remove this code that creates the song.
song = melody.Melody(buzzer, melody.decode_melody(jingle_bells), 480)
Add in this code that creates the melody_sequence. This should be placed in the
same place that song was removed from.
melody_sequence = melody.MelodySequence(
    melody.Melody(buzzer, melody.decode_melody(santa), 480),
    melody.Melody(buzzer, melody.decode_melody(rudolph), 480),
    melody.Melody(buzzer, melody.decode_melody(merry_christmas), 480),
    melody.Melody(buzzer, melody.decode_melody(jingle_bells), 480))
Step 8b: Replace song.update() with melody_sequence.update()
The play_music() function currently calls song.update() as below.
async def play_music() -> None:
    song.update()
    button.update()
Replace the call to song.update() with melody_sequence.update() as in the
code below.
async def play_music() -> None:
    melody_sequence.update()
    button.update()
Step 8c: Replace click_handler()
The existing click_handler() interacts with song which has now been deleted.
Replace the click_handler() code with a new click_handler() like the one below.
def click_handler() -> None:
    if melody_sequence.paused:
        melody_sequence.resume()
    else:
        melody_sequence.pause()
Now you program should cycle through the different songs.
Making the Christmas Trees
Making the Christmas Trees is very similar to the MakeCode Maker
version of these materials except the White LED is not connected to 3V3 but
A2/GP28 pin instead. There is also a small buzzer which is connected to A2/
GP29. The reason those pins are not used in the MakeCode Maker variant of the
Christmas Tree is because they are not accessible from that framework. For the
CircuitPython to work, you will need the following
config.py as well as
cptkip (this was tested with version 0.1.0).
This project will work equally well with either of the following microcontrollers:
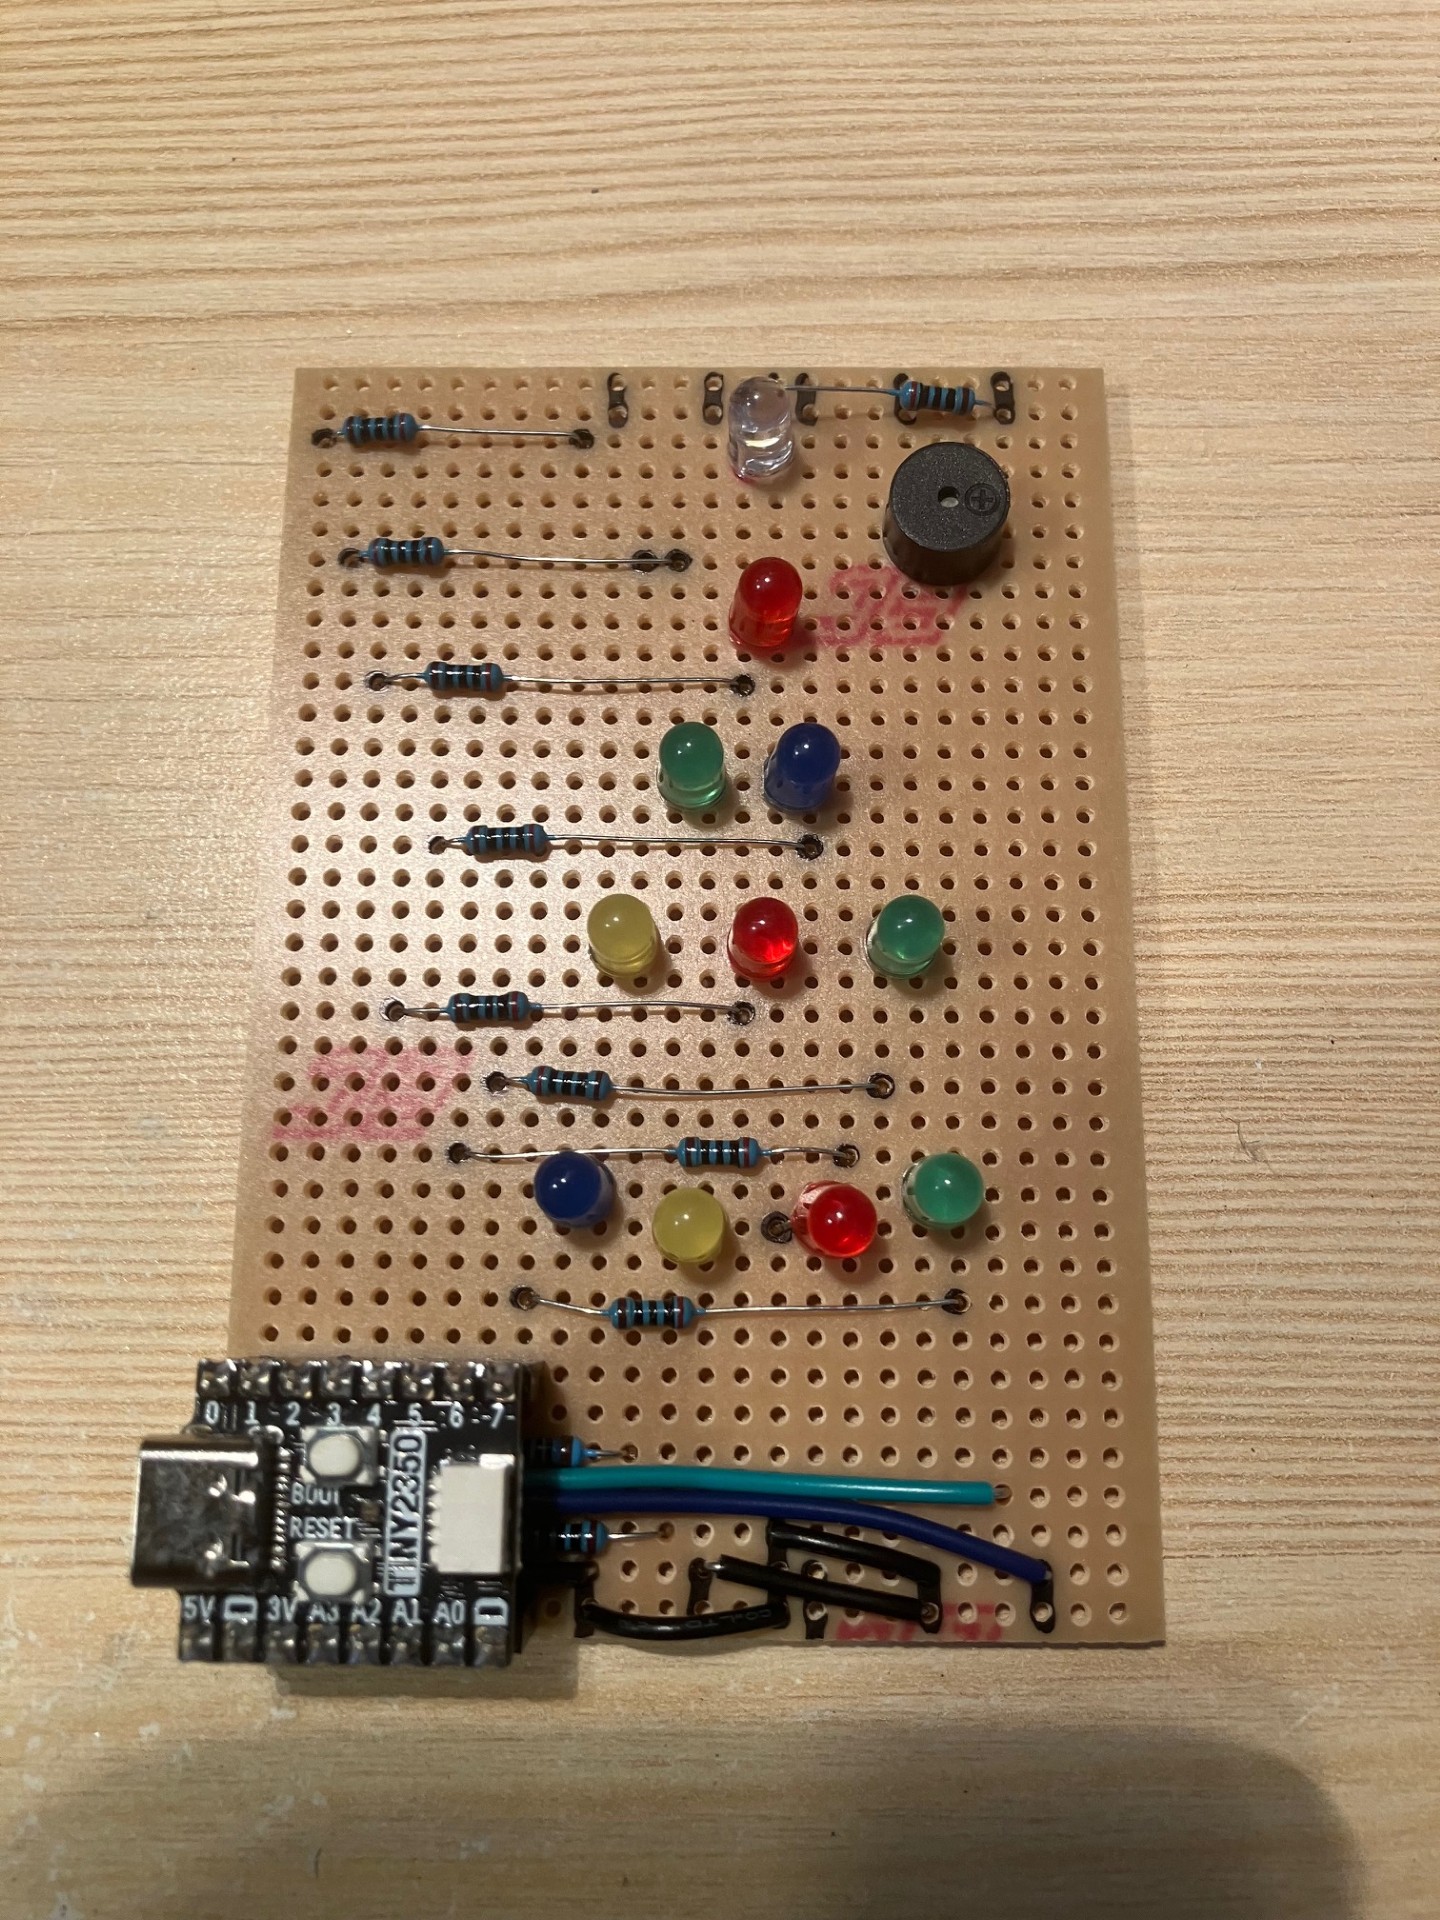
An image of the finished circuit board prior to assembly.
Solution: How to make the blue LED flicker
Here is the example code to help with the experiment in step 3.
pinGP4 = pin.PwmPin(board.GP4)
ledGP4 = device.Led(pinGP4)
animationGP4 = Flicker(ledGP4, speed=1 / 40, color=BRIGHTNESS, base=150, flame=105)
Remember to add the call to animationGP4.animate() in the animate() function.
async def animate() -> None:
    animationGP2.animate()
    animationGP1.animate()
    animationGP4.animate()
Solution: How to make the red and green LEDs pulse
Here is the example code to help with the experiment in step 4.
pinGP3 = pin.PwmPin(board.GP3)
ledGP3 = device.Led(pinGP3)
animationGP3 = Pulse(ledGP3, speed=1/100, period=1/4, color=BRIGHTNESS)

pinGP6 = pin.PwmPin(board.GP6)
ledGP6 = device.Led(pinGP6)
animationGP6 = Pulse(ledGP6, speed=1/100, period=5, color=BRIGHTNESS)
Remember to add the calls to animationGP3.animate() and
animationGP6.animate()in the animate() function.
async def animate() -> None:
    animationGP2.animate()
    animationGP1.animate()
    animationGP4.animate()
    animationGP27.animate()
    animationGP3.animate()
    animationGP6.animate()