Aliens
These instructions will take you through the steps of creating a game that uses the 1979 game Galaxian and the 1981 game Galaga as its inspiration. If you wish to try Galaga for yourself, a free to play modern interpretation has been made available online by Jason Cirillo and is available at freegalaga.com. If you wish to see what the original version looks like, watch this video on YouTube.
The premise of the game is simple. You will control a spaceship along the bottom of the screen and you will need to destroy wave after wave of aliens. You will start with 3 lives and a new life will be awarded at 30,000 points, then another at 120,000 points and then each 120,000 points thereafter.

Learning points
These instructions Build on the techniques and concepts introduced in Muncher and Smash along with the following new concepts to build a general purpose game engine:
- Variable length arguments
- Lambda functions
The game engine you build in this project will form the basis of future projects in this module, enabling a focus on the gameplay mechanics and removing the need to keep adding boilerplate code.
These instructions are suitable if you were comfortable completing the Muncher and Smash projects and is about the size of Muncher and Smash combined.
Step 0: Create the project in Replit
Navigate to Replit and login.
To create a new Pygame app, select "Developer Frameworks" from the "Explore more" section of the left menu. Click the Create button to create a new project and select the Pygame template. Give it the title "Aliens" as illustrated by the screenshot below.
In the main.py file, replace the code provided with the code below and
run the program to make sure it can download the packages and runs. You
should be presented with a black screen that is 600 pixels wide and 700
pixels tall. If you are running this on a desktop computer, the window
will be placed at the location (700, 100) on the screen and is set by
the statement os.environ['SDL_VIDEO_WINDOW_POS'] = f'700,100'.
Everything else in this code should be familiar as it sets up Pygame
Zero, declares the screen, keyboard and clock variables and sets up
the draw() and update() functions in the same way as in
Muncher and Smash.
import os

os.environ['SDL_VIDEO_WINDOW_POS'] = f'700,100'

import pgzrun
from pgzero.clock import Clock
from pgzero.keyboard import Keyboard
from pgzero.screen import Screen

screen: Screen
keyboard: Keyboard
clock: Clock

WIDTH = 600
HEIGHT = 700

BLACK = (0, 0, 0)
RED = (255, 0, 0)
WHITE = (255, 255, 255)
CYAN = (0, 255, 255)
YELLOW = (255, 255, 0)

draw_funcs = []

def draw():
    screen.fill(BLACK)
    for draw_func in draw_funcs:
        draw_func(screen.draw)


update_funcs = []

def update(dt):
    for update_func in update_funcs:
        update_func(dt)

# Code for later steps will go here.

pgzrun.go()
Step 1: Adding support for game objects
The completed code for this step is available here.
In this step we are going to use a similar technique to that used for particle effects
in the Smash project but for a more general use case. We will introduce
a new class called GameObject that can be used to represent anything in the game
(more on that later). We will also create draw and update functions to hook the game
objects into the engine.
Every GameObject created will automatically be added to a new list called game_objects
so that we can keep track of all the game objects and automatically update and draw them.
A GameObject has the following properties and methods to provide a basic set of
functionality for all game objects:
activevisibledestroydraw()update()activated()deactivated()destroyed()
Place the following code before the call to pgzrun.go().
game_objects = []

class GameObject:
    def __init__(self, activate=True):
        self._active = not activate
        self.visible = True
        self.destroy = False
        game_objects.append(self)
        self.active = activate

    def draw(self, draw):
        pass

    def update(self, dt):
        pass

    @property
    def active(self):
        return self._active

    @active.setter
    def active(self, value):
        if self._active != value:
            self._active = value
            if value:
                self.activated()
            else:
                self.deactivated()

    def activated(self):
        pass

    def deactivated(self):
        pass

    def destroyed(self):
        pass
So what is a GameObject? A GameObject can be anything from a sprite representing
the player to the contents of a title screen. The purpose of a GameObject is to make
it simpler to add functionality to our game. Later, we will use it as the basis for
sprites, the player and aliens. When a GameObject is created, it is automatically
added to the game_objects list so it can be automatically updated and drawn. Some
of the GameObject behaviour is defined in the class itself and some of the behaviour
is defined in the draw and update methods that will be implemented shortly. The following
explains the details?
When active is set to True, the game object will have its activated() method
called. When active is set to False, the game object will have its deactivated()
method called.
When active is True, the game object will have its update() method called on
each update cycle. When False its update() method will not be called.
When active and visible are both True, the game object will have its draw()
method called on each draw cycle. When either is False its draw() method will
not be called.
When destroy is set to True, the game object will be removed from the game_objects
list and its destroy() method called on the next update cycle.
The code in the update() and draw() functions uses list comprehensions to select
the game objects to update, draw or destroy. This should be familiar to the list
comprehensions used in Smash. If you need a refresher, also see the
section on list comprehensions.
Place the following code before the call to pgzrun.go(). Run your game after you have
added the code to make sure it runs. There will be no visible difference at this point
so you should still get a black window.
Place the following code before the call to pgzrun.go() and after the GameObject
class you have just written. Run your game after you have added the code to make
sure it runs without errors. There will be no visible difference at this point
so you should still get a black window.
def draw_game_objects(draw):
    # Draw all active and visible game objects
    active_game_objects = [
        game_object for game_object in game_objects
        if game_object.active and game_object.visible
    ]

    for game_object in active_game_objects:
        game_object.draw(draw)


def update_game_objects(dt):
    # Update all active game objects
    global game_objects

    active_game_objects = [
        game_object for game_object in game_objects
        if game_object.active
    ]

    for game_object in active_game_objects:
        game_object.update(dt)

    # Remove any destroyed game objects
    game_objects_to_destroy = [
        game_object for game_object in game_objects
        if game_object.destroy
    ]

    game_objects = [
        game_object for game_object in game_objects
        if not game_object.destroy
    ]

    for destroyed_game_object in game_objects_to_destroy:
        destroyed_game_object.destroyed()


draw_funcs.append(draw_game_objects)
update_funcs.append(update_game_objects)
Step 2: Adding the starfield
The completed code for this step is available here.
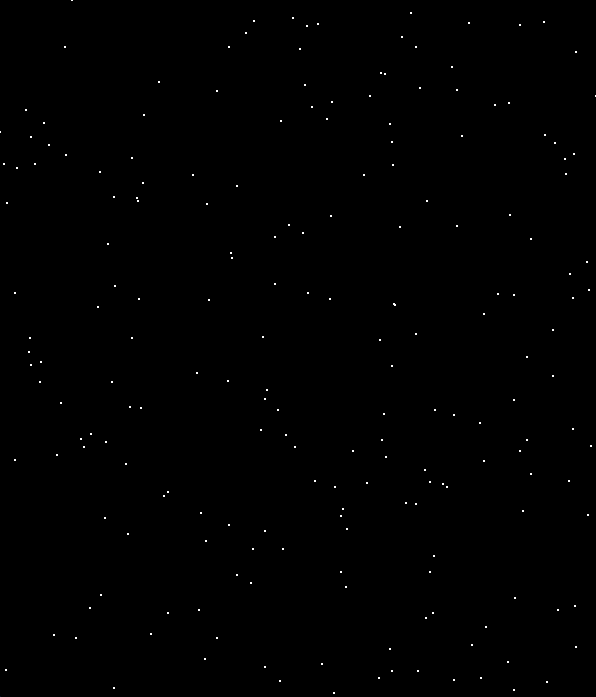
In this step we will create our first GameObject which will represent a starfield.
The starfield will be created with a specified number of stars (the default is 200)
spread across the screen, each with its own velocity. These stars will be drawn by
the draw() method.
The update() method will move each star downwards by its velocity. All stars that
"fall" off the bottom of the screen are removed and replaced with new stars at the
top of the screen but with random horizontal positions. This will create the effect
of a continuously moving starfield. As each star has its own velocity, a parallax
effect is created which adds depth to the starfield.
The starfield will look similar to the image below:
Place the following code before the call to pgzrun.go(). Run your game after you
have added the code to make sure it runs. You should see a moving starfield.
STARS_MIN_SPEED = 75
STARS_MAX_SPEED = 150
STARS_TOTAL = 200

from random import randint

class StarField(GameObject):

    def __init__(self, n):
        super().__init__()
        self.n = n
        self.stars = [
            (
                randint(0, WIDTH),  # x position
                randint(0, HEIGHT),  # y position
                randint(STARS_MIN_SPEED, STARS_MAX_SPEED)  # speed
            )
            for _ in range(n)
        ]

    def draw(self, draw):
        for star in self.stars:
            draw.filled_circle((star[0], star[1]), 1, WHITE)

    def update(self, dt):
        # STEP A: Move stars down the screen
        self.stars = [
            (
                star[0],  # x position
                star[1] + (star[2] * dt),  # y position
                star[2]  # speed
            )
            for star in self.stars
        ]

        # STEP B: Remove stars that have moved off the bottom of the screen
        self.stars = [
            (
                star[0],
                star[1],
                star[2]
            )
            for star in self.stars
            if star[1] < HEIGHT
        ]

        # STEP C: Add new stars at the top to maintain the total number of stars
        for _ in range(self.n - len(self.stars)):
            self.stars.append(
                (
                    randint(0, WIDTH),  # x position
                    0,  # y position - top of screen
                    randint(STARS_MIN_SPEED, STARS_MAX_SPEED)  # speed
                )
            )


starfield = StarField(STARS_TOTAL)
Experiment: Changing the number stars
The number of stars in the starfield is controlled by the STARS_TOTAL variable
which is set to 200 by default. Try experimenting with the number of stars
until you find a number you like the most. Good examples to try are:
- 1
- 50
- 100
- 300
- 1000
Experiment: Changing the speed of the stars
The speed of the stars is controlled by variables STARS_MIN_SPEED and
STARS_MAX_SPEED. Try experimenting with different values for each until you
find a pair of numbers that you like the most. Good examples to try are:
- 10 and 150
- 50 and 100
- 75 and 200
- 75 and 500
- 500 and 1000
Experiment: Changing the size and colour of the stars
By default, the stars are drawn as single pixels that are WHITE. Try
experimenting with different sizes and colours to find something you
really like the look of.
What about random sizes? Try changing the size of the stars randomly each time they are drawn. What effect does this create? Good examples to try are:
randint(0, 1)randint(0, 2)randint(1, 2)randint(1, 5)
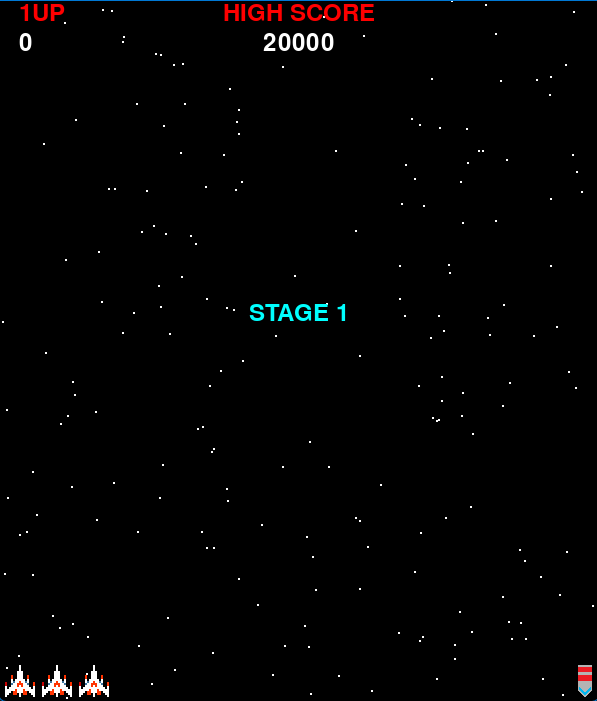
Step 3: Adding the title screen
The completed code for this step is available here.
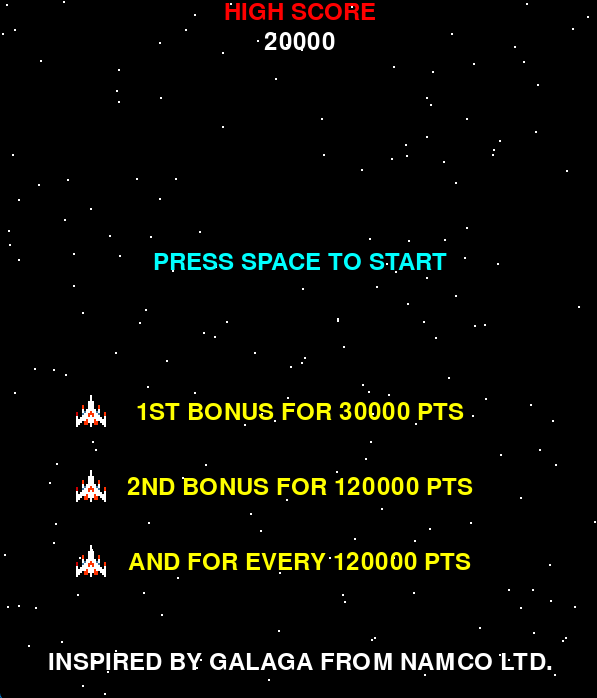
In this step we will create the title screen which contains some key information
such as the current highest score, when new lives are awarded and some animated
text to inform the user to "PRESS SPACE TO START". This will be achieved by
creating another child class of GameObject called TitleScreen.
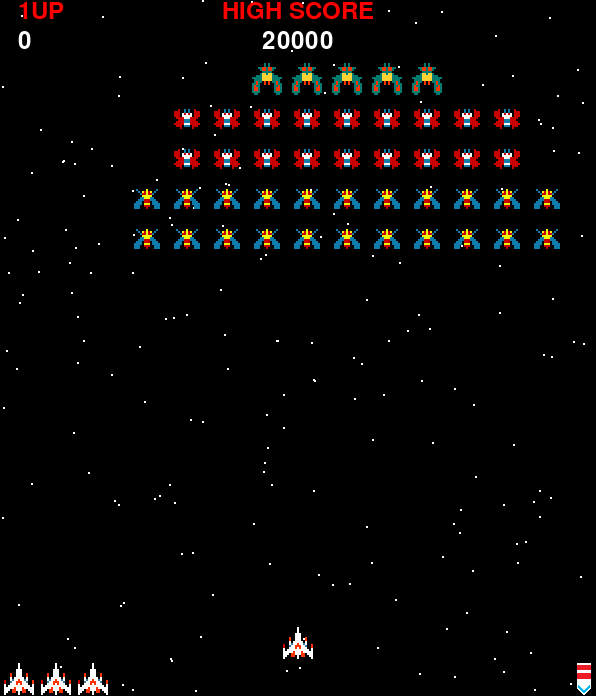
Once this step is completed, your game will look like the image below:
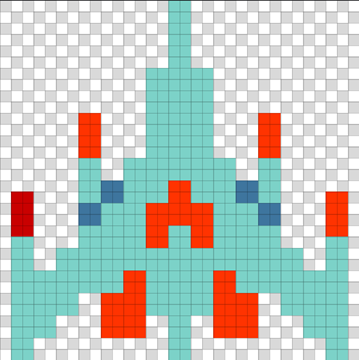
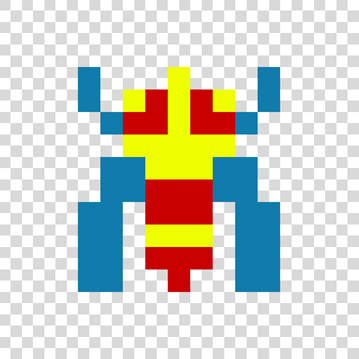
For this step, you will also need an image of the players spaceship. This
will need to be a single 32 pixel x 32 pixel image called player.png and placed
into an images folder in your project. As with previous projects you can either
use my images that are provided below or draw your own. If drawing your own, you
need to use a paint program that supports transparency such as
PixilArt. All the images provided here were
created using PixilArt.
 download as
player.png or
player.pixil.
The image below is a zoomed in version of player.png with grid lines to help
you see how it was drawn. In this image, the white has been replaced with
light blue to help it contrast with the background. The white and gray
checked areas are the transparent parts of the image.
The TitleScreen code is relatively straightforward as most of what it displays
on the screen is static. The "PRESS SPACE TO START" text is animated and switches
on and off every half second via the update() method. There is also an
activated() method which is called when the TitleScreen instance is active
property is set to True and this forces the "PRESS SPACE TO START" text to be
displayed for the first half second.
Place the following code before the call to pgzrun.go(). Run your game after you
have added the code to make sure it runs. You should see the title screen with
flashing "PRESS SPACE TO START" text.
high_score = 20000
score = 0
lives = 3
stage = 1

import time

class TitleScreen(GameObject):
    def __init__(self):
        super().__init__()
        self.draw_press_space = True
        self.press_space_transition = 0

    def activated(self):
        self.draw_press_space = True
        self.press_space_transition = time.time() + 0.5

    def draw(self, draw):
        draw.text("HIGH SCORE",
                  midtop=(WIDTH / 2, 0),
                  color=RED,
                  fontsize=36)
        draw.text(f"{high_score}",
                  midtop=(WIDTH / 2, 30),
                  color=WHITE,
                  fontsize=36)

        if self.draw_press_space:
            draw.text("PRESS SPACE TO START",
                      midtop=(WIDTH / 2, 250),
                      color=CYAN,
                      fontsize=36)

        screen.blit('player', (75, 395))
        screen.blit('player', (75, 470))
        screen.blit('player', (75, 545))

        draw.text("1ST BONUS FOR 30000 PTS",
                  midtop=(WIDTH / 2, 400),
                  color=YELLOW,
                  fontsize=36)

        draw.text("2ND BONUS FOR 120000 PTS",
                  midtop=(WIDTH / 2, 475),
                  color=YELLOW,
                  fontsize=36)

        draw.text("AND FOR EVERY 120000 PTS",
                  midtop=(WIDTH / 2, 550),
                  color=YELLOW,
                  fontsize=36)

        draw.text("INSPIRED BY GALAGA FROM NAMCO LTD.",
                  midtop=(WIDTH / 2, 650),
                  color=WHITE,
                  fontsize=36)

    def update(self, dt):
        now = time.time()
        if self.press_space_transition < now:
            self.press_space_transition = now + 0.5
            self.draw_press_space = not self.draw_press_space


title_screen = TitleScreen()
Experiment: Changing the size and colour of the text
The TitleScreen displays several lines of text and the high score, all of
which use a fontsize of 36. Experiment with different sizes of text as
well as the content of that text to make the game your own. Also experiment
with the colours of the text. There are the following predefined colours
BLACK, RED, WHITE, CYAN and YELLOW but you can also define your
own colours by specifying a tuple of 3 numbers in the range of 0 to 255,
each representing on of Red, Green and Blue. Some examples to try are:
- (50, 50, 50)
- (150, 150, 0)
- (0, 150, 250)
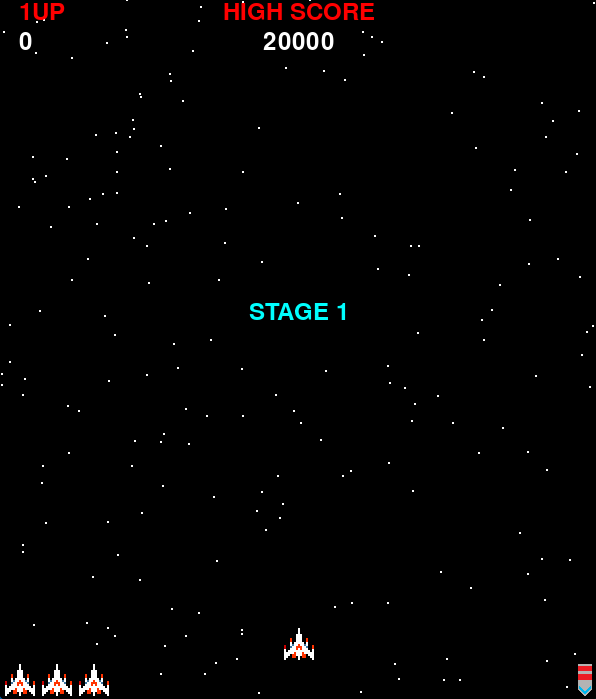
Step 4: Add a game HUD
The completed code for this step is available here.
HUD stands for Heads Up Display and in games generally refers to the areas of the screen where information about the game is presented to the user. In the case of this game, that information will include:
- The players current score
- The high score
- How many lives the player has remaining
- The current stage that is being played.
Once this step is completed and yoy run your game, it will look like the screen
shot below. GameHud will be another subclass of GameObject and will be
implemented in a manner very similar to that used for TitleScreen.
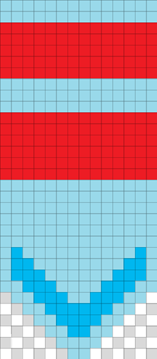
To complete this step, we will need an image that will be used to represent the
stage the player is on. This will need to be a single 14 pixel x 32 pixel image
called stage_marker.png and placed into an images folder in your project. As
with previous projects you can either use my images that are provided below or
draw your own. If drawing your own, you need to use a paint program that supports
transparency such as PixilArt.
 download as
stage marker or
stage_marker.pixil.
The image below is a zoomed in version of stage_marker.png with grid lines to
help you see how it was drawn. In this image, the white has been replaced with
light blue to help it contrast with the background. The white and gray checked
areas are the transparent parts of the image.
Place the following code before the call to pgzrun.go().
LOWER_BORDER_HEIGHT = 40
UPPER_BORDER_HEIGHT = 50
LOWER_BORDER_START = HEIGHT - LOWER_BORDER_HEIGHT

class GameHud(GameObject):
    def __init__(self):
        super().__init__(False)
        self.draw_one_up = True
        self.one_up_transition = 0
        self.show_stage = True
        self.show_stage_left = 0

    def activated(self):
        self.draw_one_up = True
        self.one_up_transition = time.time() + 0.5
        self.show_stage = True
        self.show_stage_left = 2.0

    def draw(self, draw):
        draw.text("HIGH SCORE",
                  midtop=(WIDTH / 2, 0),
                  color=RED,
                  fontsize=36)
        draw.text(f"{high_score}",
                  midtop=(WIDTH / 2, 30),
                  color=WHITE,
                  fontsize=36)

        if self.draw_one_up:
            draw.text("1UP",
                      topleft=(20, 0),
                      color=RED,
                      fontsize=36)

        draw.text(f"{score}",
                  topleft=(20, 30),
                  color=WHITE,
                  fontsize=36)

        if self.show_stage:
            draw.text(f"STAGE {stage}",
                      midtop=(WIDTH / 2, 300),
                      color=CYAN,
                      fontsize=36)

        for i in range(lives):
            screen.blit('player', (5 + (37 * i), LOWER_BORDER_START + 4))

        for i in range(stage):
            screen.blit('stage_marker',
                        ((WIDTH - 5) - (16 * (i + 1)), LOWER_BORDER_START + 4))

    def update(self, dt):
        self.show_stage_left = self.show_stage_left - dt
        self.show_stage = self.show_stage_left > 0

        now = time.time()
        if self.one_up_transition < now:
            self.one_up_transition = now + 0.5
            self.draw_one_up = not self.draw_one_up


game_hud = GameHud()
If you run your game at this point, nothing will happen when you press space. This is
because we have not yet added any code to respond to the space key being pressed to
make the transition from the TitleScreen to a new game.
Place the following code before the call to pgzrun.go(). Run your game after you
have added the code to make sure it runs. You should now be able to press space and
the game will from the title screen to the game proper.
def new_game(dt):
    global score, lives, stage
    if title_screen.active and keyboard.space:
        score = 0
        lives = 3
        stage = 1

        title_screen.active = False
        game_hud.active = True


update_funcs.append(new_game)
Experiment: Changing the HUD
GameHud is implemented in much the same way as TitleScreen and can be customised
in exactly the same ways. Try experimenting with the fontsize, color and positions
of the text until you find something that you really like.
In particular, experiment with the position that the player and stage_marker images
are blitted onto the screen. Change one of the numbers at a time and see the effect
it has on the position of the images.
Step 5: Add the player sprite
The completed code for this step is available here.
In this step we are going to be adding support for sprites with customisable
behaviours and then using that functionality to create the player sprite which can
be moved using the keyboard left and right cursor keys or the a and d keys.
Once completed, the game will look like the screen shot below.
First lets explain the Sprite class. Sprites will be used to represent the the
moving objects in the screen such as the player, aliens, lasers and bombs. A sprite
is a specialisation of GameObject so will have all of the existing functionality of
a GameObject such as being drawn, updated, destroyed, activated and deactivated.
In addition, a Sprite contains an Actor instance to draw the sprite on the
screen and has an animation capability that is almost identical to that used
in Muncher. To animate the Sprite, simply pass it more than
one image in the images list parameter in the constructor. You can override
the speed you wish a Sprite to animate by changing the fps property
(frames per second), which defaults to 2 frames per second.
The Sprite class also has a lifetime property that provides a basic
auto-destroy capability which we will make use of in later steps. The default
value is None but it can be set to the desired number of seconds that you
wish the Sprite to exist for. When the lifetime reaches zero the Sprite
will set it's destroy property.
The final and most interesting capability that a Sprite has is behaviours.
These are specified in the constructor and can also be added individually
with the add_behaviour() method. A Behaviour requires three methods
called enabled(), execute() and remove(). Each time a Sprite is
updated, it iterates over all specified behaviours and will call execute()
on those that return True when their enabled() method (passing itself to
both methods (more on this later)). Each Behaviour can then modify the
Sprite as it needs. If a Behaviour returns True when its remove()
method is called, it is removed from the list of behaviours for that
Sprite. The power of this technique is that the same Behaviour can be
used across different types of Sprite as well as allowing for different
behaviours for the same type of Sprite. This gives lots of flexibility.
The power of Behaviour will become more apparent when we add in more
types of Sprite such as the different types of alien.
Whilst there is the add_behaviour() method, the most common way to provide
behaviours to a Sprite is with the constructor. The Sprite class uses a
Python technique called variable length arguments to allow as many behaviours
as desired to be specified. This Python functionality is explained in more
depth in Variable Length Arguments.
Place the following code before the call to pgzrun.go(). Run your game after you
have added the code to make sure it runs. At this point there will be no visible
change to the game because we have not yet added the player sprite.
class Behaviour:
    def enabled(self, sprite):
        return True

    def execute(self, dt, sprite):
        pass

    def remove(self, sprite):
        return False

class Sprite(GameObject):
    def __init__(self, position, images, *behaviours):
        super().__init__()
        self.lifetime = None
        self.fps = 2
        self.images = images
        self.next_frame = -1
        self.frame = -1
        self.actor = Actor(images[0], position)
        self.behaviours = behaviours

    def activated(self):
        self.next_frame = -1
        self.frame = -1

    def add_behaviour(self, behaviour):
        self.behaviours += behaviour,

    @property
    def pos(self):
        return self.actor.pos

    @pos.setter
    def pos(self, pos):
        self.actor.pos = pos

    def animate(self):
        now = time.time_ns()

        if now > self.next_frame:
            self.frame = (self.frame + 1) % len(self.images)
            self.actor.image = self.images[self.frame]
            self.next_frame = now + (1_000_000_000 / self.fps)

    def draw(self, draw):
        self.actor.draw()

    def update(self, dt):
        if self.lifetime:
            self.lifetime -= dt
            if self.lifetime <= 0:
                self.destroy = True
                return

        self.animate()

        self.behaviours = [
            behaviour for behaviour in self.behaviours
            if not behaviour.remove(self) # NOTE: We pass self to the behaviour
        ]
        for behaviour in self.behaviours:
            if behaviour.enabled(self): # NOTE: We pass self to the behaviour
                behaviour.execute(dt, self) # NOTE: We pass self to the behaviour
Now we will extend the game to add the players spaceship. We will use the
player.png image created in step 3 for the title screen. We will only be
using a single image for the spaceship so it will not be animated. We do
however want to be able to move the player spaceship and for this we are
going to create a new Behaviour called MovePlayer.
MovePlayer will move a Sprite (the player in this case) left or right
at the speed defined by a vx property on the Sprite. MovePlayer will
also keep the players position (pos property) within the bounds defined
by two additional properties called max_left and max_right on the
Sprite. Those three properties are set on the player sprite after it
is created, along with setting the active property to False.
Place the following code before the call to pgzrun.go(). Run your game
after you have added the code to make sure it runs. The players spaceship
sprite will not yet be displayed in the game. Why do you think this is?
class MovePlayer(Behaviour):
    def execute(self, dt, sprite):
        new_pos = sprite.pos
        if keyboard.a or keyboard.left:
            new_pos = (new_pos[0] - (sprite.vx * dt), new_pos[1])
        elif keyboard.d or keyboard.right:
            new_pos = (new_pos[0] + (sprite.vx * dt), new_pos[1])

        if new_pos[0] < sprite.max_left:
            new_pos = (sprite.max_left, new_pos[1])
        elif new_pos[0] > sprite.max_right:
            new_pos = (sprite.max_right, new_pos[1])

        sprite.pos = new_pos

# Constants to help define the bounds of the player sprite.
PLAYER_SHIP_HEIGHT = 32
PLAYER_SHIP_WIDTH = 32
PLAYER_SHIP_MAX_LEFT = (PLAYER_SHIP_WIDTH / 2)
PLAYER_SHIP_MAX_RIGHT = WIDTH - (PLAYER_SHIP_WIDTH / 2)
PLAYER_SHIP_START_HEIGHT = LOWER_BORDER_START - (PLAYER_SHIP_HEIGHT / 2)

player = Sprite((WIDTH / 2, PLAYER_SHIP_START_HEIGHT), ['player'], MovePlayer())
player.vx = 200
player.max_left = PLAYER_SHIP_MAX_LEFT
player.max_right = PLAYER_SHIP_MAX_RIGHT
player.active = False
The players spaceship is not displayed because the active property has been
set to False after it has been created. This is done because we don't want
the player Sprite to be visible when the TitleScreen is being displayed.
Therefore, we need to switch active to True at the right time so the
spaceship gets displayed. This needs to be done in the existing new_game()
function. Add the player.active = True statement to the new_game()
function so that it looks like the code below.
Run your game after you have made the change and you should now be able to use
the keyboard to move the spaceship left and right by using the arrow keys as well
as the a and d keys.
def new_game(dt):
    global score, lives, stage
    if title_screen.active and keyboard.space:
        score = 0
        lives = 3
        stage = 1

        title_screen.active = False
        game_hud.active = True
        player.active = True  # <- Add this
Extension: Animating the player
Do you want to animate your player spaceship? If so, this is really easy to do.
Decide how many animation frames you want (2 is the minimum but more allows for
more complex animations). The use a tool such as PixilArt
to draw each frame as a 32 pixel by 32 pixel image. Save these as PNG files to the
images folder with names such as player_2 and player_3.
Modify the statement that creates the player and replace ['player'] with a list
that contains all of the frames you have drawn. For 2 frames it will look like this
['player', 'player_2'] and for 3 frames it would look like this
['player', 'player_2', 'player_3'].
You can also change the speed of animation by setting the player.fps property
to a value different to the default value of 2. Larger numbers result in faster
animations.
Experiment: Adjusting the speed and bounds of the player
The three properties vx, max_left and max_right control the speed the player
spaceship moves as well as the left and right limits to movement. Experiment with
different values for these properties and observe how it affects the spaceship.
Good values to try with vx are:
- 0
- 50
- 100
- 200
- 400
- 1000
Good values to try with max_left are:
- 0
- 100
- 200
- 500
Good values to try with max_right are:
- 0 - this produces a very interesting effect when
max_leftis at it's default value - 100
- 500
- 600
Experiment: Adjusting which keys move the player
Can you modify the code so that the j and k keys can also move the player
spaceship left and right?
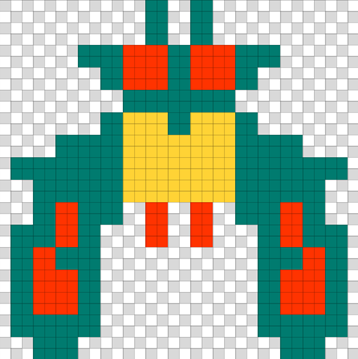
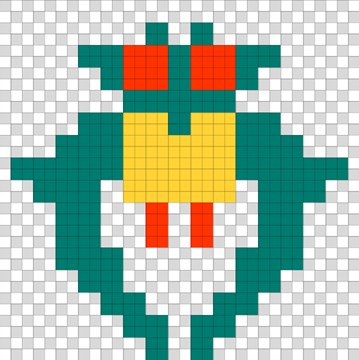
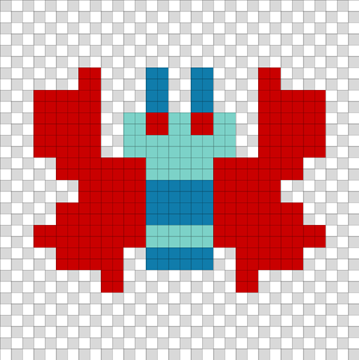
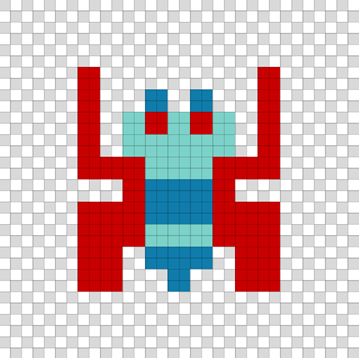
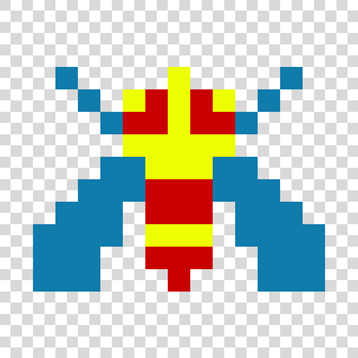
Step 6a: Drawing aliens
Before we can create the first wave of aliens, we need to have some images for
them. For this step, we will create images for three different types of alien.
All three will have two images each to demonstrate how the animation works.
As with the player image, each alien image needs to be 32 pixels x 32 pixels
and saved into the images folder. As with previous steps you can either use
my images that are provided below or draw your own. If drawing your own, you
need to use a paint program that supports transparency such as
PixilArt.
 and
and  .
Download as
.
Download as
alien_a_1.pngandalien_a_2.pngoralien_a.pixil and
and  Download as
alien_c_1.pngandalien_c_2.pngoralien_c.pixil and
and  Download as
alien_d_1.pngandalien_d_2.pngoralien_d.pixil
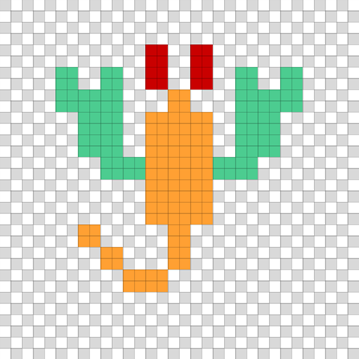
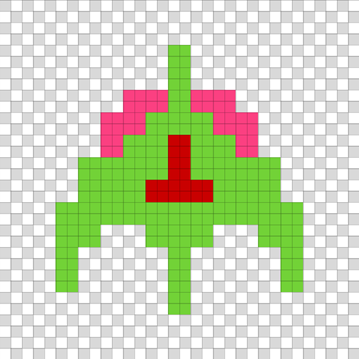
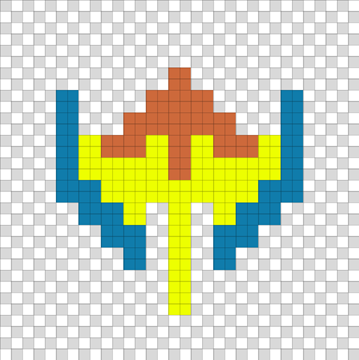
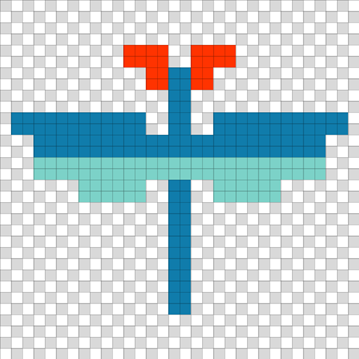
The images below are zoomed in versions with grid lines to help you see how they were drawn. In these images, the white has been replaced with light blue to help it contrast with the background. The white and gray checked areas are the transparent parts of the image.
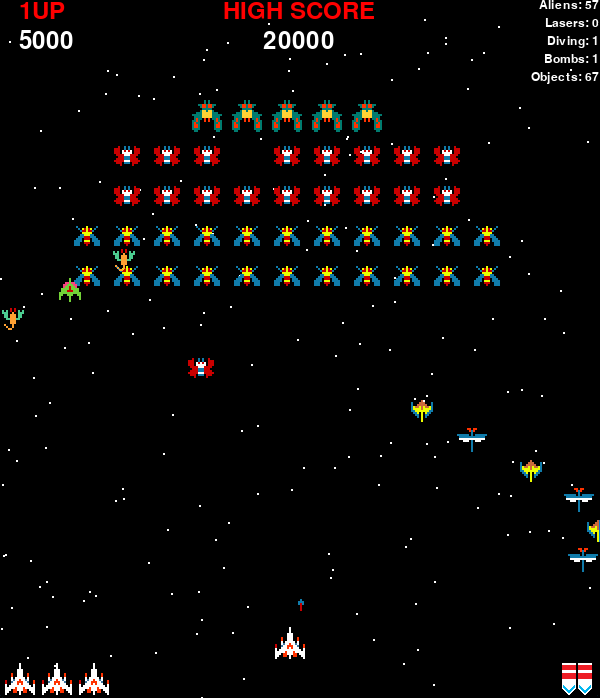
Step 6b: First wave of aliens
The completed code for this step is available here.
In this step we will add in the first wave of aliens. This wave of aliens
won't make grand entrances onto the screen (we will do that in a later
step). Instead, we create the 45 aliens in 5 rows and place them straight
on the screen. We then introduce two new behaviours to make the aliens
move side to side in an arc: RelativeToNow and CalculatedPosition.
Each section is explained in more depth below.
Once this step is completed, your game will look like the image below:
We start by creating a specialisation of Sprite called Alien which
allows a points value to be stored against each Alien as well add
the newly created Alien instance to a new global variable called
aliens which is used to track all of the aliens on the screen.
Place the following code before the call to pgzrun.go().
import math

aliens = []

class Alien(Sprite):
    def __init__(self, pos, points, images, *behaviours):
        super().__init__(pos, images, *behaviours)
        self.points = points
        aliens.append(self)

    def destroyed(self):
        super().destroyed()
        aliens.remove(self)
The first new Behaviour is called RelativeToNow and is designed
to wrap another Behaviour. The first time execute() is called
on RelativeToNow, it saves the current position of the Sprite.
Each time execute() is called, the stored position is added to the
position of the Sprite after the wrapped behaviour is executed. The
result is that the new position is always relative to the the initial
position of the Sprite (which in this step is the position that it is
created in). Place the following code before the call to pgzrun.go().
class RelativeToNow(Behaviour):
    def __init__(self, behaviour):
        self.start_pos = None
        self.behaviour = behaviour

    def execute(self, dt, sprite):
        if self.start_pos is None:
            self.start_pos = sprite.pos

        self.behaviour.execute(dt, sprite)

        sprite.pos = (
            self.start_pos[0] + sprite.pos[0],
            self.start_pos[1] + sprite.pos[1]
        )

    def enabled(self, sprite):
        return self.behaviour.enabled(sprite)
The second new Behaviour is called CalculatedPosition which uses
two functions to calculate the x and y coordinates of the sprite.
CalculatedPosition tracks the amount of time that has elapsed and
passes that to each of the functions used to calculated the x and y
positions of the Sprite.
Place the following code before the call to pgzrun.go().
class CalculatedPosition(Behaviour):
    def __init__(self, x_func=None, y_func=None):
        self.x_func = x_func
        self.y_func = y_func
        self.elapsed = 0

    def enabled(self, dt, sprite):
        self.elapsed += dt

        new_x, new_y = sprite.pos[0], sprite.pos[1]
        if self.x_func:
            new_x = self.x_func(self.elapsed)

        if self.y_func:
            new_y = self.y_func(self.elapsed)

        sprite.pos = new_x, new_y
Now we create the function create_wave_1() which will create 5 rows of
aliens. Each row is created byt the function create_alien_row() which is
defined inside the create_wave_1(). Being able to define functions inside
other functions is a useful technique to modularise your code.
We want to create each row of aliens so the is centred on the screen. Therefore
when we use range() to for the loop, we calculate (using integer division)
half the value of the number of aliens. The loop then starts at minus half and
then increments to positive half with zero always being in the middle of the
screen. Structuring the loop like this makes it easy to calculate the position
of each Alien. More details on how to use range can be found in
this article.
The movement of each Alien is defined by wrapping CalculatedPosition inside
RelativeToNow and providing two lambdas for the functions required by
CalculatedPosition. RelativeToNow records the starting position of the
Sprite. The two lambda functions define mathematical expressions based on
the trigonometric functions sine and cosine. These lambdas calculate values
between -50 and 50 for the x value and -20 to 20 for the y value. These two
functions are what provides the gently rocking motion of the aliens.
So what are lambdas? They are a compact way to provide simple single statement functions. More information on lambdas and how to use them can be found in lambdas.
Place the following code before the call to pgzrun.go(). Run your game after you
have added the code to make sure it runs without error. You will not see any aliens
on the screen yet because we have one final item to do.
MIDDLE = WIDTH / 2
WAVE_TOP = 100

def create_wave_1():
    def create_alien_row(row, count, points, images):
        half = count // 2
        for x in range(-half, half + 1, 1):
            pos_x = MIDDLE + (x * 40)
            pos_y = WAVE_TOP + (row * 40)
            movement = (
                RelativeToNow(
                    CalculatedPosition(lambda dt: math.sin(dt * 1) * 50,
                                       lambda dt: math.cos(dt * 2) * 20)
                )
            )

            Alien((pos_x, pos_y), points, images, movement)

    create_alien_row(0, 5, 1000, ['alien_a_1', 'alien_a_2'])
    create_alien_row(1, 9, 500, ['alien_c_1', 'alien_c_2'])
    create_alien_row(2, 9, 250, ['alien_c_1', 'alien_c_2'])
    create_alien_row(3, 11, 100, ['alien_d_1', 'alien_d_2'])
    create_alien_row(4, 11, 50, ['alien_d_1', 'alien_d_2'])
The final step is to call the function create_wave_1() when creating
a new game. We want to do this on a short time delay and we achieve this
by using clock.schedule(). Update your new_game() function by adding
the statement indicated below to the end of the function. Run your game
to make sure it works and creates the 5 rows of aliens.
def new_game(dt):
    global score, lives, stage
    if title_screen.active and keyboard.space:
        score = 0
        lives = 3
        stage = 1

        title_screen.active = False
        game_hud.active = True
        player.active = True

        clock.schedule(create_wave_1, 2) # <- Add this
Experiment: Changing the motion
The motion that the aliens take is defines by the two lambda functions
passed to CalculatedPosition. Experiment with different values for the
dt modified as well as the overall modifiers and see how it affects the
motion of the aliens.
Good examples to try for the dt modifiers are:
- 0
- 0.5
- 1
- 2
- 5
- 10
Good examples to try for the overall modifiers are at the end of each lambda are:
- 0
- 10
- 20
- 50
- 100
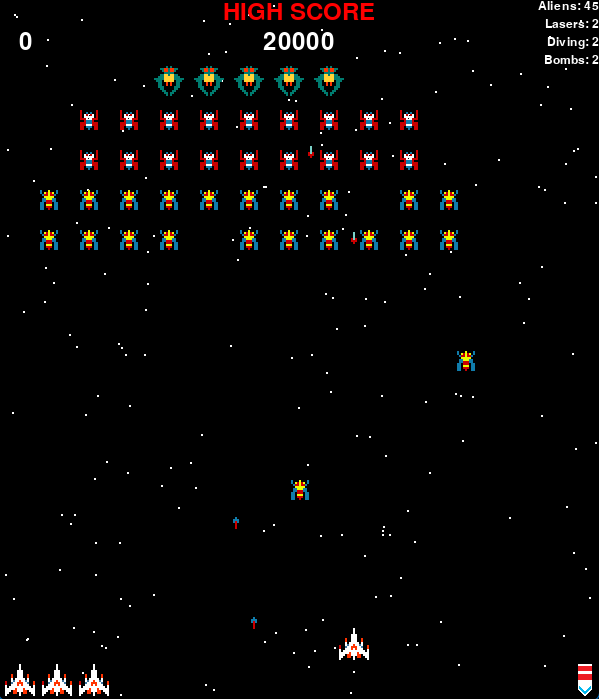
Step 7: Player shoots lasers
The completed code for this step is available here.
In this step, we will add the ability for the player to shoot lasers at
the aliens. We wont be adding collision detection at this point, we defer
that until step 10. We limit the maximum number of lasers that a player
can shoot to 3. We also introduce the DebugHud which allows us to display
key internal data from the game.
We introduce a new Sprite called Laser to represent each laser the player
shoots. To control the movement and lifecycle of a laser we introduce three
new behaviours. These Behaviours are used to move the Laser forward and
when it reaches the top most point, destroy it. These new Behaviours are:
MoveDestroySelfSequence
Additionally, we introduce a new Behaviour for the Player class which allows
the player to shoot.
PlayerShoot
Once this step is completed, your game will look like the image below:
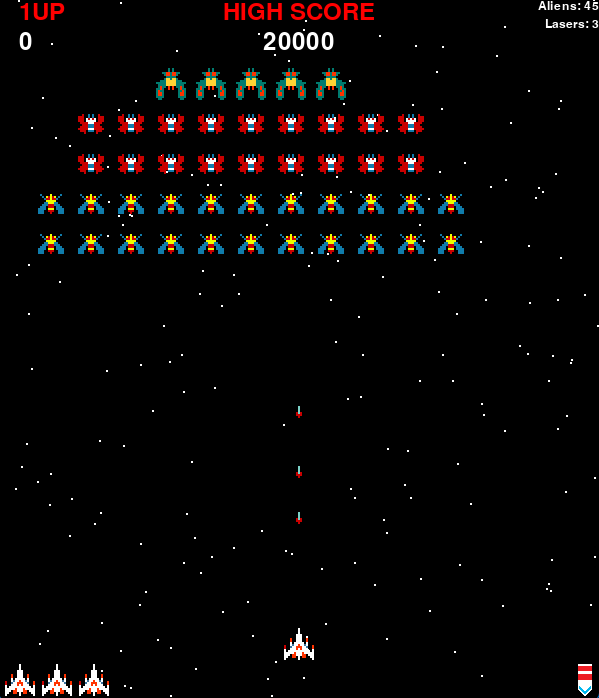
For this step, you will also need an image of the laser the players spaceship
will fire. This will need to be a single 6 pixel x 12 pixel image called
laser.png and placed into an images folder in your project. As with
previous projects you can either use my images that are provided below or
draw your own. If drawing your own, you need to use a paint program that
supports transparency such as PixilArt.
 download as
laser.png or
laser.pixil.
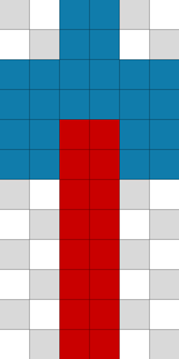
The image below is a zoomed in version of laser.png with grid lines to help
you see how it was drawn. The white and gray checked areas are the transparent
parts of the image.

The first Behaviour to implement is Move which moves a Sprite a set
distance (called offset) horizontally and vertically at the specified
speed (called velocity). Once the Move class has completed the move,
it disables itself.
Place the following code before the call to pgzrun.go().
class Move(Behaviour):
    def __init__(self, offset, velocity):
        self.offset_x = offset[0]
        self.offset_y = offset[1]
        self.x_left = abs(self.offset_x)
        self.y_left = abs(self.offset_y)
        self.velocity = velocity

    def execute(self, dt, sprite):
        x = abs(self.velocity[0] * dt)
        y = abs(self.velocity[1] * dt)

        if self.x_left <= 0:
            x = 0
        if self.y_left <= 0:
            y = 0

        if x > self.x_left:
            x = self.x_left

        if y > self.y_left:
            y = self.y_left

        self.x_left -= x
        self.y_left -= y

        if self.offset_x < 0:
            x = -x

        if self.offset_y < 0:
            y = -y

        pos = sprite.pos
        sprite.pos = pos[0] + x, pos[1] + y

    def enabled(self, sprite):
        return self.x_left > 0 or self.y_left > 0
Next we introduce the new Behaviour called DestroySelf class. This is
a very simple Behaviour as it simply sets the destroy property of the
Sprite to True. DestroySelf is completely stateless (holds no data)
so we only need one instance of it for the entire game which we can then
reuse. This instance is called destroy_self.
Place the following code before the call to pgzrun.go().
class DestroySelf(Behaviour):
    def execute(self, dt, sprite):
        sprite.destroy = True


destroy_self = DestroySelf()
A Sprite will execute all behaviours that return True when enabled() is
called. This creates a challenge because we only want to execute DestroySelf
once Move has completed. What we have is a classic sequence problem. We
therefore introduce a new Behaviour called Sequence which accepts any
number of Behaviours but executes only a single behaviour at a time. The
first Behaviour is executed until it returns False when enabled() is
called. At this point Sequence moves onto the next Behaviour and so on
until it reaches the final Behaviour.
Place the following code before the call to pgzrun.go().
class Sequence(Behaviour):
    def __init__(self, *behaviours):
        self.behaviours = behaviours
        self.index = 0

    def execute(self, dt, sprite):
        self.behaviours[self.index].execute(dt, sprite)

    def enabled(self, sprite):
        if not self.behaviours[self.index].enabled(sprite) and self.index < len(self.behaviours) - 1:
            self.index += 1
            return self.enabled(sprite)

        return self.behaviours[self.index].enabled(sprite)
Now we introduce the Laser sprite which represents each shot fired by the
player. Just like Alien keep track of how many instances there are in the
aliens list, Laser does the same with the laser list. As Lasers do
not have customisable behaviour, the behaviours are defined by the Laser
class.
Place the following code before the call to pgzrun.go().
lasers = []


class Laser(Sprite):
    def __init__(self, position):
        super().__init__(position, ['laser'],
                         Sequence(
                             Move((0, -575), (0, 400)),
                             destroy_self)
                         )
        self.active = True
        lasers.append(self)

    def destroyed(self):
        super().destroyed()
        lasers.remove(self)
All that remains now is to add a new Behaviour to the player that performs the
shooting. We want to control the maximum number of lasers that can be on screen
at any one time to 3. Pressing space will perform the shooting.
Place the following code before the call to pgzrun.go(). Run your game after you
have added the code to make sure it runs without error. You should now be able to
shoot a maximum of 3 lasers at any one time.
class PlayerShoot(Behaviour):
    def __init__(self):
        self.pressed = False

    def enabled(self, sprite):
        return sprite.active

    def execute(self, dt, sprite):
        # Prevent shooting while the stage number is being shown
        if game_hud.show_stage:
            return

        if len(lasers) >= 3:
            return

        if keyboard.space:
            self.pressed = True
            return

        if self.pressed:
            self.pressed = False
            Laser(sprite.pos)


player.add_behaviour(PlayerShoot())
Before finishing this step, we are going to introduce a new GameObject called
DebugHud which we will modify over the future steps to output debug information
about the game as it is running. The DebugHud can be enabled and disabled by
simply setting its active property to either True or False. If you are
wondering, HUD stands for Heads Up Display.
Place the following code before the call to pgzrun.go().
class DebugHud(GameObject):

    def __init__(self):
        super().__init__(False)

    def draw(self, draw):
        draw.text(f"Aliens: {len(aliens)}",
                  topright=(WIDTH, 0),
                  color=WHITE,
                  fontsize=18)
        draw.text(f"Lasers: {len(lasers)}",
                  topright=(WIDTH, 18),
                  color=WHITE,
                  fontsize=18)


debugHud = DebugHud()
debugHud.active = True
Experiment: Modifying the lasers
The code currently limits the maximum number of lasers to 3. This is
controlled by PlayerShoot. Try modifying PlayerShoot so the maximum
number of lasers or 1, 2, 3, 5 or 10. Set the final number to whichever
value you feel is most appropriate.
The speed of the lasers is defined by the velocity passed to Move in
the __init__() method of Laser. This will be (0, 400). Experiment
with different values and see what happens. Good values to try are:
- (0, 50)
- (0, 200)
- (0, 1000)
- (0, -50)
- (25, 400) - see below
- (-25, 400) - see below
The last two speeds should make no difference to the horizontal movement
of the lasers. This is because the offset has a horizontal movement of
zero. Modify the offset from (0, -575) to (50, -575) and try again.
Step 8: Aliens attack
The completed code for this step is available here.
In this step we add a dynamic capability for the aliens to dive attack.
Periodically an Alien will be chosen at random to attack the player by
performing a dive towards them. To help the Alien avoid the players
attack, the Alien will move from side to side. Once the Alien has
completed their attack they will return back to their starting position.
To perform the attack, we will introduce the following new behaviours as
well as reuse some existing ones:
RemoveWhenFinishedOverridePositionWhilstRelativeToNowOnlyXReturnToNormalPositionExactlyCallback
These Behaviour classes will be combined together to create the dive
pattern in the following form. Take some time to see how the Behaviour
classes fit together.
RemoveWhenFinished(
    OverridePosition(
        Sequence(
            Whilst(
                Sequence(
                    Move(...),
                    Move(...)
                ),
                RelativeToNowOnlyX(
                    CalculatedPosition(...)
                )
            ),
            ReturnToNormalPosition(...),
            Exactly(
                Callback(...)
            )
        )
    )
)
Once completed, the game will look like the screen shot below.

Because a dive attack by an Alien only lasts for a short period, we
want the whole dive attack Behaviour to be automatically removed when
it has finished. A Behaviour will be automatically removed if the
remove() method returns True when called. We therefore create a new
Behaviour called RemoveWhenFinished which will wrap all the other
behaviours that perform the dive pattern.
Place the following code before the call to pgzrun.go().
class RemoveWhenFinished(Behaviour):
    def __init__(self, behaviour):
        self.behaviour = behaviour

    def execute(self, dt, sprite):
        self.behaviour.execute(dt, sprite)

    def enabled(self, sprite):
        return self.behaviour.enabled(sprite)

    def remove(self, sprite):
        return not self.behaviour.enabled(sprite)
A diving Alien will still have its original Behaviours that perform
its normal movement running. Therefore we need a way to override the
current position of the Alien whilst the dive attack is happening.
This is what the new Behaviour called OverridePosition does. This
is achieved by execute() storing the current position of the Sprite
in normal_pos then overriding the Sprite position. OverridePosition
then calls execute() on the other Behaviour to move the Sprite.
Finally it saves the current Sprite position so that it can restore
it again next time.
Place the following code before the call to pgzrun.go().
class OverridePosition(Behaviour):
    def __init__(self, behaviour):
        self.pos = None
        self.behaviour = behaviour

    def execute(self, dt, sprite):
        if self.pos is None:
            self.pos = sprite.pos

        sprite.normal_pos = sprite.pos
        sprite.pos = self.pos
        self.behaviour.execute(dt, sprite)
        self.pos = sprite.pos

    def enabled(self, sprite):
        return self.behaviour.enabled(sprite)
The next Behaviour we will create is Whilst which takes two Behaviours as
parameters: primary and secondary. Whilst is used to execute both
primary and secondary at the same time but use only primary to control
enabled().
Place the following code before the call to pgzrun.go().
class Whilst(Behaviour):
    def __init__(self, primary, secondary):
        self.primary = primary
        self.secondary = secondary

    def execute(self, dt, sprite):
        self.primary.execute(dt, sprite)
        self.secondary.execute(dt, sprite)

    def enabled(self, sprite):
        return self.primary.enabled(sprite)
The next Behaviour we will create is RelativeToNowOnlyX which is very
similar to RelativeToNow which we created earlier but only applies the
change to the x coordinate of the Sprite position.
Place the following code before the call to pgzrun.go().
class RelativeToNowOnlyX(Behaviour):
    def __init__(self, behaviour):
        self.start_pos = None
        self.behaviour = behaviour

    def execute(self, dt, sprite):
        if self.start_pos is None:
            self.start_pos = sprite.pos

        pos = sprite.pos
        self.behaviour.execute(dt, sprite)

        sprite.pos = self.start_pos[0] + sprite.pos[0], pos[1]

    def enabled(self, sprite):
        return self.behaviour.enabled(sprite)
When we initiate a dive attack for an Alien, we record the start position
of the Alien at the point we start the dive attack. The Alien will dive
and then return back to the start position. Because all sprites continue to
move during the dive, the location that the Alien returns to after the dive
attack may be different to where it would currently be based on the normal
move pattern. If we just reset the position, the Alien would appear to
jump. To avoid this, ReturnToNormalPosition moves the Alien from the
location the dive finished back to where it's normal location will be. For
this to work, ReturnToNormalPosition uses the normal_pos property of the
Alien as set by OverridePosition.
Place the following code before the call to pgzrun.go().
class ReturnToNormalPosition(Behaviour):
    def __init__(self, velocity):
        self.velocity = velocity

    def execute(self, dt, sprite):
        new_x = 0
        new_y = 0
        if sprite.pos[0] > sprite.normal_pos[0]:
            new_x = sprite.pos[0] - (self.velocity[0] * dt)
            if new_x < sprite.normal_pos[0]:
                new_x = sprite.normal_pos[0]

        if sprite.pos[0] < sprite.normal_pos[0]:
            new_x = sprite.pos[0] + (self.velocity[0] * dt)
            if new_x > sprite.normal_pos[0]:
                new_x = sprite.normal_pos[0]

        if sprite.pos[1] > sprite.normal_pos[1]:
            new_y = sprite.pos[1] - (self.velocity[1] * dt)
            if new_y < sprite.normal_pos[1]:
                new_y = sprite.normal_pos[1]

        if sprite.pos[1] < sprite.normal_pos[1]:
            new_y = sprite.pos[1] + (self.velocity[1] * dt)
            if new_y > sprite.normal_pos[1]:
                new_y = sprite.normal_pos[1]

        sprite.pos = new_x, new_y

    def enabled(self, sprite):
        return sprite.normal_pos != sprite.pos
The following Behaviour called Exactly, wraps a another Behaviour and
will call it's execute() method the specified number of times only. This
is mostly useful for executing a Behaviour exactly one time only.
Place the following code before the call to pgzrun.go().
class Exactly(Behaviour):
    def __init__(self, count, behaviour):
        self.count = count
        self.behaviour = behaviour

    def execute(self, dt, sprite):
        self.count -= 1

        self.behaviour.execute(dt, sprite)

    def enabled(self, sprite):
        return self.count > 0
The final Behaviour to implement is called Callback and is used to execute
an arbitrary function or lambda. This is a useful way to execute a simple or
short piece of code without having to create a new Behaviour class.
Place the following code before the call to pgzrun.go().
class Callback(Behaviour):
    def __init__(self, func):
        self.func = func

    def execute(self, dt, sprite):
        self.func(dt, sprite)
To complete the dive attack, we add a new GameObject called DiveAliens. All
the logic happens in the update() method. Each Alien that is currently
diving is tracked in the instance variable diving_aliens and update()
keeps this up-to-date by removing any destroyed Alien (as it wont have
completed the dive pattern Behaviour so wont have removed itself).
DiveAliens will look to dive an Alien at most once every second. If the
number of diving aliens does not exceed the pre-defined limit, a random
test is performed which decides whether to dive another Alien. If the test
passes so we do want to dive an Alien, we randomly select an Alien from
all aliens and if it is neither destroyed nor already diving, we add the dive
behaviour to it.
Place the following code before the call to pgzrun.go().
class DiveAliens(GameObject):

    def __init__(self):
        super().__init__()
        self.diving_aliens = []
        self.next_dive = 0

    def dive_pattern_1(self):
        return RemoveWhenFinished(
            OverridePosition(
                Sequence(
                    Whilst(
                        Sequence(
                            Move((0, 400), (0, 100)),
                            Move((0, -400), (0, 100))

                        ),
                        RelativeToNowOnlyX(
                            CalculatedPosition(
                                lambda dt: math.sin(dt * 2) * 100
                            )
                        )
                    ),
                    ReturnToNormalPosition((100, 10)),
                    Exactly(1, Callback(
                        lambda dt, sprite: self.diving_aliens.remove(sprite))
                    )
                )
            )
        )

    def update(self, dt):
        if game_hud.show_stage:
            return

        # Remove any destroyed aliens from diving_aliens
        self.diving_aliens = [
            alien for alien in self.diving_aliens
            if not alien.destroy
        ]

        # Only select a new diving alien once every second as a rate limit.
        now = time.time()
        if self.next_dive > now:
            return

        self.next_dive = now + 1

        if len(aliens) == 0:
            return

        if len(self.diving_aliens) >= stage * 4:
            return

        if randint(0, max(0, 5 - stage)) == 0:
            index = randint(0, len(aliens) - 1)
            alien = aliens[index]
            if alien.destroy or alien in self.diving_aliens:
                return

            alien.add_behaviour(self.dive_pattern_1())
            self.diving_aliens.append(alien)


dive_aliens = DiveAliens()
The final item in this step is to update the GameHud to show the number of
diving aliens. Modify the DebugHud class to add the new statement indicated
in the code below. Once added, run your game and watch as aliens will
periodically dive towards the player.
class DebugHud(GameObject):

    def __init__(self):
        super().__init__(False)

    def draw(self, draw):
        draw.text(f"Aliens: {len(aliens)}",
                  topright=(WIDTH, 0),
                  color=WHITE,
                  fontsize=18)
        draw.text(f"Lasers: {len(lasers)}",
                  topright=(WIDTH, 18),
                  color=WHITE,
                  fontsize=18)
        draw.text(f"Diving: {len(dive_aliens.diving_aliens)}", # <- Add this statement
                  topright=(WIDTH, 36),
                  color=WHITE,
                  fontsize=18)
Improvement: Dive starting position
If you look closely when an Alien begins a dive attack, the Alien seems to
jump sideways from it's starting position. Why do you think this is? Can you
fix it? If you are stuck, head to the appendix to find out.
Experiment: Change the number of diving aliens
The maximum number of diving aliens is controlled by the update() method
of DiveAliens. The default limit is stage * 4. Modify this value to see
the impact it has. Good options to try are:
stage * 2stage * 8stage * 16- 1
- 20
Experiment: Modify the dive parameters
The method dive_pattern_1 creates the dive pattern Behaviour which we add
to the Alien. There are various numbers to experiment with to modify the dive.
Experiment modifying the speed specified in Move. Some good numbers to try are:
(0, 50)(0, 150)(0, 200)(0, 250)
Experiment modifying the lambda specified in RelativeToNowOnlyX. Try to work
out the different effects the multiplier inside the math.cos() call has
compared to the multiplier outside the call. Some good numbers to try are:
math.cos(dt * 2) * 50math.cos(dt * 2) * 100math.cos(dt * 2) * 200math.cos(dt * 2) * 400math.cos(dt * 1) * 100math.cos(dt * 2) * 100math.cos(dt * 4) * 100math.cos(dt * 8) * 100
Experiment modifying the speed specified in ReturnToNormalPosition. In
particular take note of what happens when the smaller number are used. Some
good numbers for speed to try are:
(5, 5)(10, 10)(20, 20)(50, 50)(100, 100)(5, 100)(100, 5)
Extension: Add an new dive pattern
If you are an advanced Python coder and feel confident, create your own dive
attack by creating a new method called dive_pattern_2() below
dive_pattern_1() and then randomly select which dive pattern to use.
Step 9: Aliens shoot
The completed code for this step is available here.
In this step we add the capability for the Aliens to shoot whilst they
are performing their diving attack. To achieve this we will create a new
Sprite called Bomb that will look remarkably similar to Laser and
a new Behaviour called Attack.
We will also need an image of the bomb the aliens
will drop. This will need to be a single 6 pixel x 12 pixel image called
bomb.png and placed into an images folder in your project. As with
previous projects you can either use my images that are provided below or
draw your own. If drawing your own, you need to use a paint program that
supports transparency such as PixilArt.
 download as
bomb.png or
bomb.pixil.
The image below is a zoomed in version of bomb.png with grid lines to help
you see how it was drawn. The white and gray checked areas are the transparent
parts of the image.
Once completed, the game will look like the screen shot below.
The Bomb class follows the same pattern as Laser so needs no further
explanation. The Attack class has two properties that are used to control
the frequency with which an Alien shoots;b oth are passed to the
constructor. The first is interval which controls the maximum rate an
Alien can shoot. This is provided in seconds and is similar to the rate
limiting used in the diving attacks Behaviour. The second is chance which
is used to control the likelihood of an Alien shooting during each interval;
again, this is similar to that used to control the diving attack Behaviour.
Place the following code before the call to pgzrun.go().
bombs = []


class Bomb(Sprite):
    def __init__(self, position):
        super().__init__(position, ['bomb'],
                         Sequence(
                             Move((0, 700), (0, 200)),
                             destroy_self)
                         )
        self.active = True
        bombs.append(self)

    def destroyed(self):
        super().destroyed()
        bombs.remove(self)


class Attack(Behaviour):
    def __init__(self, interval, chance):
        self.interval = interval
        self.chance = chance
        self.next_attack = 0

    def execute(self, dt, sprite):
        now = time.time()
        if self.next_attack > now:
            return

        self.next_attack = now + self.interval
        if randint(0, self.chance) == 0:
            Bomb(sprite.pos)
Next, Attack needs to be added to the downward move phase of the
diving attack. Replace the following code in the function
dive_pattern_1()
Move((0, 400), (0, 100)),
With this code:
                            Whilst(
                                Move((0, 400), (0, 100)),
                                Attack(1, 1),
                            ),
Your dive_pattern_1() function should now look like this:
    def dive_pattern_1(self):
        return RemoveWhenFinished(
            OverridePosition(
                Sequence(
                    Whilst(
                        Sequence(
                            Whilst(
                                Move((0, 400), (0, 100)),
                                Attack(1, 1),
                            ),
                            Move((0, -400), (0, 100))

                        ),
                        RelativeToNowOnlyX(Calculated(
                            lambda dt: math.sin(dt * 2) * 100)
                        )
                    ),
                    ReturnToNormalPosition((100, 10)),
                    Exactly(1, Callback(lambda dt, sprite: self.diving_aliens.remove(sprite)))
                )
            )
        )
Finally, we adjust the DebugHud to show the number of Bomb that are
currently on the screen. Once added, run your game and check it works
as expected.
class DebugHud(GameObject):

    def __init__(self):
        super().__init__(False)

    def draw(self, draw):
        draw.text(f"Aliens: {len(aliens)}",
                  topright=(WIDTH, 0),
                  color=WHITE,
                  fontsize=18)
        draw.text(f"Lasers: {len(lasers)}",
                  topright=(WIDTH, 18),
                  color=WHITE,
                  fontsize=18)
        draw.text(f"Diving: {len(dive_aliens.diving_aliens)}",
                  topright=(WIDTH, 36),
                  color=WHITE,
                  fontsize=18)
        draw.text(f"Bombs: {len(bombs)}", # <- Add this statement
                  topright=(WIDTH, 54),
                  color=WHITE,
                  fontsize=18)
Experiment: Speed and frequency
Adjust the properties of Move for a Bomb to change how far and how
fast it moves.
Currently, the Attack has a frequency of and chance of 1. This means
there is a 50% chance each second that anAlien` will shoot. Experiment
with different values, good examples to try are:
Attack(0.1, 1)Attack(0.1, 10)Attack(0.2, 0)Attack(0.2, 2)Attack(0.2, 5)Attack(0.5, 0)Attack(0.1, 10)Attack(1, 1)Attack(1, 1)Attack(2, 0)
Extension: Additional attacks
Currently, an Alien will only attack when it is in the downward
movement phase of a diving attack. Modify your game so that they also
attack when the Aliens are returning back up the screen to the formation.
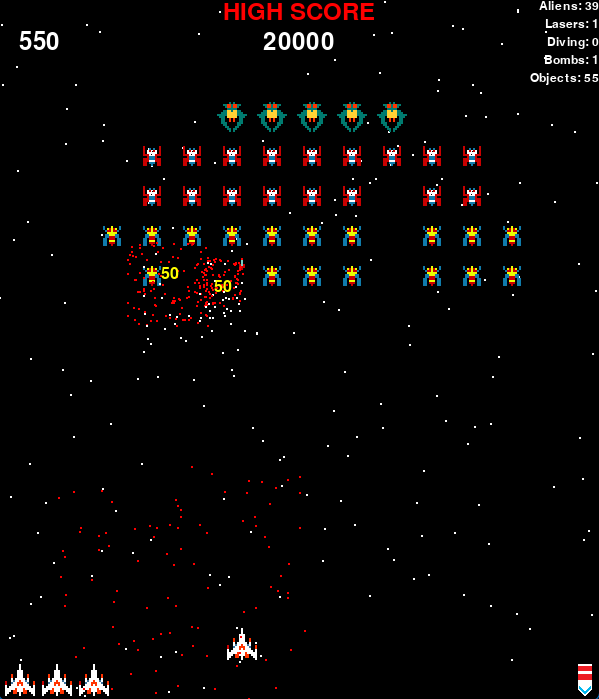
Step 10: Collision detection
The completed code for this step is available here.
In this step we are going to put in place general purpose collision detection
and add detection for a Laser colliding with either an Alien or a Bomb.
Collision detection with the player will be saved until the next step. In
addition to the collision detection, we will be adding a particle explosion
and a particle score effect based on that used in Smash.
Once completed, the game will look like the screen shot below.
First we add ParticleExplosion which is a slightly modified versions of that
used in Smash and should be familiar. The main difference is that it
now inherits from GameObject so its lifetime can easily be controlled by the
destroy property which is set in the update() method.
Place the following code before the call to pgzrun.go().
GRAVITY = 60

PARTICLE_EXPLOSION_MIN_VX = -90
PARTICLE_EXPLOSION_MAX_VX = 90
PARTICLE_EXPLOSION_MIN_VY = -90
PARTICLE_EXPLOSION_MAX_VY = 90


class ParticleExplosion(GameObject):

    def __init__(self, pos, lifetime, colour, count):
        super().__init__()
        self.left = lifetime
        self.colour = colour
        self.particles = [(pos[0], pos[1],
                           randint(PARTICLE_EXPLOSION_MIN_VX,
                                   PARTICLE_EXPLOSION_MAX_VX),
                           randint(PARTICLE_EXPLOSION_MIN_VY,
                                   PARTICLE_EXPLOSION_MAX_VY))
                          for _ in range(count)]

    def draw(self, draw):
        for particle in self.particles:
            draw.filled_circle((particle[0], particle[1]), 1, self.colour)

    def update(self, dt):
        self.left -= dt
        self.destroy = self.left < 0

        self.particles = [(particle[0] + (particle[2] * dt),
                           particle[1] + (particle[3] * dt), particle[2],
                           particle[3] + (GRAVITY * dt))
                          for particle in self.particles]
The general purpose collision detection is remarkably simple and leans heavily
into the use of lambda functions. The SpriteCollisions class holds a list of
detections which consists of 3 members, each of which is a function. The first
two returns lists which represent the two sets of sprites to check for collisions
between. The third function is called when a collision is detected. The easiest
way to return the lists is through the use of a lambda.
So why use functions or lambdas over simply providing lists? The answer is for flexibility. In the examples below we are indeed only providing a list without modifying it but a lambda does allow us to filter those lists (see extensions) or make up a new list on the fly.
Place the following code before the call to pgzrun.go().
class SpriteCollisions(GameObject):

    def __init__(self):
        super().__init__()
        self.detections = []

    def update(self, dt):
        if game_hud.show_stage:
            return

        for sprites1, sprites2, callback in self.detections:

            for sprite1 in sprites1():
                for sprite2 in sprites2():
                    if sprite1.destroy or sprite2.destroy:
                        continue

                    if sprite1.actor.colliderect(sprite2.actor):
                        callback(sprite1, sprite2)

    def add_detection(self, sprites1, sprites2, callback):
        self.detections.append((sprites1, sprites2, callback))


def alien_hit_with_laser(alien, laser):
    global score
    score += alien.points
    alien.destroy = True
    laser.destroy = True
    ParticleExplosion(alien.pos, 2.0, RED, 100)
    ParticleExplosion(laser.pos, 0.5, WHITE, 20)


def bomb_hit_with_laser(bomb, laser):
    bomb.destroy = True
    laser.destroy = True
    ParticleExplosion(bomb.pos, 2.0, CYAN, 30)
    ParticleExplosion(laser.pos, 0.5, WHITE, 20)


collisions = SpriteCollisions()
collisions.add_detection(lambda: aliens, lambda: lasers, alien_hit_with_laser)
collisions.add_detection(lambda: bombs, lambda: lasers, bomb_hit_with_laser)
Finally, we adjust the DebugHud to show the total number of GameObjects
that currently exist so we can see the particle classes being created and
automatically destroyed. Once added, run your game and check it works
as expected.
class DebugHud(GameObject):

    def __init__(self):
        super().__init__(False)

    def draw(self, draw):
        draw.text(f"Aliens: {len(aliens)}",
                  topright=(WIDTH, 0),
                  color=WHITE,
                  fontsize=18)
        draw.text(f"Lasers: {len(lasers)}",
                  topright=(WIDTH, 18),
                  color=WHITE,
                  fontsize=18)
        draw.text(f"Diving: {len(dive_aliens.diving_aliens)}",
                  topright=(WIDTH, 36),
                  color=WHITE,
                  fontsize=18)
        draw.text(f"Bombs: {len(bombs)}",
                  topright=(WIDTH, 54),
                  color=WHITE,
                  fontsize=18)
        draw.text(f"Objects: {len(game_objects)}", # <- Add this statement
                  topright=(WIDTH, 72),
                  color=WHITE,
                  fontsize=18)
Experiment: Modify the particles
Change the lifetime, colour and number of particles in the alien_hit_with_laser()
and bomb_hit_with_laser() functions to personalise your game. Some good values
to try for lifetime are:
- 0.1
- 0.2
- 0.5
- 1.0
- 2.0
- 5.0
- 10.0
Some good values to try for the count of particles are:
- 1
- 2
- 5
- 10
- 20
- 50
- 100
- 250
- 500
- 1000
Extension: Only collide when visible
Because SpriteCollisions takes functions or lambdas to return lists of
Sprite instances to check for collisions, we can easily modify the
lambda in our game to only consider a Sprite if it is visible my
modifying:
collisions.add_detection(lambda: aliens, lambda: lasers, alien_hit_with_laser)
To this:
collisions.add_detection(
    lambda: [alien for alien in aliens if alien.visible],
    lambda: lasers, alien_hit_with_laser)
This isn't much use of a change because the aliens are all visible. What
if you added a rate limited GameObject that randomly made the Aliens
invisible? Remember, they can still shoot at you when they are invisible!
class RandomInvisibility(GameObject):

    def __init__(self):
        super().__init__()
        self.next_change = 0

    def update(self, dt):
        if game_hud.show_stage:
            return

        now = time.time()
        if self.next_change > now:
            return

        self.next_change = now + 1

        if len(aliens) == 0:
            return

        if randint(0, max(0, 5 - stage)) == 0:
            index = randint(0, len(aliens) - 1)
            alien = aliens[index]
            alien.visible = not alien.visible


RandomInvisibility()
Extension: Score particle
Using ParticleExplosion as an example, can you modify ParticleScore from
Smash and use it for the score for each alien? If you get stuck,
use the example in the appendix.
Step 11: Losing a life
The completed code for this step is available here.
In this step we are going to add the collision detection with the player and losing a life. As part of this step we will also need to detect for the player losing all their lives and the game being over.
Once completed, the game will look like the screen shot below.
We will start by adding the game over screen by creating a new class called
GameOver which has active set to False by default so that it does not
show. The GameOver class is similar to the other screens so the code should
be familiar to you. The game over screen will tell the player if they set a
new high score or not.
Place the following code before the call to pgzrun.go().
class GameOver(GameObject):
    def __init__(self):
        super().__init__(False)

    def draw(self, draw):
        draw.text("HIGH SCORE",
                  midtop=(WIDTH / 2, 0),
                  color=RED,
                  fontsize=36)
        draw.text(f"{high_score}",
                  midtop=(WIDTH / 2, 30),
                  color=WHITE,
                  fontsize=36)

        draw.text("YOU SCORED",
                  midtop=(WIDTH / 2, 300),
                  color=CYAN,
                  fontsize=36)
        draw.text(f"{score}",
                  midtop=(WIDTH / 2, 336),
                  color=WHITE,
                  fontsize=36)

        if score > high_score:
            draw.text("NEW HIGH SCORE",
                      midtop=(WIDTH / 2, 400),
                      color=RED,
                      fontsize=36)


game_over = GameOver()
The next stage is to add some functions that end the game, show the game
over screen and then schedule a return to the title screen after a delay
of 3 seconds using the Pygame Zero object clock. You can read more about
the built in PyGame Zero built-in objects (including Clock)
here. An
important job of the show_game_over() function is to destroy all of the
sprites so they get cleared up by the game engine.
Place the following code before the call to pgzrun.go().
def show_game_over():
    player.active = False
    game_hud.active = False
    game_over.active = True

    for alien in aliens:
        alien.destroy = True

    for bomb in bombs:
        bomb.destroy = True

    for laser in lasers:
        laser.destroy = True

    clock.schedule(back_to_title_screen, 3)


def back_to_title_screen():
    global high_score

    if score > high_score:
        high_score = score

    game_over.active = False
    title_screen.active = True
The final stage is to add the collision detection. This is done in exactly
the same manner as the collision detection with the aliens. A point worth
noting is that we treat an Alien and Player collision as if an Alien
was hit with a Laser and the Player hit with a Bomb. This allows us
to reuse the code for those events.
Place the following code before the call to pgzrun.go(). Once added, run
your game and check it works as expected.
def reinstate_player():
    player.pos = (WIDTH / 2, PLAYER_SHIP_START_HEIGHT)
    player.destroy = False
    game_objects.append(player)


def player_hit_with_bomb(player, bomb):
    global lives
    lives -= 1
    player.destroy = True
    bomb.destroy = True
    ParticleExplosion(bomb.pos, 2.0, CYAN, 30)
    ParticleExplosion(player.pos, 5.0, WHITE, 100)

    clock.schedule(reinstate_player, 2)
    if lives > 0:
        # For the stage to be shown again.
        game_hud.active = False
        game_hud.active = True
    else:
        clock.schedule(show_game_over, 2)


def player_alien_collide(player, alien):
    alien_hit_with_laser(alien, player)
    player_hit_with_bomb(player, alien)


collisions.add_detection(
    lambda: [player],
    lambda: bombs,
    player_hit_with_bomb)

collisions.add_detection(
    lambda: [player],
    lambda: aliens,
    player_alien_collide)
Extension: Diving aliens when losing a life
There are a number of extensions that you could implement for the diving aliens when the player has lost a life.
- Remove all bombs so the player cannot be shot again when re-spawning.
- Prevent new aliens from diving whilst the player
- Only re-instate the player when all the aliens have returned back to their formation position.
Extension: Flash new high score
Presently, if the player sets a new high score it is shown in the middle of the screen. It's nice but not eye catching. Can you make it flash on and off in the same manner as with other text on some of the screens?
Step 12a: New aliens
For this step we will introduce four new alien types. As before each alien
image needs to be 32 pixels x 32 pixels and saved into the images folder.
As with previous steps you can either use my images that are provided below
or draw your own. If drawing your own, you need to use a paint program that
supports transparency such as PixilArt.
 Download as
alien_e_1.pngoralien_other.pixil Download as
alien_f_1.pngoralien_other.pixil Download as
alien_g_1.pngoralien_other.pixil Download as
alien_h_1.pngoralien_other.pixil
The images below are zoomed in versions with grid lines to help you see how they were drawn. In these images, the white has been replaced with light blue to help it contrast with the background. The white and gray checked areas are the transparent parts of the image.
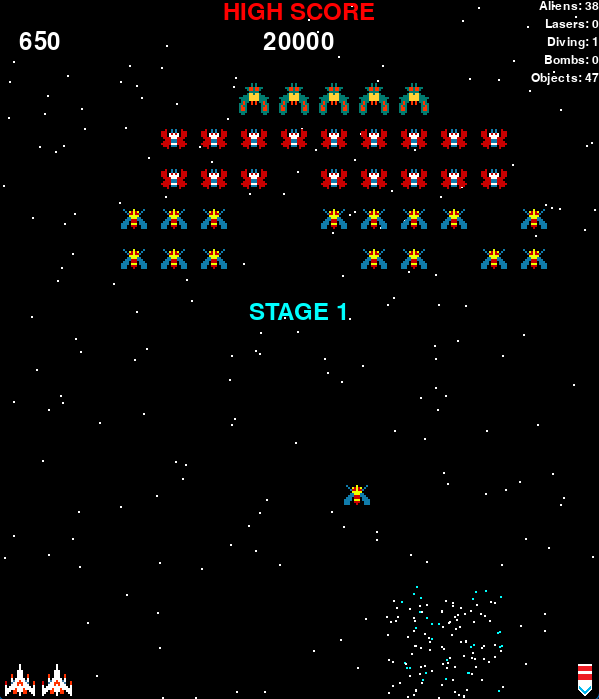
Step 12b: Destroying the first wave
The completed code for this step is available here.
In this step we will detect when all of the aliens have been destroyed in the first wave and then move the player on to stage 2. The second wave will be a combination of the first wave plus some new aliens using the images you created in step 12a. These new aliens will enter the game from the bottom of the screen in a side to side pattern.
To perform the entrance, we will introduce the following new behaviours as well as reuse some existing ones:
GotoVisibleDelayRelativeToPosition
These Behaviour classes will be combined together to create an entrance pattern that looks
very similar to the dive pattern used earlier. Take some time to see how the Behaviour
classes fit together and how this differs from the dive pattern.
RemoveWhenFinished(
    OverridePosition(
        Sequence(
            Delay(...),
            Goto(...),
            Visible(...),
            Whilst(
                Move(...),
                RelativeToNowOnlyX(
                    CalculatedPosition(
                        ...
                    )
                )
            ),
            ReturnToNormalPosition(...)
        )
    )
Once completed, the game will look like the screen shot below.
First we need to detect whether all of the aliens have been destroyed so we can trigger
the second wave. To do this, we create a new GameObject called WaveDestroyed which
checks for the all aliens having been destroyed. We need to put in a check to see if
we are starting the first stage as we only want this to trigger after the game has
started properly. We make the game HUD display the current stage by activating and
then immediately deactivating it.
Place the following code before the call to pgzrun.go(). It wont work yet because we
have not created the code to put in the second wave of aliens.
class WaveDestroyed(GameObject):

    def __init__(self):
        super().__init__()
        self.create_new_wave = False
        self.ignore_stage_1_start = False

    def update(self, dt):
        global stage

        if not game_hud.active:
            return

        # Special case for stage 1 as the aliens are created by new_game()
        if stage == 1 and game_hud.show_stage:
            self.ignore_stage_1_start = True
            return

        if len(aliens) == 0 and self.ignore_stage_1_start:
            return

        if len(aliens) > 0:
            self.ignore_stage_1_start = False
        # End of special case for stage 1

        if len(aliens) == 0 and not self.create_new_wave:
            self.create_new_wave = True
            stage += 1
            game_hud.active = False
            game_hud.active = True
            return

        if self.create_new_wave and not game_hud.show_stage:
            self.create_new_wave = False
            create_wave_1()
            create_wave_2()


wave_destroyed = WaveDestroyed()
The first new Behaviour we create is Goto which takes a single value which
represents a position to move the Sprite to. This is used to set the starting
position of the entrance of the Sprite.
Place the following code before the call to pgzrun.go().
class Goto(Behaviour):
    def __init__(self, pos):
        self.pos = pos
        self.done = False

    def execute(self, dt, sprite):
        self.done = True
        sprite.pos = self.pos

    def enabled(self, sprite):
        return not self.done
The next Behaviour to add is Visible which can be used to make a
Sprite either visible or invisible. As we make each Alien invisible
when we create it, we use this to make it visible when the entrance starts.
Place the following code before the call to pgzrun.go().
class Visible(Behaviour):
    def __init__(self, visible):
        self.visible = visible
        self.done = False

    def execute(self, dt, sprite):
        sprite.visible = self.visible
        self.done = True

    def enabled(self, sprite):
        return not self.done
The final Behaviour required for the entrance is Delay. Because we want
each Alien to follow the previous one in a chain, we have to delay each
Alien by a small amount from each other. We use Delay to achieve this.
Place the following code before the call to pgzrun.go().
class Delay(Behaviour):
    def __init__(self, delay):
        self.delay_left = delay

    def execute(self, dt, actor):
        self.delay_left -= dt

    def enabled(self, sprite):
        return self.delay_left > 0
We now create a new function entrance() that will create the movement pattern
to take an Alien from a starting position at the bottom of the screen, back to
its nominal normal position.
Place the following code before the call to pgzrun.go().
def entrance(delay, offset):
    return RemoveWhenFinished(
        OverridePosition(
            Sequence(
                Delay(delay),
                Goto((offset, LOWER_BORDER_START - 32 - 16)),
                Visible(True),
                Whilst(
                    Move((0, -500), (0, 150)),
                    RelativeToNowOnlyX(
                        CalculatedPosition(
                            lambda dt: math.sin(dt * 3) * 100
                        )
                    )
                ),
                ReturnToNormalPosition((100, 100))
            )
        )
    )
Before we can add in the remaining code to create the second wave, we need
one final Behaviour called RelativeToPosition. Because each Alien that
performs an entrance does not start in it's formation position, we cant make
use of RelativeToPosition. We need a new Behaviour that allows us to
specify the position to be relative to so that the Alien can return to this
position when it has finished its entrance.
Place the following code before the call to pgzrun.go().
class RelativeToPosition(Behaviour):
    def __init__(self, position, behaviour):
        self.start_pos = position
        self.behaviour = behaviour

    def execute(self, dt, sprite):
        self.behaviour.execute(dt, sprite)

        sprite.pos = (
            self.start_pos[0] + sprite.pos[0],
            self.start_pos[1] + sprite.pos[1]
        )

    def enabled(self, sprite):
        return self.behaviour.enabled(sprite)
And finally we add the code to create the second wave. This should look familiar as it is similar to the code used to create the first wave.
Place the following code before the call to pgzrun.go(). Once added, run
your game and check it works as expected.
def create_wave_2():
    def create_aliens(rows, columns, offset, points, delay, images):
        for row in range(rows):
            for column in range(columns):
                i = (row * columns) + column
                pos_x = offset + (column * 40)
                pos_y = WAVE_TOP + (row * 40)

                movement = (
                    RelativeToPosition(
                        (pos_x, pos_y),
                        CalculatedPosition(
                            lambda dt: math.sin(dt * 1) * 50,
                            lambda dt: math.cos(dt * 2) * 20)
                    )
                )

                alien = Alien(
                    (offset, LOWER_BORDER_START - 32 - 16),
                    points,
                    images[i % len(images)],
                    movement, entrance(delay + (i * 0.2), offset))
                alien.visible = False

    create_aliens(3, 2, 60, 1000, 1, [["alien_e_1"], ["alien_f_1"]])
    create_aliens(3, 2, 500, 1000, 2, [["alien_g_1"], ["alien_h_1"]])
Extension: Aliens doing an entrance can dive
One limitation of the existing code that selects an Alien to dive is that
it randomly selects from all Alien instances. This means it can sometimes
select an Alien doing an entrance to dive. Can you modify your code so
that an Alien is never chosen for a dive until it has finished its entrance?
Extension: Animate the new aliens
None of these new aliens are animated. If you enjoyed drawing the sprites, why not create more images so that you can animate these four new aliens.
Extension: Introduce new entrance types for other waves
Presently the game only has two types of wave and only the second performs an entrance. Try adding your own entrance types for other waves.
Step 13: Awarding new lives
The completed code for this step is available here.
This is a relatively easy step. We create a new GameObject that resets itself
when the GameHud is inactive to the starting score. When the GameHud is active
it simply checks the score against it's internal next_life counter and awards
a life if that counter is exceeded, incrementing the counter to the next value.
Place the following code before the call to pgzrun.go().
class AwardNewLife(GameObject):

    def __init__(self):
        super().__init__()
        self.next_life = 30000

    def update(self, dt):
        global lives

        if not game_hud.active:
            self.next_life = 30000
            return

        if score >= self.next_life:
            lives += 1
            if self.next_life == 30000:
                self.next_life = 120000
            else:
                self.next_life += 120000


award_new_life = AwardNewLife()
Step 14: Multi-hit aliens
The completed code for this step is available here.
Presently, any Alien that is hit by a laser is destroyed immediately. In this
step, we will modify the top row of Aliens so they require multiple hits from a
laser to be destroyed. To indicate it has been hit, we will change the colour of
the Alien. Adding this functionality is relatively simple but requires
modification of the existing code to implement.
As with the previous alien images, each image needs to be 32 pixels
x 32 pixels and saved into the images folder. As before, you can
either use my images that are provided below or draw your own. If
drawing your own, you need to use a paint program that supports
transparency such as PixilArt.
 and
and  Download as
alien_b_1.pngandalien_b_2.pngoralien_b.pixil
The images below are zoomed in versions with grid lines to help you see how they were drawn. The white and gray checked areas are the transparent parts of the image.
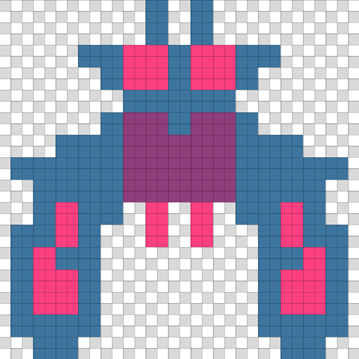
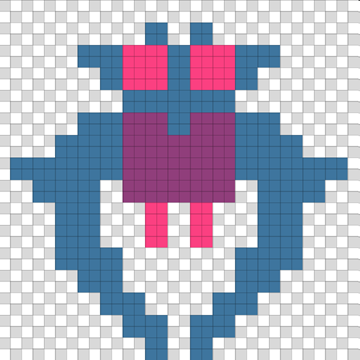
The first code change to make is to add a hit_points property to the
Alien class with a default value of 1. Find your Alien class and
modify the code so it looks as indicated below.
class Alien(Sprite):
    def __init__(self, pos, points, images, *behaviours):
        super().__init__(pos, images, *behaviours)
        self.points = points
        self.hit_points = 1 # Add this line
        aliens.append(self)

    def destroyed(self):
        super().destroyed()
        aliens.remove(self)
The next step is to modify the create_alien_row() function which is
inside your create_wave_1() function. There is one line to modify and
two lines of code to add. The line modified adds a variable alien and
the two lines added set the hit_points to 2 for the top row.
def create_wave_1():
    def create_alien_row(row, count, points, images):
        half = count // 2
        for x in range(-half, half + 1, 1):
            pos_x = MIDDLE + (x * 40)
            pos_y = WAVE_TOP + (row * 40)
            movement = (
                RelativeToNow(
                    CalculatedPosition(lambda dt: math.sin(dt * 1) * 50,
                                       lambda dt: math.cos(dt * 2) * 20)
                )
            )

            alien = Alien((pos_x, pos_y), points, images, movement) # Modify this line
            if row == 0:                                            # Add this line
                alien.hit_points = 2                                # Add this line
The final step is to modify the alien_hit_with_laser() function so that
it only destroys an Alien if there are no hit_points left. It also
changes the images if it is an Alien from the top row.
def alien_hit_with_laser(alien, laser):
    global score
    laser.destroy = True
    ParticleExplosion(laser.pos, 0.5, WHITE, 20)

    alien.hit_points -= 1
    if alien.hit_points <= 0:
        score += alien.points
        alien.destroy = True
        ParticleExplosion(alien.pos, 2.0, RED, 100)
        ParticleScore(alien.pos, 1.0, alien.points)

    if alien.hit_points == 1 and alien.images == ['alien_a_1', 'alien_a_2']:
        alien.images = ['alien_b_1', 'alien_b_2']
Extension: Tough as nails
Make the aliens that make an entrance from the bottom, as tough as nails. Change their
number of hit points to 5. Think about animating them if you have not already done so
and use different images to indicate how many hit_points they have left.
Step 15: Adding sound effects
The completed code for this step is available here.
In this step we will add some sound effects. This is done in exactly the same way as we added sound in Muncher and Smash. This should already be familiar to you and we are going to reuse three sounds from Muncher:
Download the above images or select your own and place them into a sounds
folder in your project.
At the top of your program and below the other import statements, add
the following code to import Sound.
from pygame.mixer import Sound

sounds: Sound
In your player_hit_with_bomb() function add to following code.
sounds.lose_life.play()
At the end of the update() method of the WaveDestroyed class, add the
following code immediately after the call to create_wave_2().
sounds.new_life.play()
In the update() method of the AwardNewLife class, add the following code
immediately after the numbers of lives has been incremented by 1.
sounds.new_level.play()
Extension: Add additional sound effects
We have only added 3 sound effects but lots more could be added. For example, when
the player shoots a Laser a shooting sound effect could play. Or when an Alien
is destroyed by a Laser it would be great to play an explosion sound effect. What
about music to introduce each stage? What about music for the title and game over
screens? Be creative and add in your own effects.
Appendix
Step 10 extension: ParticleScore
For the extension on step 10.
PARTICLE_SCORE_MIN_VX = -60
PARTICLE_SCORE_MAX_VX = 60
PARTICLE_SCORE_MIN_VY = -30
PARTICLE_SCORE_MAX_VY = 60


class ParticleScore(GameObject):

    def __init__(self, pos, lifetime, value):
        super().__init__()
        self.position = pos
        self.left = lifetime
        self.value = value
        self.vx = randint(PARTICLE_SCORE_MIN_VX, PARTICLE_SCORE_MAX_VX)
        self.vy = randint(PARTICLE_SCORE_MIN_VY, PARTICLE_SCORE_MAX_VY)

    @property
    def position(self):
        return self.x, self.y

    @position.setter
    def position(self, pos):
        self.x = pos[0]
        self.y = pos[1]

    def draw(self, draw):
        draw.text(f"{self.value}",
                  center=self.position,
                  color=YELLOW,
                  fontsize=24)

    def update(self, dt):
        self.left -= dt
        self.destroy = self.left < 0
        self.vy += (GRAVITY * dt)
        self.x += self.vx * dt
        self.y += self.vy * dt
Also modify alien_hit_with_laser() to create the particle.
def alien_hit_with_laser(alien, laser):
    global score
    score += alien.points
    alien.destroy = True
    laser.destroy = True
    ParticleExplosion(alien.pos, 2.0, RED, 100)
    ParticleExplosion(laser.pos, 0.5, WHITE, 20)
    ParticleScore(alien.pos, 1.0, alien.points) # <- Add this statement